引言
单选,多选,是很常见的 UI 组件,这里以它们为例,来讲解如何分离布局组件和状态组件,以实现较好的复用性。
假如我们要实现如下需求:
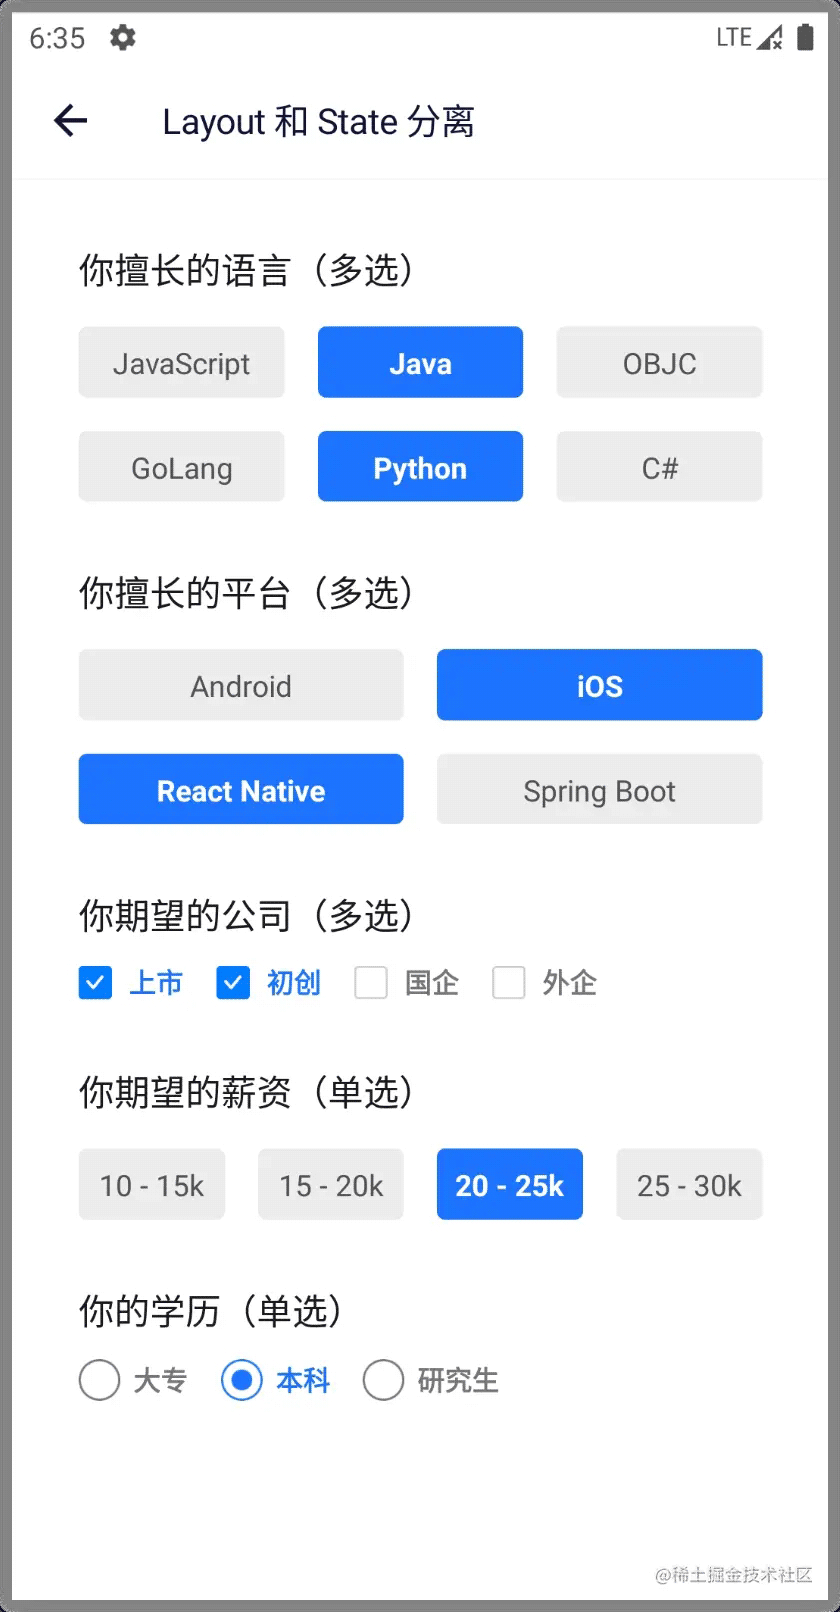
这类 UI 有如下特点:
- 不管是单选还是多选,都可以有网格布局,我们可以把这个网格布局单独抽离出来,放到一个独立的组件中。
- 多选有 Label 形式和 CheckBox 形式,表现形式不一样,但是状态逻辑是一样的,我们可以单独封装这个状态逻辑。
- 单选有 Label 形式和 RadioButton 形式,表现形式不一样,但是状态逻辑是一样的,我们可以单独封装这个状态逻辑。
- 布局可以很复杂,在某个层级中,才会发生选择行为。
现在让我们一步一步来实现一个设计良好的,可复用的 UI 组件。
包装 Context.Provider 作为父组件
为了实现父子组件的跨层级通讯,我们需要使用 React.Context。
首先来实现 CheckGroup 组件。
// CheckContext.ts
export interface Item<T> {
  label: string
  value: T
}
export interface CheckContext<T> {
  checkedItems: Array<Item<T>>
  setCheckedItems: (items: Array<Item<T>>) => void
}
export const CheckContext = React.createContext<CheckContext<any>>({
  checkedItems: [],
  setCheckedItems: () => {},
})
CheckGroup 实际上是个 CheckContext.Provider。
// CheckGroup.tsx
import { CheckContext, Item } from './CheckContext'
interface CheckGroupProps<T> {
  limit?: number
  checkedItems?: Array<Item<T>>
  onCheckedItemsChanged?: (items: Array<Item<T>>) => void
}
export default function CheckGroup({
  limit = 0,
  checkedItems = [],
  onCheckedItemsChanged,
  children,
}: PropsWithChildren<CheckGroupProps<any>>) {
  const setCheckedItems = (items: Array<Item<any>>) => {
    if (limit <= 0 || items.length <= limit) {
      onCheckedItemsChanged?.(items)
    }
  }
  return (
    <CheckContext.Provider value={{ checkedItems, setCheckedItems }}>
      {children}
    </CheckContext.Provider>
  )
}
使用 Context Hook 来实现子组件
复选组件有多种表现形式,我们先来实现 CheckLabel。主要是使用 useContext 这个 hook。
// CheckLabel.tsx
import { CheckContext, Item } from './CheckContext'
interface CheckLabelProps<T> {
  item: Item<T>
  style?: StyleProp<TextStyle>
  checkedStyle?: StyleProp<TextStyle>
}
export default function CheckLabel({
  item,
  style,
  checkedStyle,
}: CheckLabelProps<any>) {
  const { checkedItems, setCheckedItems } = useContext(CheckContext)
  const checked = checkedItems?.includes(item)
  return (
    <Pressable
      onPress={() => {
        if (checked) {
          setCheckedItems(checkedItems.filter((i) => i !== item))
        } else {
          setCheckedItems([...checkedItems, item])
        }
      }}>
      <Text
        style={[
          styles.label,
          style,
          checked ? [styles.checked, checkedStyle] : undefined,
        ]}>
        {item.label}
      </Text>
    </Pressable>
  )
}
现在组合 CheckGroup 和 CheckLabel,看看效果:
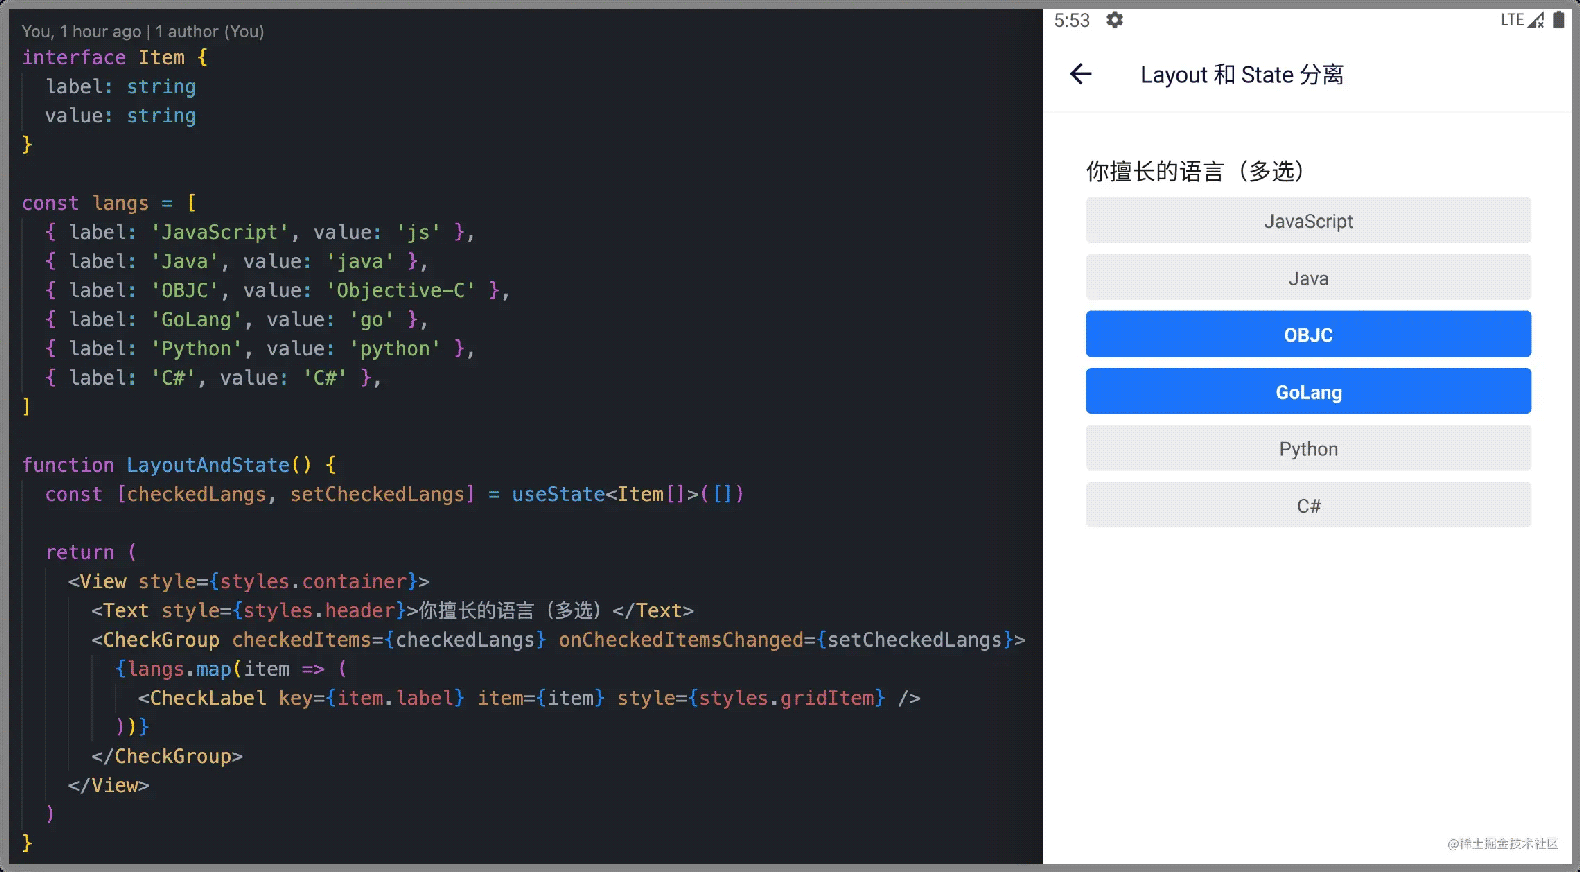
可见,复选功能已经实现,但我们需要的是网格布局哦。好的,现在就去写一个 GridVeiw 来实现网格布局。
使用 React 顶层 API 动态设置样式
我们的 GridView 可以通过 numOfRow 属性来指定列数,默认值是 3。
这里使用了一些 React 顶层 API,掌握它们,可以做一些有趣的事情。
// GridView.tsx
import { useLayout } from '@react-native-community/hooks'
import { View, StyleSheet, StyleProp, ViewStyle } from 'react-native'
interface GridViewProps {
  style?: StyleProp<ViewStyle>
  numOfRow?: number
  spacing?: number
  verticalSpacing?: number
}
export default function GridView({
  style,
  numOfRow = 3,
  spacing = 16,
  verticalSpacing = 8,
  children,
}: PropsWithChildren<GridViewProps>) {
  const { onLayout, width } = useLayout()
  const itemWidth = (width - (numOfRow - 1) * spacing - 0.5) / numOfRow
  const count = React.Children.count(children)
  return (
    <View style={[styles.container, style]} onLayout={onLayout}>
      {React.Children.map(children, function (child: any, index) {
        const style = child.props.style
        return React.cloneElement(child, {
          style: [
            style,
            {
              width: itemWidth,
              marginLeft: index % numOfRow !== 0 ? spacing : 0,
              marginBottom:
                Math.floor(index / numOfRow) <
                Math.floor((count - 1) / numOfRow)
                  ? verticalSpacing
                  : 0,
            },
          ],
        })
      })}
    </View>
  )
}
现在组合 CheckGroup CheckLabel 和 GridView 三者,看看效果:
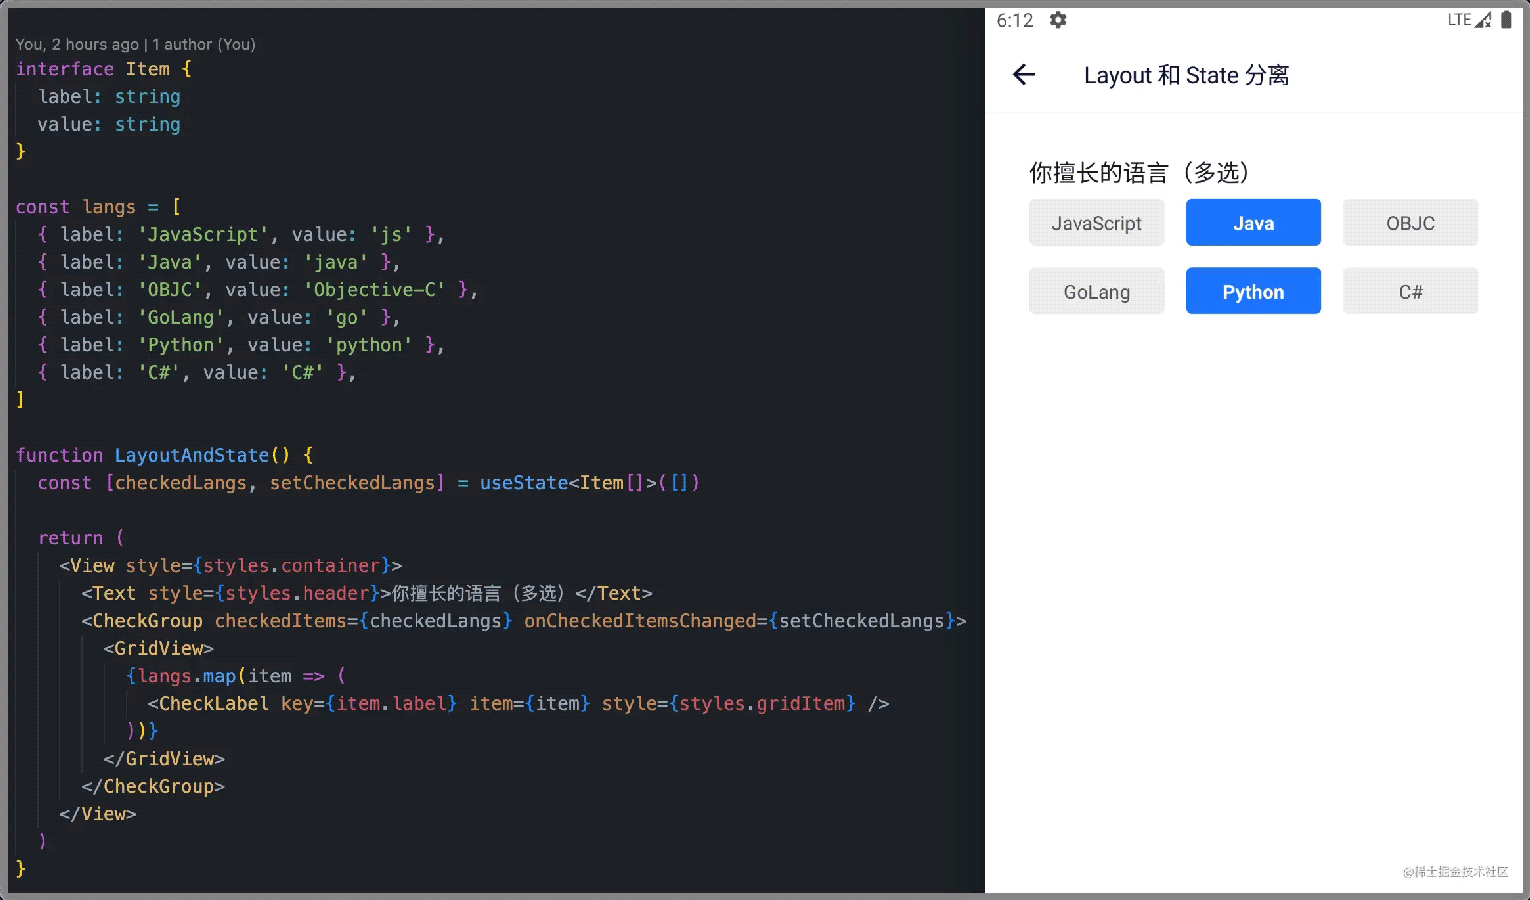
嗯,效果很好。
复用 Context,实现其它子组件
现在来实现 CheckBox 这个最为常规的复选组件:
// CheckBox.tsx
import { CheckContext, Item } from '../CheckContext'
interface CheckBoxProps<T> {
  item: Item<T>
  style?: StyleProp<ViewStyle>
}
export default function CheckBox({ item, style }: CheckBoxProps<any>) {
  const { checkedItems, setCheckedItems } = useContext(CheckContext)
  const checked = checkedItems?.includes(item)
  return (
    <Pressable
      onPress={() => {
        if (checked) {
          setCheckedItems(checkedItems.filter((i) => i !== item))
        } else {
          setCheckedItems([...checkedItems, item])
        }
      }}
      hitSlop={{ top: 8, bottom: 8, left: 8, right: 8 }}>
      <View style={[styles.container, style]}>
        <Image
          source={
            checked ? require('./checked.png') : require('./unchecked.png')
          }
        />
        <Text style={[styles.label, checked ? styles.checkedLabel : undefined]}>
          {item.label}
        </Text>
      </View>
    </Pressable>
  )
}
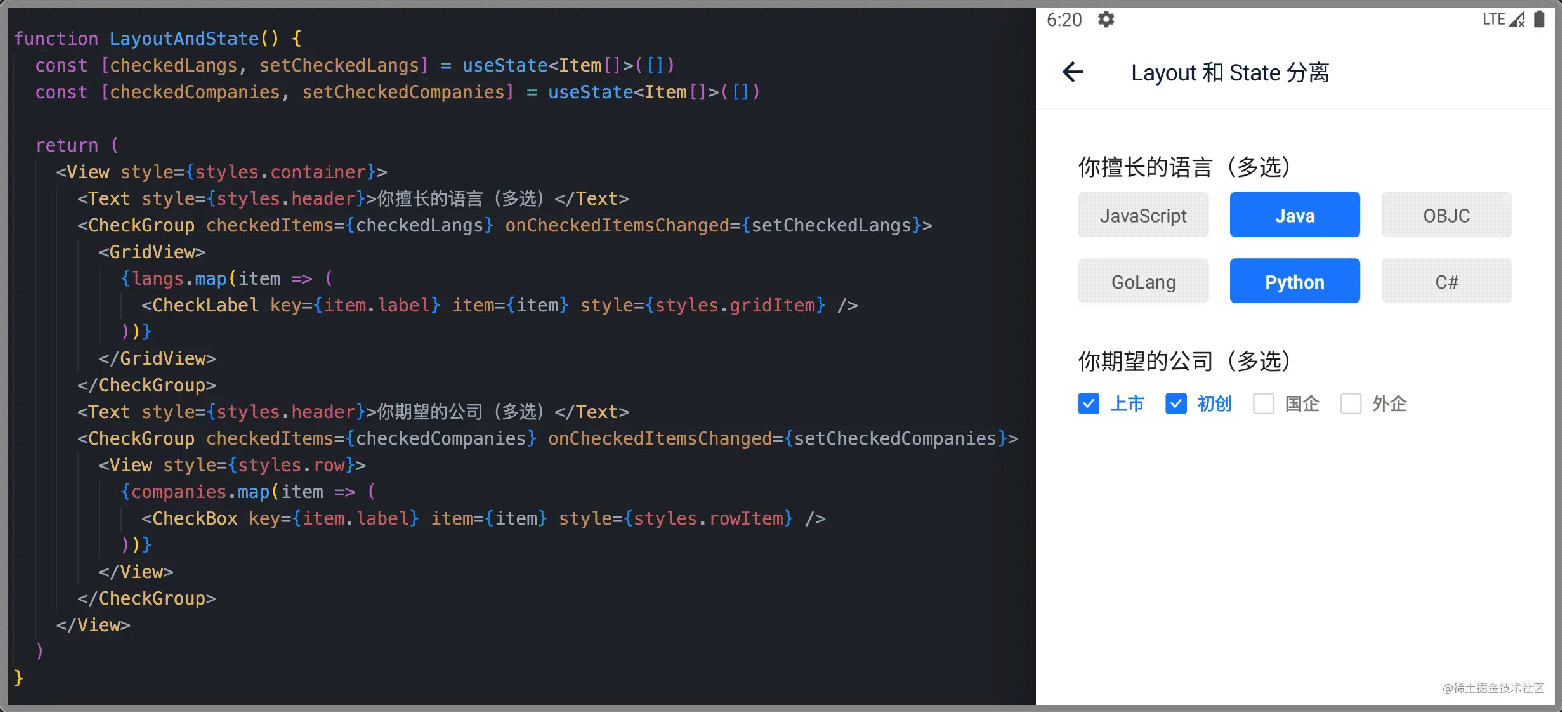
组合 CheckGroup 和 CheckBox,效果如下:
抽取共同状态逻辑
CheckLabel 和 CheckBox 有些共同的状态逻辑,我们可以把这些共同的状态逻辑抽取到一个自定义 Hook 中。
// CheckContext.ts
export function useCheckContext(item: Item<any>) {
  const { checkedItems, setCheckedItems } = useContext(CheckContext)
  const checked = checkedItems?.includes(item)
  const onPress = () => {
    if (checked) {
      setCheckedItems(checkedItems.filter((i) => i !== item))
    } else {
      setCheckedItems([...checkedItems, item])
    }
  }
  return [checked, onPress] as const
}
于是, CheckLabel 和 CheckBox 的代码可以简化为:
// CheckLabel.tsx
import { Item, useCheckContext } from './CheckContext'
interface CheckLabelProps<T> {
  item: Item<T>
  style?: StyleProp<TextStyle>
  checkedStyle?: StyleProp<TextStyle>
}
export default function CheckLabel({
  item,
  style,
  checkedStyle,
}: CheckLabelProps<any>) {
  const [checked, onPress] = useCheckContext(item)
  return (
    <Pressable onPress={onPress}>
      <Text
        style={[
          styles.label,
          style,
          checked ? [styles.checked, checkedStyle] : undefined,
        ]}>
        {item.label}
      </Text>
    </Pressable>
  )
}
// CheckBox.tsx
import { Item, useCheckContext } from '../CheckContext'
interface CheckBoxProps<T> {
  item: Item<T>
  style?: StyleProp<ViewStyle>
}
export default function CheckBox({ item, style }: CheckBoxProps<any>) {
  const [checked, onPress] = useCheckContext(item)
  return (
    <Pressable
      onPress={onPress}
      hitSlop={{ top: 8, bottom: 8, left: 8, right: 8 }}>
      <View style={[styles.container, style]}>
        <Image
          source={
            checked ? require('./checked.png') : require('./unchecked.png')
          }
        />
        <Text style={[styles.label, checked ? styles.checkedLabel : undefined]}>
          {item.label}
        </Text>
      </View>
    </Pressable>
  )
}
自由组合父组件与子组件
接下来,我们可以如法炮制 Radio 相关组件,譬如 RadioGroup RadioLabel RadioButton 等等。
然后可以愉快地把它们组合在一起,本文开始页面截图的实现代码如下:
// LayoutAndState.tsx
interface Item {
  label: string
  value: string
}
const langs = [
  { label: 'JavaScript', value: 'js' },
  { label: 'Java', value: 'java' },
  { label: 'OBJC', value: 'Objective-C' },
  { label: 'GoLang', value: 'go' },
  { label: 'Python', value: 'python' },
  { label: 'C#', value: 'C#' },
]
const platforms = [
  { label: 'Android', value: 'Android' },
  { label: 'iOS', value: 'iOS' },
  { label: 'React Native', value: 'React Native' },
  { label: 'Spring Boot', value: 'spring' },
]
const companies = [
  { label: '上市', value: '上市' },
  { label: '初创', value: '初创' },
  { label: '国企', value: '国企' },
  { label: '外企', value: '外企' },
]
const salaries = [
  { label: '10 - 15k', value: '15' },
  { label: '15 - 20k', value: '20' },
  { label: '20 - 25k', value: '25' },
  { label: '25 - 30k', value: '30' },
]
const edus = [
  { label: '大专', value: '大专' },
  { label: '本科', value: '本科' },
  { label: '研究生', value: '研究生' },
]
function LayoutAndState() {
  const [checkedLangs, setCheckedLangs] = useState<Item[]>([])
  const [checkedPlatforms, setCheckedPlatforms] = useState<Item[]>([])
  const [checkedCompanies, setCheckedCompanies] = useState<Item[]>([])
  const [salary, setSalary] = useState<Item>()
  const [education, setEducation] = useState<Item>()
  return (
    <View style={styles.container}>
      <Text style={styles.header}>你擅长的语言(多选)</Text>
      <CheckGroup
        checkedItems={checkedLangs}
        onCheckedItemsChanged={setCheckedLangs}>
        <GridView style={styles.grid}>
          {langs.map((item) => (
            <CheckLabel key={item.label} item={item} style={styles.gridItem} />
          ))}
        </GridView>
      </CheckGroup>
      <Text style={styles.header}>你擅长的平台(多选)</Text>
      <CheckGroup
        checkedItems={checkedPlatforms}
        onCheckedItemsChanged={setCheckedPlatforms}>
        <GridView style={styles.grid} numOfRow={2}>
          {platforms.map((item) => (
            <CheckLabel key={item.label} item={item} style={styles.gridItem} />
          ))}
        </GridView>
      </CheckGroup>
      <Text style={styles.header}>你期望的公司(多选)</Text>
      <CheckGroup
        checkedItems={checkedCompanies}
        onCheckedItemsChanged={setCheckedCompanies}>
        <View style={styles.row}>
          {companies.map((item) => (
            <CheckBox key={item.label} item={item} style={styles.rowItem} />
          ))}
        </View>
      </CheckGroup>
      <Text style={styles.header}>你期望的薪资(单选)</Text>
      <RadioGroup checkedItem={salary} onItemChecked={setSalary}>
        <GridView style={styles.grid} numOfRow={4}>
          {salaries.map((item) => (
            <RadioLabel key={item.label} item={item} style={styles.gridItem} />
          ))}
        </GridView>
      </RadioGroup>
      <Text style={styles.header}>你的学历(单选)</Text>
      <RadioGroup checkedItem={education} onItemChecked={setEducation}>
        <View style={styles.row}>
          {edus.map((item) => (
            <RadioButton key={item.label} item={item} style={styles.rowItem} />
          ))}
        </View>
      </RadioGroup>
    </View>
  )
}
export default withNavigationItem({
  titleItem: {
    title: 'Layout 和 State 分离',
  },
})(LayoutAndState)
const styles = StyleSheet.create({
  container: {
    flex: 1,
    justifyContent: 'flex-start',
    alignItems: 'stretch',
    paddingLeft: 32,
    paddingRight: 32,
  },
  header: {
    color: '#222222',
    fontSize: 17,
    marginTop: 32,
  },
  grid: {
    marginTop: 8,
  },
  gridItem: {
    marginTop: 8,
  },
  row: {
    flexDirection: 'row',
    marginTop: 12,
  },
  rowItem: {
    marginRight: 16,
  },
})
请留意 CheckGroup RadioGroup GridView CheckLabel RadioLabel CheckBox RadioButton 之间的组合方式。
示例
这里有一个示例,供你参考。
以上就是React Native可复用 UI分离布局组件和状态组件技巧的详细内容,更多关于React Native UI分离组件的资料请关注Devmax其它相关文章!