在日常开发中,尤其是在微服务盛行的时代下,我们在调用外部接口时,经常会因为第三方接口超时、限流等问题从而造成接口调用失败,那么此时我们通常会对接口进行重试,那么问题来了,如何重试呢?该重试几次呢?如果要设置重试时间超过多长时间后还不成功就不重试了该怎么做呢?所幸guava-retrying为我们提供了强大而简单易用的重试框架guava-retrying。
guava-retrying是谷歌的Guava库的一个小扩展,允许为任意函数调用创建可配置的重试策略,比如与正常运行时间不稳定的远程服务对话的函数调用。
一、pom依赖
<dependency>
      <groupId>com.github.rholder</groupId>
      <artifactId>guava-retrying</artifactId>
      <version>2.0.0</version>
    </dependency>
二、使用示例
我们可以通过RetryerBuilder来构造一个重试器,通过RetryerBuilder可以设置什么时候需要重试(即重试时机)、停止重试策略、失败等待时间间隔策略、任务执行时长限制策略
先看一个简单的例子:
private int invokeCount = 0;

    public int realAction(int num) {
        invokeCount  ;
        System.out.println(String.format("当前执行第 %d 次,num:%d", invokeCount, num));
        if (num <= 0) {
            throw new IllegalArgumentException();
        }
        return num;
    }

    @Test
    public void guavaRetryTest001() {
        Retryer<Integer> retryer = RetryerBuilder.<Integer>newBuilder()
            // 非正数进行重试
            .retryIfRuntimeException()
            // 偶数则进行重试
            .retryIfResult(result -> result % 2 == 0)
            // 设置最大执行次数3次
            .withStopStrategy(StopStrategies.stopAfterAttempt(3)).build();

        try {
            invokeCount=0;
            retryer.call(() -> realAction(0));
        } catch (Exception e) {
            System.out.println("执行0,异常:"   e.getMessage());
        }

        try {
            invokeCount=0;
            retryer.call(() -> realAction(1));
        } catch (Exception e) {
            System.out.println("执行1,异常:"   e.getMessage());
        }

        try {
            invokeCount=0;
            retryer.call(() -> realAction(2));
        } catch (Exception e) {
            System.out.println("执行2,异常:"   e.getMessage());
        }
    }
输出:
当前执行第 1 次,num:0
当前执行第 2 次,num:0
当前执行第 3 次,num:0
执行0,异常:Retrying failed to complete successfully after 3 attempts.
当前执行第 1 次,num:1
当前执行第 1 次,num:2
当前执行第 2 次,num:2
当前执行第 3 次,num:2
执行2,异常:Retrying failed to complete successfully after 3 attempts.
三、重试时机
RetryerBuilder的retryIfXXX()方法用来设置**在什么情况下进行重试,总体上可以分为根据执行异常进行重试和根据方法执行结果进行重试两类。关注公众号:“码猿技术专栏”,回复关键词:“1111” 获取阿里内部Java调优手册
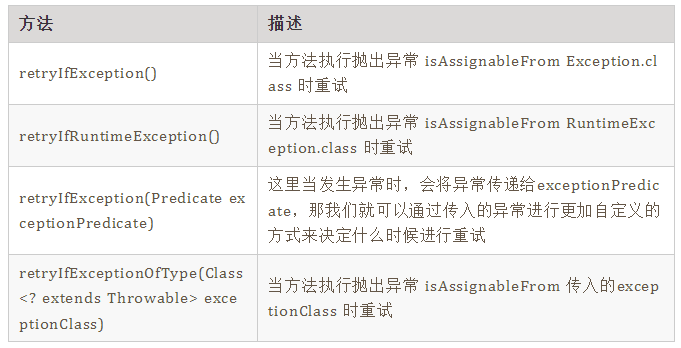
1. 根据异常进行重试
2. 根据返回结果进行重试
retryIfResult(@Nonnull Predicate resultPredicate) 这个比较简单,当我们传入的resultPredicate返回true时则进行重试
四、停止重试策略StopStrategy
停止重试策略用来决定什么时候不进行重试,其接口com.github.rholder.retry.StopStrategy,停止重试策略的实现类均在com.github.rholder.retry.StopStrategies中,它是一个策略工厂类。
public interface StopStrategy {

    /**
     * Returns <code>true</code> if the retryer should stop retrying.
     *
     * @param failedAttempt the previous failed {@code Attempt}
     * @return <code>true</code> if the retryer must stop, <code>false</code> otherwise
     */
    boolean shouldStop(Attempt failedAttempt);
}
1. NeverStopStrategy
此策略将永远重试,永不停止,查看其实现类,直接返回了false:
@Override
public boolean shouldStop(Attempt failedAttempt) {
 return false;
}
2. StopAfterAttemptStrategy
当执行次数到达指定次数之后停止重试,查看其实现类:
private static final class StopAfterAttemptStrategy implements StopStrategy {
        private final int maxAttemptNumber;

        public StopAfterAttemptStrategy(int maxAttemptNumber) {
            Preconditions.checkArgument(maxAttemptNumber >= 1, "maxAttemptNumber must be >= 1 but is %d", maxAttemptNumber);
            this.maxAttemptNumber = maxAttemptNumber;
        }

        @Override
        public boolean shouldStop(Attempt failedAttempt) {
            return failedAttempt.getAttemptNumber() >= maxAttemptNumber;
        }
    }
3. StopAfterDelayStrategy
当距离方法的第一次执行超出了指定的delay时间时停止,也就是说一直进行重试,当进行下一次重试的时候会判断从第一次执行到现在的所消耗的时间是否超过了这里指定的delay时间,查看其实现:
private static final class StopAfterAttemptStrategy implements StopStrategy {
        private final int maxAttemptNumber;

        public StopAfterAttemptStrategy(int maxAttemptNumber) {
            Preconditions.checkArgument(maxAttemptNumber >= 1, "maxAttemptNumber must be >= 1 but is %d", maxAttemptNumber);
            this.maxAttemptNumber = maxAttemptNumber;
        }

        @Override
        public boolean shouldStop(Attempt failedAttempt) {
            return failedAttempt.getAttemptNumber() >= maxAttemptNumber;
        }
    }
五、重试间隔策略、重试阻塞策略
这两个策略放在一起说,它们合起来的作用就是用来控制重试任务之间的间隔时间,以及如何任务在等待时间间隔时如何阻塞。也就是说WaitStrategy决定了重试任务等待多久后进行下一次任务的执行,BlockStrategy用来决定任务如何等待。它们两的策略工厂分别为com.github.rholder.retry.WaitStrategies和BlockStrategies。
1.BlockStrategy
(1) ThreadSleepStrategy
这个是BlockStrategies,决定如何阻塞任务,其主要就是通过**Thread.sleep()**来进行阻塞的,查看其实现:
@Immutable
    private static class ThreadSleepStrategy implements BlockStrategy {

        @Override
        public void block(long sleepTime) throws InterruptedException {
            Thread.sleep(sleepTime);
        }
    }
2. WaitStrategy
(1) IncrementingWaitStrategy
该策略在决定任务间隔时间时,返回的是一个递增的间隔时间,即每次任务重试间隔时间逐步递增,越来越长,查看其实现:
private static final class IncrementingWaitStrategy implements WaitStrategy {
        private final long initialSleepTime;
        private final long increment;

        public IncrementingWaitStrategy(long initialSleepTime,
                                        long increment) {
            Preconditions.checkArgument(initialSleepTime >= 0L, "initialSleepTime must be >= 0 but is %d", initialSleepTime);
            this.initialSleepTime = initialSleepTime;
            this.increment = increment;
        }

        @Override
        public long computeSleepTime(Attempt failedAttempt) {
            long result = initialSleepTime   (increment * (failedAttempt.getAttemptNumber() - 1));
            return result >= 0L ? result : 0L;
        }
    }
该策略输入一个起始间隔时间值和一个递增步长,然后每次等待的时长都递增increment时长。
(2) RandomWaitStrategy
顾名思义,返回一个随机的间隔时长,我们需要传入的就是一个最小间隔和最大间隔,然后随机返回介于两者之间的一个间隔时长,其实现为:
private static final class RandomWaitStrategy implements WaitStrategy {
        private static final Random RANDOM = new Random();
        private final long minimum;
        private final long maximum;

        public RandomWaitStrategy(long minimum, long maximum) {
            Preconditions.checkArgument(minimum >= 0, "minimum must be >= 0 but is %d", minimum);
            Preconditions.checkArgument(maximum > minimum, "maximum must be > minimum but maximum is %d and minimum is", maximum, minimum);

            this.minimum = minimum;
            this.maximum = maximum;
        }

        @Override
        public long computeSleepTime(Attempt failedAttempt) {
            long t = Math.abs(RANDOM.nextLong()) % (maximum - minimum);
            return t   minimum;
        }
    }
(3) FixedWaitStrategy
该策略是返回一个固定时长的重试间隔。查看其实现:
private static final class FixedWaitStrategy implements WaitStrategy {
        private final long sleepTime;

        public FixedWaitStrategy(long sleepTime) {
            Preconditions.checkArgument(sleepTime >= 0L, "sleepTime must be >= 0 but is %d", sleepTime);
            this.sleepTime = sleepTime;
        }

        @Override
        public long computeSleepTime(Attempt failedAttempt) {
            return sleepTime;
        }
    }
() ExceptionWaitStrategy
该策略是由方法执行异常来决定是否重试任务之间进行间隔等待,以及间隔多久。
private static final class ExceptionWaitStrategy<T extends Throwable> implements WaitStrategy {
        private final Class<T> exceptionClass;
        private final Function<T, Long> function;

        public ExceptionWaitStrategy(@Nonnull Class<T> exceptionClass, @Nonnull Function<T, Long> function) {
            this.exceptionClass = exceptionClass;
            this.function = function;
        }

        @SuppressWarnings({"ThrowableResultOfMethodCallIgnored", "ConstantConditions", "unchecked"})
        @Override
        public long computeSleepTime(Attempt lastAttempt) {
            if (lastAttempt.hasException()) {
                Throwable cause = lastAttempt.getExceptionCause();
                if (exceptionClass.isAssignableFrom(cause.getClass())) {
                    return function.apply((T) cause);
                }
            }
            return 0L;
        }
    }
(5) CompositeWaitStrategy
这个没啥好说的,顾名思义,就是一个策略的组合,你可以传入多个WaitStrategy,然后所有WaitStrategy返回的间隔时长相加就是最终的间隔时间。查看其实现:
private static final class CompositeWaitStrategy implements WaitStrategy {
        private final List<WaitStrategy> waitStrategies;

        public CompositeWaitStrategy(List<WaitStrategy> waitStrategies) {
            Preconditions.checkState(!waitStrategies.isEmpty(), "Need at least one wait strategy");
            this.waitStrategies = waitStrategies;
        }

        @Override
        public long computeSleepTime(Attempt failedAttempt) {
            long waitTime = 0L;
            for (WaitStrategy waitStrategy : waitStrategies) {
                waitTime  = waitStrategy.computeSleepTime(failedAttempt);
            }
            return waitTime;
        }
    }
(6) FibonacciWaitStrategy
这个策略与IncrementingWaitStrategy有点相似,间隔时间都是随着重试次数的增加而递增的,不同的是,FibonacciWaitStrategy是按照斐波那契数列来进行计算的,使用这个策略时,我们需要传入一个乘数因子和最大间隔时长,其实现就不贴了
(7) ExponentialWaitStrategy
这个与IncrementingWaitStrategy、FibonacciWaitStrategy也类似,间隔时间都是随着重试次数的增加而递增的,但是该策略的递增是呈指数级递增。查看其实现:
private static final class ExponentialWaitStrategy implements WaitStrategy {
        private final long multiplier;
        private final long maximumWait;

        public ExponentialWaitStrategy(long multiplier,
                                       long maximumWait) {
            Preconditions.checkArgument(multiplier > 0L, "multiplier must be > 0 but is %d", multiplier);
            Preconditions.checkArgument(maximumWait >= 0L, "maximumWait must be >= 0 but is %d", maximumWait);
            Preconditions.checkArgument(multiplier < maximumWait, "multiplier must be < maximumWait but is %d", multiplier);
            this.multiplier = multiplier;
            this.maximumWait = maximumWait;
        }

        @Override
        public long computeSleepTime(Attempt failedAttempt) {
            double exp = Math.pow(2, failedAttempt.getAttemptNumber());
            long result = Math.round(multiplier * exp);
            if (result > maximumWait) {
                result = maximumWait;
            }
            return result >= 0L ? result : 0L;
        }
    }
六、重试监听器RetryListener
当发生重试时,将会调用RetryListener的onRetry方法,此时我们可以进行比如记录日志等额外操作。
public int realAction(int num) {
        if (num <= 0) {
            throw new IllegalArgumentException();
        }
        return num;
    }

    @Test
    public void guavaRetryTest001() throws ExecutionException, RetryException {
        Retryer<Integer> retryer = RetryerBuilder.<Integer>newBuilder().retryIfException()
            .withRetryListener(new MyRetryListener())
            // 设置最大执行次数3次
            .withStopStrategy(StopStrategies.stopAfterAttempt(3)).build();
        retryer.call(() -> realAction(0));

    }

    private static class MyRetryListener implements RetryListener {

        @Override
        public <V> void onRetry(Attempt<V> attempt) {
            System.out.println("第"   attempt.getAttemptNumber()   "次执行");
        }
    }
输出:
第1次执行
第2次执行
第3次执行
七、重试原理
其实到这一步之后,实现原理大概就很清楚了,就是由上述各种策略配合从而达到了非常灵活的重试机制。在这之前我们看一个上面没说的东东-Attempt:
public interface Attempt<V> {
    public V get() throws ExecutionException;

    public boolean hasResult();

    public boolean hasException();

    public V getResult() throws IllegalStateException;

    public Throwable getExceptionCause() throws IllegalStateException;

    public long getAttemptNumber();

    public long getDelaySinceFirstAttempt();
}
通过接口方法可以知道Attempt这个类包含了任务执行次数、任务执行异常、任务执行结果、以及首次执行任务至今的时间间隔,那么我们后续的不管重试时机、还是其他策略都是根据此值来决定。
接下来看关键执行入口Retryer##call:
public V call(Callable<V> callable) throws ExecutionException, RetryException {
        long startTime = System.nanoTime();

        // 执行次数从1开始
        for (int attemptNumber = 1; ; attemptNumber  ) {
            Attempt<V> attempt;
            try {
                // 尝试执行
                V result = attemptTimeLimiter.call(callable);

                // 执行成功则将结果封装为ResultAttempt
                attempt = new Retryer.ResultAttempt<V>(result, attemptNumber, TimeUnit.NANOSECONDS.toMillis(System.nanoTime() - startTime));
            } catch (Throwable t) {
                // 执行异常则将结果封装为ExceptionAttempt
                attempt = new Retryer.ExceptionAttempt<V>(t, attemptNumber, TimeUnit.NANOSECONDS.toMillis(System.nanoTime() - startTime));
            }

            // 这里将执行结果传给RetryListener做一些额外事情
            for (RetryListener listener : listeners) {
                listener.onRetry(attempt);
            }

            // 这个就是决定是否要进行重试的地方,如果不进行重试直接返回结果,执行成功就返回结果,执行失败就返回异常
            if (!rejectionPredicate.apply(attempt)) {
                return attempt.get();
            }

            // 到这里,说明需要进行重试,则此时先决定是否到达了停止重试的时机,如果到达了则直接返回异常
            if (stopStrategy.shouldStop(attempt)) {
                throw new RetryException(attemptNumber, attempt);
            } else {
                // 决定重试时间间隔
                long sleepTime = waitStrategy.computeSleepTime(attempt);
                try {
                    // 进行阻塞
                    blockStrategy.block(sleepTime);
                } catch (InterruptedException e) {
                    Thread.currentThread().interrupt();
                    throw new RetryException(attemptNumber, attempt);
                }
            }
        }
八、总结
通篇下来可以看到其实核心实现并不难,但是此框架通过建造者模式和策略模式组合运用,提供了十分清晰明了且灵活的重试机制,其设计思路还是值得借鉴学习!
以上就是Java利用Guava Retry实现重处理的详细内容,更多关于Java Guava Retry的资料请关注Devmax其它相关文章!