实现流程:
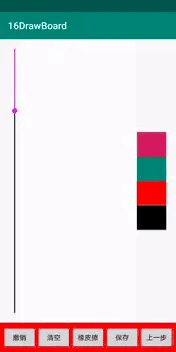
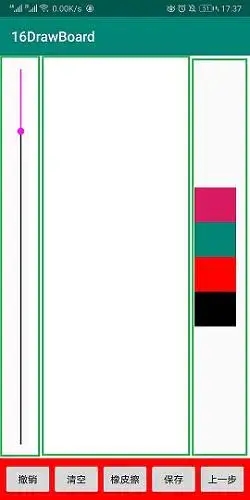
一、预期效果
二、设置横竖屏切换
三、确定布局
四、自定义滑动条
五、绘画区域
六、MainActivity
实现步骤:
一、预期效果
二、设置横竖屏切换
| screenOrientation属性 | 作用 |
|---|---|
| user | 用户当前设置的方向。 |
| unspecified | 由系统选择显示方向,不同的设备可能会有所不同。(旋转手机,界面会跟着旋转) |
| landscape | 限制界面为横屏,旋转屏幕也不会改变当前状态。 |
| portrait | 限制界面为竖屏,旋转屏幕也不会改变当前状态。 |
| behind | 与前一个activity方向相同。 |
| sensor | 根据传感器定位方向,旋转手机90度,180,270,360,界面都会发生变化。 |
| nosensor | 不由传感器确定方向。旋转设备的时候,界面不会跟着旋转。初始界面方向由系统提供。 |
| sensorLandscape | (横屏的旋转,不会出现竖屏的现象)根据传感器定位方向,旋转手机180度界面旋转。一般横屏游戏会是这个属性。 |
| sensorPortrait | (竖屏的旋转,不会出现横屏的现象)根据传感器定位方向,旋转手机180度界面会旋转。 |
三、确定布局
因为横竖屏切换后控件的宽高都是不一样的,也就是不固定的,不能用线性布局,而是根据相对位置进行布局。先用constraintLayout约束,再将小控件组合成一个线性布局,然后对整个线性布局进行相对布局。
<androidx.constraintlayout.widget.ConstraintLayout xmlns:android="http://schemas.android.com/apk/res/android"
    xmlns:app="http://schemas.android.com/apk/res-auto"
    xmlns:tools="http://schemas.android.com/tools"
    android:layout_width="match_parent"
    android:layout_height="match_parent"
    tools:context=".MainActivity">

    <androidx.constraintlayout.widget.ConstraintLayout
        android:layout_width="match_parent"
        android:layout_height="0dp"
        app:layout_constraintTop_toTopOf="parent"
        app:layout_constraintBottom_toTopOf="@id/operation"
        >
        <!--滑动条-->
        <com.example.a16drawboard.Slider
            android:id="@ id/slider"
            android:layout_width="20dp"
            android:layout_height="match_parent"
            android:layout_marginLeft="20dp"
            android:layout_marginTop="20dp"
            android:layout_marginBottom="20dp"
            app:layout_constraintLeft_toLeftOf="parent"
            />
        <!--画板-->
        <com.example.a16drawboard.DrawBoardView
            android:id="@ id/board"
            android:layout_width="0dp"
            android:layout_height="match_parent"
            app:layout_constraintLeft_toRightOf="@id/slider"
            app:layout_constraintRight_toLeftOf="@id/color"/>
    <!--选颜色-->
        <LinearLayout
            android:id="@ id/color"
            android:layout_width="60dp"
            android:layout_height="match_parent"
            android:orientation="vertical"
            android:layout_marginRight="20dp"
            app:layout_constraintRight_toRightOf="parent"
            android:gravity="center">

            <Button
                android:layout_width="match_parent"
                android:layout_height="50dp"
                android:background="@color/colorAccent"
                android:onClick="choiceColor"/>

            <Button
                android:layout_width="match_parent"
                android:layout_height="50dp"
                android:background="@color/colorPrimary"
                android:onClick="choiceColor"/>
            <Button
                android:layout_width="match_parent"
                android:layout_height="50dp"
                android:background="#f00"
                android:onClick="choiceColor"/>
            <Button
                android:layout_width="match_parent"
                android:layout_height="50dp"
                android:background="#000"
                android:onClick="choiceColor"/>

        </LinearLayout>
    </androidx.constraintlayout.widget.ConstraintLayout>

    <LinearLayout
        android:id="@ id/operation"
        android:layout_width="match_parent"
        android:layout_height="60dp"
        android:background="#f00"
        android:orientation="horizontal"
        app:layout_constraintBottom_toBottomOf="parent"
        android:gravity="center">

        <Button
            android:layout_width="70dp"
            android:layout_height="wrap_content"
            android:text="撤销"
            android:onClick="goBack"/>

        <Button
            android:layout_width="70dp"
            android:layout_height="wrap_content"
            android:text="清空"
            android:onClick="clear"/>

        <Button
            android:layout_width="70dp"
            android:layout_height="wrap_content"
            android:text="橡皮擦"
            android:onClick="eraser"/>

        <Button
            android:layout_width="70dp"
            android:layout_height="wrap_content"
            android:text="保存"
            android:onClick="save"/>

        <Button
            android:layout_width="70dp"
            android:layout_height="wrap_content"
            android:text="上一步"
            android:onClick="lastStep"/>

    </LinearLayout>

</androidx.constraintlayout.widget.ConstraintLayout>
四、自定义滑动条
public class Slider extends View {
    private int lineSize = 6; // 线条的粗细
    private int lineColor = Color.BLACK;// 默认线条颜色
    private Paint linePaint;

    private Paint circlePaint; // 圆点画笔
    private int thumbColor = Color.MAGENTA; // 圆点颜色
    private int cx; // 中心点x
    private int cy; // 中心点y
    private int radius; // 小圆点半径

    private int thumbScale = 4; // 圆点缩放尺寸
    private float position; // 触摸点的坐标
    private Paint progressPaint; // 进度条进度的画笔
    private int progressColor = Color.MAGENTA; // 进度条颜色

    public static int PROGRESS = 0; // 进度条
    public static int SLIDER = 1; // 滑动条
    private int style = PROGRESS; // 用户选择的样式,默认为进度条

    public int max = 100; // 设置最大值
    public float progress; // 进度值

    private OnSliderChangeListener onSliderChangeListener; // 滑动改变监听者

    public Slider(Context context) {
        super(context);
    }

    public Slider(Context context, AttributeSet attrs) {
        super(context, attrs);
        init();
    }

    private void init(){
        // 背景线
        linePaint = new Paint(Paint.ANTI_ALIAS_FLAG);
        linePaint.setColor(lineColor);
        linePaint.setStrokeWidth(lineSize);

        // 圆点
        circlePaint = new Paint(Paint.ANTI_ALIAS_FLAG);
        circlePaint.setColor(thumbColor);
        circlePaint.setStyle(Paint.Style.FILL);

        // 进度条
        progressPaint = new Paint(Paint.ANTI_ALIAS_FLAG);
        progressPaint.setColor(progressColor);
        progressPaint.setStrokeWidth(lineSize);
    }

    @Override
    protected void onDraw(Canvas canvas) {

        if (getWidth() > getHeight()){
            // 横着
            canvas.drawLine(0, getHeight()/2, getWidth(), getHeight()/2, linePaint);
            if (position>0){
                canvas.drawLine(0, getHeight()/2, position, getHeight()/2, progressPaint);
            }
            radius = getHeight()/thumbScale;
            cy = getHeight()/2;
            // 确定cx的值
            if (position < radius) {
                cx = radius;
            }else if (position > getWidth()-radius){
                cx = getWidth()-radius;
            }else {
                cx = (int) position;
            }
        }else{
            // 竖着
            canvas.drawLine(getWidth()/2, 0, getWidth()/2, getHeight(), linePaint);
            if (position>0){
                canvas.drawLine(getWidth()/2, 0, getWidth()/2, position, progressPaint);
            }
            radius = getWidth()/thumbScale;
            cx = getWidth()/2;
            // 确定中心点cy的值
            if (position<radius){
                cy = radius;
            }else if (position > getHeight()-radius){
                cy = getHeight()-radius;
            }else {
                cy = (int) position;
            }
        }
        // 画小圆点
        if (style == SLIDER){
            canvas.drawCircle(cx,cy,radius,circlePaint);
        }
    }

    @Override
    public boolean onTouchEvent(MotionEvent event) {
        switch (event.getAction()){
            case MotionEvent.ACTION_DOWN:
                // 圆点放大
                thumbScale = 2;
                // 点下去就到那个位置
                if (getWidth()>getHeight()){
                    // 横向时,y不变 x改变
                    position = event.getX();
                }else {
                    // 纵向时,x不变 y改变
                    position = event.getY();
                }
                callback();
                break;
            case MotionEvent.ACTION_MOVE:
                // 获取当前触摸点的值XY
                if (getWidth()>getHeight()){
                    // 横向时,y不变 x改变
                    position = event.getX();
                    if (position<0){
                        progress = 0;
                    }else if (position>getWidth()){
                        position = getWidth();
                    }
                }else {
                    // 竖着时,x不变 y改变
                    position = event.getY();
                    if (position<0){
                        progress = 0;
                    }else if (position>getHeight()){
                        position = getHeight();
                    }
                }
                callback();
                break;
            case MotionEvent.ACTION_UP:
                thumbScale = 4;
                break;
        }
        if (style == SLIDER){
            invalidate();
        }
        return true;
    }
    private void callback(){
        if (onSliderChangeListener != null){
            if (getWidth()>getHeight()){
                progress = position/getWidth();
            }else {
                progress = position/getHeight();
            }
            onSliderChangeListener.progressChange(progress*max);
        }
    }

    public int getStyle() {
        return style;
    }

    public void setStyle(int style) {
        this.style = style;
    }

    public float getProgress() {
        return progress;
    }

    public void setProgress(int progress){
        // 计算比例
        float rate = (float)(progress*1.0/max);
        setProgress(rate);
    }
    public void setProgress(float progress) {
        this.progress = progress;

        if (progress <1.001) {
            // 将进度值转化为控件中的尺寸位置
            if (getWidth() > getHeight()) {
                position = progress * getWidth();
            } else {
                position = progress * getHeight();
            }
            invalidate();
        }
    }

    @Override
    protected void onSizeChanged(int w, int h, int oldw, int oldh) {
        if (getWidth() > getHeight()) {
            position = progress * getWidth();
        } else {
            position = progress * getHeight();
        }
    }

    public void setMax(int max) {
        this.max = max;
    }
    public interface OnSliderChangeListener{
        void progressChange(float progress);
    }

    public void setOnSliderChangeListener(OnSliderChangeListener onSliderChangeListener) {
        this.onSliderChangeListener = onSliderChangeListener;
    }
}
五、绘画区域
public class DrawBoardView extends View {
    private ArrayList<Graph> graphs; // 操作数组
    private ArrayList<Graph> orginalGraphs; // 原始数组

    private int lineColor = Color.BLACK;
    private int lineSize = 5;
    Path mPath;

    public DrawBoardView(Context context) {
        super(context);
    }

    public DrawBoardView(Context context, @Nullable AttributeSet attrs) {
        super(context, attrs);
        init();
    }

    private void init(){
        // 初始化数组
        graphs = new ArrayList<>();
        orginalGraphs = new ArrayList<>();
        setBackgroundColor(Color.WHITE);
    }

    @Override
    protected void onDraw(Canvas canvas) {
        // 遍历数组
        Iterator<Graph> iterator = graphs.iterator();
        while (iterator.hasNext()){
            // 从集合中获取一个图形对象
            Graph line = iterator.next();
            // 绘制图形
            canvas.drawPath(line.path,line.paint);
        }
    }

    @Override
    public boolean onTouchEvent(MotionEvent event) {
        switch (event.getAction()){
            case MotionEvent.ACTION_DOWN:
                // 创建这条线对应的paint和path
                Paint mPaint = new Paint(Paint.ANTI_ALIAS_FLAG);
                mPaint.setColor(lineColor);
                mPaint.setStrokeWidth(lineSize);
                mPaint.setStyle(Paint.Style.STROKE);
                mPath = new Path();

                // 设置图形的起点
                mPath.moveTo(event.getX(),event.getY());

                // 保存当前这个图形的详细信息
                Graph temp = new Graph(mPaint,mPath);
                graphs.add(temp);
                orginalGraphs.add(temp);
                break;
            case MotionEvent.ACTION_MOVE:
                // 连接从path终点到当前触摸点的线
                mPath.lineTo(event.getX(),event.getY());
                break;
            case MotionEvent.ACTION_UP:
                break;
        }
        invalidate();
        return true;
    }
    // 用私有类来管理图形的画笔和路径
    private class Graph{
        Paint paint;
        Path path;

        public Graph(Paint paint,Path path){
            this.paint=paint;
            this.path=path;
        }
    }

    // 删除最后一个图形  撤销
    public void removeLast(){
        if (graphs.size() >0){
            graphs.remove(graphs.size()-1);
            invalidate();
        }
    }
    // 删除所有 清空
    public void removeAll(){
        graphs.clear();
        invalidate();
    }
    // 还原上一步
    public void returnToLastStep(){
        // 判断缓存中是否有
        if (graphs.size() < orginalGraphs.size()){
            // 获取上一步的索引值
            int index = graphs.size()-1 1;
            // 从缓存中获取index,添加到操作数组中
            graphs.add(orginalGraphs.get(index));
            invalidate();
        }
    }
    public int getLineSize() {
        return lineSize;
    }

    public void setLineSize(int lineSize) {
        this.lineSize = lineSize;
    }

    public int getLineColor() {
        return lineColor;
    }

    public void setLineColor(int lineColor) {
        this.lineColor = lineColor;
    }
}
六、MainActivity
public class MainActivity extends AppCompatActivity {
    private DrawBoardView boardView;

    @Override
    protected void onCreate(Bundle savedInstanceState) {
        super.onCreate(savedInstanceState);
        setContentView(R.layout.activity_main);
        // 获取画板对象
        boardView = findViewById(R.id.board);
        // 获取滑动条对象
        final Slider slider = findViewById(R.id.slider);
        slider.setStyle(Slider.SLIDER);
        slider.setMax(30);
        slider.setOnSliderChangeListener(new Slider.OnSliderChangeListener() {
            @Override
            public void progressChange(float progress) {
                boardView.setLineSize((int) progress);
            }
        });
        slider.setProgress(boardView.getLineSize());

    }

    @Override
    public void onWindowFocusChanged(boolean hasFocus) {
        super.onWindowFocusChanged(hasFocus);
    }

    @Override
    protected void onStart() {
        super.onStart();
    }

    @Override
    protected void onResume() {
        super.onResume();
        // 设置横屏
        setRequestedOrientation(ActivityInfo.SCREEN_ORIENTATION_FULL_SENSOR);
    }

    @Override
    protected void onPause() {
        super.onPause();
    }

    @Override
    protected void onStop() {
        super.onStop();
    }
    // 选择颜色 获取按钮上面的背景颜色
    public void choiceColor(View view) {
        // 获取按钮上面的背景颜色
        ColorDrawable drawable = (ColorDrawable) view.getBackground();

        // 获取颜色
        boardView.setLineColor(drawable.getColor());
    }

    // 撤回
    public void goBack(View view) {
        boardView.removeLast();
    }
    // 清空
    public void clear(View view) {
        boardView.removeAll();
    }
    // 橡皮擦
    public void eraser(View view) {
        // 获取画板的drawable
        ColorDrawable drawable = (ColorDrawable) boardView.getBackground();
        // 设置线条颜色和背景色相同
        if (drawable != null){
            boardView.setLineColor(drawable.getColor());
        }else {
            boardView.setLineColor(Color.TRANSPARENT);
        }
    }
    // 保存
    public void save(View view) {
    }
    // 还原
    public void lastStep(View view) {
        boardView.returnToLastStep();
    }
}
到这里就结束啦。
以上就是Android实现画板功能的详细内容,更多关于Android 画板功能的资料请关注Devmax其它相关文章!