本文实例为大家分享了ViewPager RadioGroup实现左右滑动卡片布局的具体代码,供大家参考,具体内容如下
效果如图所示:
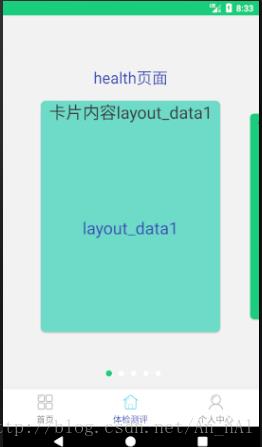
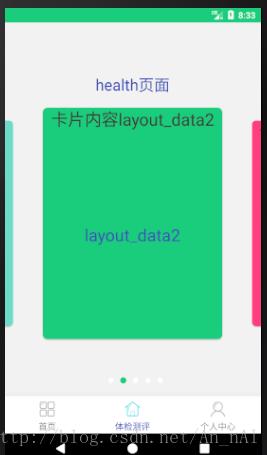
1.选择某个界面时,对应的第几个小圆点亮:
通过selector制造圆点和进行更改小圆点被选择和未被选择时的颜色:
<?xml version="1.0" encoding="utf-8"?>
<selector xmlns:android="http://schemas.android.com/apk/res/android">
    <item android:state_checked="true">
        <shape>
            <solid android:color="@color/app_green_area" />
            <corners android:radius="5dp" />

        </shape>
    </item>
    <item android:state_checked="false">
        <shape>
            <solid android:color="#fff" />
            <corners android:radius="5dp" />
            <stroke android:width="0.2dp"
                android:color="@color/app_line"/>
        </shape>
    </item>
</selector>
2.主界面布局:
<?xml version="1.0" encoding="utf-8"?>
<RelativeLayout xmlns:android="http://schemas.android.com/apk/res/android"
    android:orientation="vertical"
    android:layout_width="match_parent"
    android:layout_height="match_parent">

    <LinearLayout
        android:layout_width="match_parent"
        android:layout_height="match_parent"
        android:orientation="vertical"
        android:gravity="center"
        android:background="@color/app_gray_bg">
        <TextView
            android:layout_width="match_parent"
            android:layout_height="wrap_content"
            android:gravity="center"
            android:textSize="25sp"
            android:textColor="@color/colorPrimary"
            android:text="health页面"/>
        <android.support.v4.view.ViewPager
            android:id="@ id/view_pager"
            android:layout_gravity="center"
            android:overScrollMode="never"
            android:layout_width="match_parent"
            android:layout_height="wrap_content"/>
    </LinearLayout>

    <RadioGroup
        android:layout_alignParentBottom="true"
        android:layout_marginBottom="20dp"
        android:id="@ id/group"
        android:layout_width="match_parent"
        android:layout_height="wrap_content"
        android:layout_gravity="center"
        android:gravity="center"
        android:orientation="horizontal">

        <RadioButton
            android:layout_width="10dp"
            android:layout_height="10dp"
            android:layout_marginLeft="10dp"
            android:background="@drawable/selector_point"
            android:button="@null" />

        <RadioButton
            android:layout_width="10dp"
            android:layout_height="10dp"
            android:layout_marginLeft="10dp"
            android:background="@drawable/selector_point"
            android:button="@null" />

        <RadioButton
            android:layout_width="10dp"
            android:layout_height="10dp"
            android:layout_marginLeft="10dp"
            android:background="@drawable/selector_point"
            android:button="@null" />

    </RadioGroup>
</RelativeLayout>
3.主界面内嵌的卡片视图布局:
<?xml version="1.0" encoding="utf-8"?>
<android.support.v7.widget.CardView xmlns:android="http://schemas.android.com/apk/res/android"
    xmlns:app="http://schemas.android.com/apk/res-auto"
    android:layout_width="match_parent"
    android:layout_height="match_parent"
    android:layout_margin="2dp"
    app:cardCornerRadius="8dp">
    <LinearLayout
        android:id="@ id/chart_bar"
        android:adjustViewBounds="true"
        android:layout_width="match_parent"
        android:layout_height="match_parent"
        android:orientation="vertical">
        <TextView
            android:id="@ id/tv_title"
            android:textColor="@color/app_black"
            android:gravity="center"
            android:textSize="30sp"
            android:layout_width="match_parent"
            android:layout_height="wrap_content" />
        <LinearLayout
            android:adjustViewBounds="true"
            android:layout_width="match_parent"
            android:layout_height="match_parent"
            android:orientation="vertical">
            <LinearLayout
                android:id="@ id/layout_data1"
                android:layout_width="match_parent"
                android:layout_height="match_parent"
                android:gravity="center"
                android:visibility="visible"
                android:orientation="vertical">
                <TextView
                    android:text="layout_data1"
                    android:textSize="30sp"
                    android:textColor="@color/colorPrimary"
                    android:layout_width="wrap_content"
                    android:layout_height="wrap_content" />
            </LinearLayout>
            <LinearLayout
                android:id="@ id/layout_data2"
                android:layout_width="match_parent"
                android:layout_height="match_parent"
                android:gravity="center"
                android:visibility="visible"
                android:orientation="vertical">
                <TextView
                    android:text="layout_data2"
                    android:textSize="30sp"
                    android:textColor="@color/colorPrimary"
                    android:layout_width="wrap_content"
                    android:layout_height="wrap_content" />
            </LinearLayout>
            <LinearLayout
                android:id="@ id/layout_data3"
                android:layout_width="match_parent"
                android:layout_height="match_parent"
                android:gravity="center"
                android:visibility="visible"
                android:orientation="vertical">
                <TextView
                    android:text="layout_data3"
                    android:textSize="30sp"
                    android:textColor="@color/colorPrimary"
                    android:layout_width="wrap_content"
                    android:layout_height="wrap_content" />
            </LinearLayout>
        </LinearLayout>
    </LinearLayout>

</android.support.v7.widget.CardView>
4.定义卡片之间切换的样式:
/**
 * 卡片之间切换的样式
 */

public class ZoomOutPageTransformer implements ViewPager.PageTransformer {

    public static final float MAX_SCALE = 0.9f;
    public static final float MIN_SCALE = 0.8f;

    @Override
    public void transformPage(View page, float position) {

        position = position < -1 ? -1 : position;
        position = position > 1 ? 1 : position;

        float tempScale = position < 0 ? 1   position : 1 - position;

        float slope = (MAX_SCALE - MIN_SCALE) / 1;
        float scaleValue = MIN_SCALE   tempScale * slope;
        page.setScaleX(scaleValue);
        page.setScaleY(scaleValue);
        if (Build.VERSION.SDK_INT < Build.VERSION_CODES.KITKAT) {
            page.getParent().requestLayout();
        }
    }
}
5.定义用于加载卡片视图的layout控件,方便自定义宽高比例:
import android.content.Context;
import android.content.res.TypedArray;
import android.text.TextUtils;
import android.util.AttributeSet;
import android.view.View;
import android.view.ViewGroup;

/**
 * 用于加载卡片视图
 */

public class RatioLayout extends ViewGroup {

    private float heightWidthRatio = 0.325f;

    public RatioLayout(Context context) {
        this(context, null);
    }

    public RatioLayout(Context context, AttributeSet attrs) {
        super(context, attrs);

        final TypedArray a = context.obtainStyledAttributes(
                attrs, R.styleable.RatioLayout);
        heightWidthRatio = getFloatFromString(a.getString(R.styleable.RatioLayout_height_width_ratio));
        a.recycle();
    }

    public void setHeightWidthRatio(String ratio) {
        heightWidthRatio = getFloatFromString(ratio);
    }

    public static float getFloatFromString(String src) {
        if (TextUtils.isEmpty(src)) {
            return 0;
        }
        float result;
        try {
            result = Float.parseFloat(src);
            return result;
        } catch (Exception e) {
        }

        String[] strs = src.split("/");
        if (strs.length == 2) {
            try {
                float molecular = Float.parseFloat(strs[0]);//分子
                float denominator = Float.parseFloat(strs[1]);//分子
                result = molecular / denominator;
            } catch (Exception e) {
                result = 0;
            }
        } else {
            result = 0;
        }
        return result;
    }

    protected void onLayout(boolean changed, int left, int top, int right, int bottom) {
        layoutChildren(left, top, right, bottom);
    }

    void layoutChildren(int left, int top, int right, int bottom) {
        final int count = getChildCount();
        for (int i = 0; i < count; i  ) {
            final View child = getChildAt(i);
            if (child.getVisibility() != GONE) {
                final LayoutParams lp = child.getLayoutParams();
                final int width = child.getMeasuredWidth();
                final int height = child.getMeasuredHeight();
                child.layout(0, 0, width, 0   height);
            }
        }
    }

    @Override
    protected void onMeasure(int widthMeasureSpec, int heightMeasureSpec) {
        super.onMeasure(widthMeasureSpec, heightMeasureSpec);
        if (heightWidthRatio > 0) {
            int width = getMeasuredWidth();
            int height = (int) (width * heightWidthRatio);
            setMeasuredDimension(width, height);
            int count = getChildCount();
            if (count >= 1) {
                for (int i = 0; i < count; i  ) {
                    View child = getChildAt(i);
                    child.measure(MeasureSpec.makeMeasureSpec(getMeasuredWidth(), MeasureSpec.EXACTLY), MeasureSpec.makeMeasureSpec(getMeasuredHeight(), MeasureSpec.EXACTLY));
                }
            }
        }
    }
}
6.卡片布局对应的activity:
public class FrHealthChart extends Fragment {

    public static final String DATA = "_data";
    @BindView(R.id.layout_data1)
    LinearLayout layoutData1;
    @BindView(R.id.layout_data2)
    LinearLayout layoutData2;
    @BindView(R.id.layout_data3)
    LinearLayout layoutData3;
    @BindView(R.id.tv_title)
    TextView tvTitle;
    @BindView(R.id.chart_bar)
    LinearLayout chartBar;

    private int position;//用于标识选择的是哪个layout

    public static Fragment getInstance(int position) {
        FrHealthChart frHealthChart = new FrHealthChart();
        Bundle bundle = new Bundle();
        bundle.putInt(DATA, position);
        frHealthChart.setArguments(bundle);
        return frHealthChart;
    }

    @Nullable
    @Override
    public View onCreateView(LayoutInflater inflater, @Nullable ViewGroup container, @Nullable Bundle savedInstanceState) {
        View view = inflater.from(getContext()).inflate(R.layout.fragment_health_chart, container, false);
        ButterKnife.bind(this, view);
        Bundle bundle = getArguments();
        if (bundle != null) {
            position = bundle.getInt(DATA);
            initCard();
        }
        //加载卡片视图,控制宽高比例
        RatioLayout ratioLayout = new RatioLayout(getContext());
        ratioLayout.addView(view);
        ratioLayout.setHeightWidthRatio("67/52");
        return ratioLayout;
    }

    private void initCard() {
        switch (position) {
            case 0://显示layoutData1
                layoutData1.setVisibility(View.VISIBLE);
                layoutData2.setVisibility(View.GONE);
                layoutData3.setVisibility(View.GONE);
                initData();
                break;
            case 1://显示layoutData2
                layoutData1.setVisibility(View.GONE);
                layoutData2.setVisibility(View.VISIBLE);
                layoutData3.setVisibility(View.GONE);
                initData();
                break;
            case 2://显示layoutData3
                layoutData1.setVisibility(View.GONE);
                layoutData2.setVisibility(View.GONE);
                layoutData3.setVisibility(View.VISIBLE);
                initData();
                break;
        }
    }

    /**
     * 初始化数据
     */
    private void initData() {
        switch (position) {
            case 0:
                tvTitle.setText("卡片内容"   "layout_data1");
                chartBar.setBackgroundColor(Color.parseColor("#6ddac6"));
                break;
            case 1:
                tvTitle.setText("卡片内容"   "layout_data2");
                chartBar.setBackgroundColor(getResources().getColor(R.color.app_green_area));
                break;
            case 2:
                tvTitle.setText("卡片内容"   "layout_data3");
                chartBar.setBackgroundColor(getResources().getColor(R.color.colorAccent));
                break;
        }
    }

}
7.主界面的activity代码:
public class FrHealth extends Fragment implements ViewPager.OnPageChangeListener {

    @BindView(R.id.view_pager)
    ViewPager viewPager;
    @BindView(R.id.group)
    RadioGroup group;

    @Nullable
    @Override
    public View onCreateView(LayoutInflater inflater, @Nullable ViewGroup container, @Nullable Bundle savedInstanceState) {
        View view = LayoutInflater.from(getContext()).inflate(R.layout.fragment_health, container, false);
        ButterKnife.bind(this, view);
        initView();
        return view;
    }

    private void initView() {
        RadioButton childAt = (RadioButton) group.getChildAt(0);
        childAt.setChecked(true);
        viewPager.setPageTransformer(true, new ZoomOutPageTransformer());//设置卡片之间切换的样式
        viewPager.setOffscreenPageLimit(3);//限定预加载的卡片个数
        ViewGroup.LayoutParams layoutParams = viewPager.getLayoutParams();
//        layoutParams.height = AppUtil.dp2px(getContext(), 400);
        float scale = getContext().getResources().getDisplayMetrics().density;
        layoutParams.height = (int) (400 * scale   0.5F);//计算高宽
        layoutParams.width = (int) (layoutParams.height * 0.8);
        if (viewPager.getParent() instanceof ViewGroup) {
            ViewGroup viewParent = ((ViewGroup) viewPager.getParent());
            viewParent.setClipChildren(false);
            viewPager.setClipChildren(false);
        }
        viewPager.addOnPageChangeListener(this);
        MyPagerAdapter myPagerAdapter = new MyPagerAdapter(getChildFragmentManager());
        viewPager.setAdapter(myPagerAdapter);
    }

    @Override
    public void onPageScrolled(int position, float positionOffset, int positionOffsetPixels) {

    }

    @Override
    public void onPageSelected(int position) {
        //根据监听viewPager的PageChangeListener获得选择的是哪个卡片,并把其对应位序的小圆点设置为选定状态
        RadioButton childAt = (RadioButton) group.getChildAt(position);
        childAt.setChecked(true);
    }

    @Override
    public void onPageScrollStateChanged(int state) {

    }

    class MyPagerAdapter extends FragmentPagerAdapter {
        HashMap<Integer, Fragment> map = new HashMap<>();

        public MyPagerAdapter(FragmentManager fm) {
            super(fm);
        }

        @Override
        public Fragment getItem(int position) {
            FrHealthChart fragment = (FrHealthChart) map.get(position);
            if (fragment == null) {
                fragment = (FrHealthChart) FrHealthChart.getInstance(position);
                map.put(position, fragment);
            }
            return fragment;
        }

        @Override
        public int getCount() {
            return 3;//卡片个数
        }
    }
}
以上就是本文的全部内容,希望对大家的学习有所帮助,也希望大家多多支持Devmax。