在了解了命名视图的用途后,发现用命名视图来实现复杂导航更加省力。更多知识请参考这里
这里只说明重要配置内容,其他内容配置请参考上一篇初始版本:
ElementUI 复杂顶部和左侧导航栏实现
或参考文末提到的github上的项目代码。
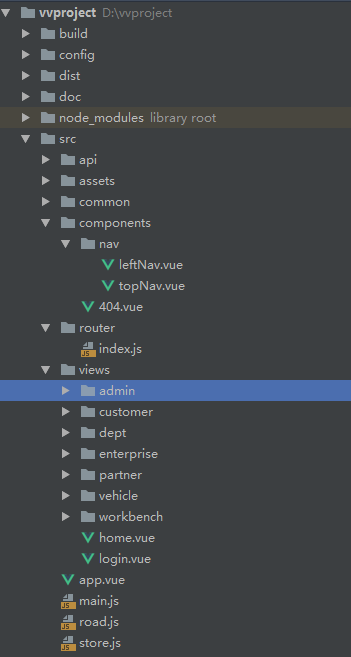
项目目录如下:
1、router配置(router/index.js)如下:
import Vue from 'vue'
import Router from 'vue-router'
import TopNav from '@/components/nav/topNav.vue'
import LeftNav from '@/components/nav/leftNav.vue'
import Home from '@/views/home.vue'
import Dashboard from '@/views/workbench/dashboard.vue'
import MySettings from '@/views/workbench/mySettings.vue'
import Mission from '@/views/workbench/mission/mission.vue'
import Plan from '@/views/workbench/plan.vue'
import Maillist from '@/views/workbench/maillist.vue'
import EnterpriseList from '@/views/enterprise/index.vue'
import EnterpriseAdd from '@/views/enterprise/add.vue'
import EnterpriseDetail from '@/views/enterprise/detail.vue'
import EnterpriseValidate from '@/views/enterprise/validate.vue'
import VehicleManage from '@/views/vehicle/index.vue'
import DeptManager from '@/views/dept/index.vue'
Vue.use(Router)

let router = new Router({
  routes: [
    {
      path: '/',
      type: 'home', // 根据type区分不同模块(顶部导航)
      name: 'home', // 根据name区分不同子模块(左侧导航)
      redirect: '/dashboard',
      component: Home,
      children: [
        {
          path: '/dashboard',
          name: '首页', // 当前路由的name(导航栏显示文字)
          components: {
            default: Dashboard,
            top: TopNav,
            aside: LeftNav
          },
          leaf: true, // 只有一个节点
          iconCls: 'iconfont icon-home', // 图标样式class
          menuShow: true
        },
        {
          path: '/mySet',
          components: {
            default: MySettings,
            top: TopNav,
            aside: LeftNav
          },
          name: '我的设置',
          iconCls: 'el-icon-menu',
          menuShow: true,
          children: [
            { path: '/mySet/plan', component: Plan, name: '行程计划', menuShow: true },
            { path: '/mySet/mission', component: Mission, name: '我的任务', menuShow: true },
            { path: '/mySet/maillist', component: Maillist, name: '通讯录', menuShow: true }
          ]
        }
      ]
    },
    {
      path: '/enterpriseManager',
      type: 'enterprise',
      name: 'enterprise',
      component: Home,
      redirect: '/enterprise/list',
      menuShow: true,
      children: [
        {
          path: '/enterprise/list',
          name: '企业信息',
          components: {
            default: EnterpriseList,
            top: TopNav,
            aside: LeftNav
          },
          leaf: true,
          iconCls: 'el-icon-setting',
          menuShow: true
        },
        {
          path: '/enterprise/detail',
          name: '企业详情',
          components: {
            default: EnterpriseDetail,
            top: TopNav,
            aside: LeftNav
          },
          leaf: true,
          iconCls: 'el-icon-setting',
          menuShow: false
        },
        {
          path: '/enterprise/add',
          name: '添加企业',
          components: {
            default: EnterpriseAdd,
            top: TopNav,
            aside: LeftNav
          },
          leaf: true,
          iconCls: 'el-icon-menu',
          menuShow: true
        },
        {
          path: '/enterprise/validate',
          name: '企业认证',
          components: {
            default: EnterpriseValidate,
            top: TopNav,
            aside: LeftNav
          },
          leaf: true,
          iconCls: 'el-icon-menu',
          menuShow: true
        }
      ]
    },
    {
      path: '/vehicleManager',
      type: 'enterprise',
      name: 'vehicle',
      component: Home,
      redirect: '/vehicle/list',
      menuShow: true,
      children: [
        {
          path: '/vehicle/list',
          name: '车辆信息',
          components: {
            default: VehicleManage,
            top: TopNav,
            aside:  LeftNav
          },
          leaf: true, // 只有一个节点
          iconCls: 'iconfont icon-home', // 图标样式class
          menuShow: true
        }
      ]
    },
    {
      path: '/deptManager',
      type: 'enterprise',
      name: 'dept',
      component: Home,
      redirect: '/dept/list',
      menuShow: true,
      children: [
        {
          path: '/dept/list',
          name: '部门信息',
          components: {
            default: DeptManager,
            top: TopNav,
            aside:  LeftNav
          },
          leaf: true, // 只有一个节点
          iconCls: 'iconfont icon-home', // 图标样式class
          menuShow: true
        }
      ]
    }
  ]
});
特别说明:
这里的路由对象router ,设置的是最多三级,一级路由主要对应的是顶部导航和其他无子页面的路由,二级和三级路由分别对应的是左侧导航的一级和二级菜单(比如三级路由对应的就是左侧导航的二级菜单),二级路由设置leaf属性,值为true表明该路由下没有子菜单(如果该路由下的某页面不显示在左侧导航,不算子菜单)。
2、home.vue,这里分别有name=top,aside,default三个视图,top代表顶部导航,aside代表左侧导航,剩下的default就是默认视图,代表右侧内容区
<template>
  <el-row class="container">
    <!--头部-->
    <el-col :span="24"><router-view name="top"></router-view></el-col>
    <el-col :span="24" class="main">
      <!--左侧导航-->
      <router-view name="aside"></router-view>
      <!--右侧内容区-->
      <section class="content-container">
        <div class="grid-content bg-purple-light">
          <el-col :span="24" class="content-wrapper">
            <transition name="fade" mode="out-in">
              <router-view></router-view>
            </transition>
          </el-col>
        </div>
      </section>
    </el-col>
  </el-row>
</template>
<script>
  export default {
    name: 'home',
    data () {
      return {
        loading: false
      }
    }
  }
</script>
3、topNav.vue 是顶部导航菜单的代码
<template>
  <el-row class="container">
    <!--头部-->
    <el-col :span="24" class="topbar-wrap">
      <div class="topbar-logo topbar-btn">
        <a href="/" rel="external nofollow"  rel="external nofollow" ><img src="../../assets/logo.png" style="padding-left:8px;"></a>
      </div>
      <div class="topbar-logos">
        <a href="/" rel="external nofollow"  rel="external nofollow"  style="color: #fff;">车车综合管理</a>
      </div>
      <div class="topbar-title">
        <!-- 注意:这里就是topNavState作用之处,根据当前路由所在根路由的type值判断显示不同顶部导航菜单 -->
        <el-row v-show="$store.state.topNavState==='home'">
          <el-col :span="24">
            <el-menu :default-active="defaultActiveIndex" class="el-menu-demo" mode="horizontal" @select="handleSelect" :router="true">
              <el-menu-item index="/">工作台</el-menu-item>
              <el-menu-item index="/enterpriseManager">企业管理</el-menu-item>
              <el-menu-item index="/orderManager">订单管理</el-menu-item>
              <el-menu-item index="/systemManager">系统管理</el-menu-item>
            </el-menu>
          </el-col>
        </el-row>
        <el-row v-show="$store.state.topNavState==='enterprise'">
          <el-col :span="24">
            <el-menu :default-active="defaultActiveIndex" class="el-menu-demo" mode="horizontal" @select="handleSelect" :router="true">
              <el-menu-item index="/enterpriseManager">企业信息</el-menu-item>
              <el-menu-item index="/vehicleManager">车辆信息</el-menu-item>
              <el-menu-item index="/deptManager">组织架构</el-menu-item>
            </el-menu>
          </el-col>
        </el-row>
      </div>
      <div class="topbar-account topbar-btn">
        <el-dropdown trigger="click">
          <span class="el-dropdown-link userinfo-inner">
            <i class="iconfont icon-user"></i> {{nickname}}   <i class="el-icon-caret-bottom"></i></span>
          <el-dropdown-menu slot="dropdown">
            <el-dropdown-item>
              <div @click="jumpTo('/user/profile')"><span style="color: #555;font-size: 14px;">个人信息</span></div>
            </el-dropdown-item>
            <el-dropdown-item>
              <div @click="jumpTo('/user/changepwd')"><span style="color: #555;font-size: 14px;">修改密码</span></div>
            </el-dropdown-item>
            <el-dropdown-item divided @click.native="logout">退出登录</el-dropdown-item>
          </el-dropdown-menu>
        </el-dropdown>
      </div>
    </el-col>
  </el-row>
</template>
<script>
  import 'element-ui/lib/theme-chalk/display.css';
  import {road} from '../../road.js'

  export default {
    data(){
      return {
        loading: false,
        companyName: '',
        nickname: '',
        defaultActiveIndex: '/',
        homeMenu: false,
        messageCount: 5
      }
    },
    created() {
      road.$on('setNickName', (text) => {
        this.nickname = text;
      });

      road.$on('goto', (url) => {
        if(url === "/login") {
          localStorage.removeItem('access-user');
          this.$router.push(url);
        }
      });
      // 组件创建完后获取数据
      this.fetchNavData();
    },
    methods: {
      jumpTo(url){
        this.$router.push(url); //用go刷新
      },
      handleSelect(index){
        this.defaultActiveIndex = index;
      },
      fetchNavData () { // 初始化菜单激活项
        let cur_path = this.$route.path; //获取当前路由
        let routers = this.$router.options.routes; // 获取路由对象
        let nav_type = "", nav_name = "";
        for (var i = 0; i < routers.length; i  ) {
          let children = routers[i].children;
          if(children){
            for (let j = 0; j < children.length; j  ) {
              if (children[j].path === cur_path) {
                nav_type = routers[i].type;
                nav_name = routers[i].name;
                break;
              }
              // 如果该菜单下还有子菜单
              if(children[j].children) {
                let grandChildren = children[j].children;
                for(let z=0; z<grandChildren.length; z  ) {
                  if(grandChildren[z].path === cur_path) {
                    nav_type = routers[i].type;
                    nav_name = routers[i].name;
                    break;
                  }
                }
              }
            }
          }
        }
        this.$store.state.topNavState = nav_type;
        this.$store.state.leftNavState = nav_name;
        if(nav_type == "home"){
          this.defaultActiveIndex = "/";
        } else {
          this.defaultActiveIndex = "/"   nav_name   "Manager";
        }
      },
      logout(){
        //logout
        this.$confirm('确认退出吗?', '提示', {
          confirmButtonClass: 'el-button--warning'
        }).then(() => {
          //确认
          localStorage.removeItem('access-user');
          road.$emit('goto', '/login');
        }).catch(() => {});
      }
    },
    mounted() {
      let user = window.localStorage.getItem('access-user');
      if (user) {
        user = JSON.parse(user);
        this.nickname = user.nickname || '';
        this.companyName = user.companyName || '';
      }
    },
    watch: {
      '$route': function(to, from){ // 路由改变时执行
        //console.info("to.path:"   to.path);
        this.fetchNavData();
      }
    }
  }
</script>
注意fetchNavData()这个方法,主要是根据当前跳转的路由,去找到这个路由对应的type(对应顶部导航栏的分类)和name(对应左侧导航栏的分类),然后保存type和name到$store中,这样在topNav.vue组件可以根据$store中的type显示相应的菜单,同样在leftNav.vue组件就可以取到这个name值并显示相应的左侧菜单栏了。另外,里面的top和aside是命名视图,分别对应顶部导航组件和左侧导航组件。
补充:topNavState和leftNavState这两个状态就是精髓所在,分别控制顶部和左侧导航展示对应模块菜单,这两个状态是在vuex配置文件store.js中设置的
import Vue from 'vue'
import Vuex from 'vuex'
Vue.use(Vuex)

const state = {
  collapsed: false, // 左侧导航折叠状态
  topNavState: 'home',
  leftNavState: 'dispatch'
}
export default new Vuex.Store({
  state
})
store.js文件在main.js中引入:
import store from './store.js'
new Vue({
  router,
  store,
  el: '#app',
  render: h => h(App)
})
4、leftNav.vue 左侧导航栏(这里的左侧菜单栏最多有两级菜单)
<template>
  <!--左侧导航-->
  <aside :class="{showSidebar:!collapsed}">
    <!--展开折叠开关-->
    <div class="menu-toggle" @click.prevent="collapse">
      <i class="iconfont icon-outdent" v-show="!collapsed" title="收起"></i>
      <i class="iconfont icon-indent" v-show="collapsed" title="展开"></i>
    </div>
    <!--导航菜单-->
    <el-menu :default-active="$route.path" router :collapse="collapsed" ref="leftNavigation">
      <template v-for="(issue,index) in $router.options.routes">
        <!-- 注意:这里就是leftNavState状态作用之处,当该值与router的根路由的name相等时加载相应菜单组 -->
        <template v-if="issue.name === $store.state.leftNavState">
          <template v-for="(item,index) in issue.children">
            <el-submenu v-if="!item.leaf" :index="index ''" v-show="item.menuShow">
              <template slot="title"><i :class="item.iconCls"></i><span slot="title">{{item.name}}</span></template>
              <el-menu-item v-for="term in item.children" :key="term.path" :index="term.path" v-if="term.menuShow"
                            :class="$route.path==term.path?'is-active':''">
                <i :class="term.iconCls"></i><span slot="title">{{term.name}}</span>
              </el-menu-item>
            </el-submenu>
            <el-menu-item v-else-if="item.leaf" :index="item.path"
                          :class="$route.path==item.path?'is-active':''" v-show="item.menuShow">
              <i :class="item.iconCls"></i><span slot="title">{{item.name}}</span>
            </el-menu-item>
          </template>
        </template>
      </template>
    </el-menu>
  </aside>
</template>
<script>
  export default {
    name: 'leftNav',
    data () {
      return {
        loading: false,
        collapsed: this.$store.state.collapsed,
      }
    },
    methods: {
      //折叠导航栏
      collapse: function () {
        this.collapsed = !this.collapsed;
        this.$store.state.collapsed = this.collapsed;
      },
      // 左侧导航栏根据当前路径默认打开子菜单(如果当前是二级菜单,则父级子菜单默认打开)
      defaultLeftNavOpened () {
        let cur_path = this.$route.path; //获取当前路由
        let routers = this.$router.options.routes; // 获取路由对象
        let subMenuIndex = '', needOpenSubmenu = false;
        for (let i = 0; i < routers.length; i  ) {
          let children = routers[i].children;
          if(children){
            for (let j = 0; j < children.length; j  ) {
              if(children[j].path === cur_path) {
                break;
              }
              // 如果该菜单下还有子菜单
              if(children[j].children && !children[j].leaf) {
                let grandChildren = children[j].children;
                for(let z=0; z<grandChildren.length; z  ) {
                  if(grandChildren[z].path === cur_path) {
                    subMenuIndex = j;
                    needOpenSubmenu = true;
                    break;
                  }
                }
              }
            }
          }
        }
        if(this.$refs['leftNavigation'] && needOpenSubmenu) {
          this.$refs['leftNavigation'].open(subMenuIndex); // 打开子菜单
        }
      },
    },
    watch: {
      '$route': function(to, from){ // 路由改变时执行
        //console.info("to.path:"   to.path);
      }
    },
    mounted() {
      this.defaultLeftNavOpened();
    },
  }
</script>
5、如果左侧导航含有二级菜单,
比如“我的设置(/mySet)”中,含有三个子菜单:
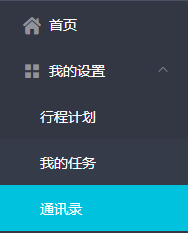
路由配置如下:(具体文件路径及配置请看router/index.js)
{
          path: '/mySet',
          components: {
            default: MySettings,
            top: TopNav,
            aside: LeftNav
          },
          name: '我的设置',
          iconCls: 'el-icon-menu',
          menuShow: true,
          children: [
            { path: '/mySet/plan', component: Plan, name: '行程计划', menuShow: true },
            { path: '/mySet/mission', component: Mission, name: '我的任务', menuShow: true },
            { path: '/mySet/maillist', component: Maillist, name: '通讯录', menuShow: true }
          ]
        }
此时,我们只需在父级菜单对应视图(MySettings)中添加一个router-view即可:
<template>
  <router-view></router-view>
</template>
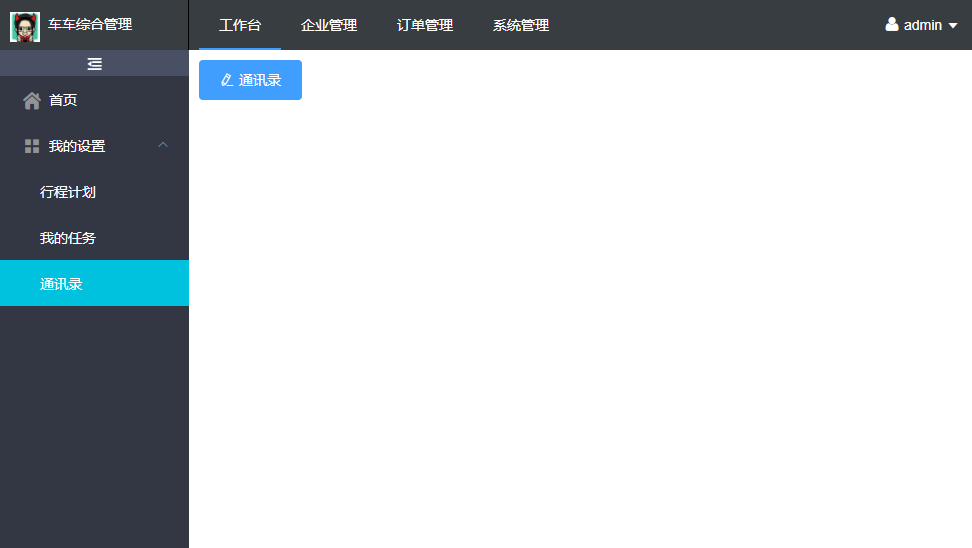
6、整体效果图:
附上github地址:https://github.com/yqrong/vvproject
到此这篇关于ElementUI 命名视图实现复杂顶部和左侧导航栏的文章就介绍到这了,更多相关Element顶部和左侧导航栏内容请搜索Devmax以前的文章或继续浏览下面的相关文章希望大家以后多多支持Devmax!