有时,UITextField自带的占位文字的颜色太浅或者不满足需求,所以需要修改,而UITextField没有直接的属性去修改占位文字的颜色,所以只能通过其他间接方式去修改。
例如:系统默认的占位文字颜色太浅

需要加深颜色,或者改变颜色
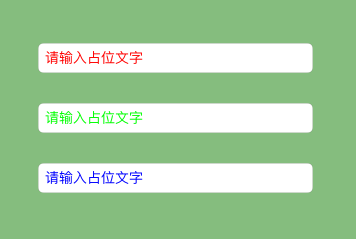
示例:
核心代码
方法一:通过attributedPlaceholder属性修改占位文字颜色
 CGFloat viewWidth = self.view.bounds.size.width;
 CGFloat textFieldX = 50;
 CGFloat textFieldH = 30;
 CGFloat padding = 30;

 UITextField *textField = [[UITextField alloc] init];
 textField.frame = CGRectMake(textFieldX, 100, viewWidth - 2 * textFieldX, textFieldH);
 textField.borderStyle = UITextBorderStyleRoundedRect; // 边框类型
 textField.font = [UIFont systemFontOfSize:14];
 NSAttributedString *attrString = [[NSAttributedString alloc] initWithString:@"请输入占位文字" attributes:
 @{NSForegroundColorAttributeName:[UIColor redColor],
     NSFontAttributeName:textField.font
   }];
 textField.attributedPlaceholder = attrString;
 [self.view addSubview:textField];
方法二:通过KVC修改占位文字颜色
 UITextField *textField1 = [[UITextField alloc] init];
 textField1.frame = CGRectMake(textFieldX, CGRectGetMaxY(textField.frame)   padding, viewWidth - 2 * textFieldX, textFieldH);
 textField1.borderStyle = UITextBorderStyleRoundedRect;
 textField1.placeholder = @"请输入占位文字";
 textField1.font = [UIFont systemFontOfSize:14];
 // "通过KVC修改占位文字的颜色"
 [textField1 setValue:[UIColor greenColor] forKeyPath:@"_placeholderLabel.textColor"];
 [self.view addSubview:textField1];
方法三:通过重写UITextField的drawPlaceholderInRect:方法修改占位文字颜色
1、自定义一个TextField继承自UITextField
2、重写drawPlaceholderInRect:方法
3、在drawPlaceholderInRect方法中设置placeholder的属性
// 重写此方法
-(void)drawPlaceholderInRect:(CGRect)rect {
 // 计算占位文字的 Size
 CGSize placeholderSize = [self.placeholder sizeWithAttributes:
        @{NSFontAttributeName : self.font}];

 [self.placeholder drawInRect:CGRectMake(0, (rect.size.height - placeholderSize.height)/2, rect.size.width, rect.size.height) withAttributes:
 @{NSForegroundColorAttributeName : [UIColor blueColor],
     NSFontAttributeName : self.font}];
}
总结:
1、当我们使用纯代码创建UITextField时,用第二种方法(KVC)修改占位文字颜色是最便捷的
2、当我们使用XIB或者Storyboard创建UITextField时,通过自定义UITextField,修改占位文字颜色是最适合的。
3、我们也可以在第三种重写方法中,通过结合第二种方法中的KVC修改属性来实现
以上就是本文的全部内容,希望对大家的学习有所帮助,也希望大家多多支持Devmax。