RFC6749
OAuth2的官方文档在RFC6749:https://datatracker.ietf.org/doc/html/rfc6749
以王者荣耀请求微信登录的过程为例
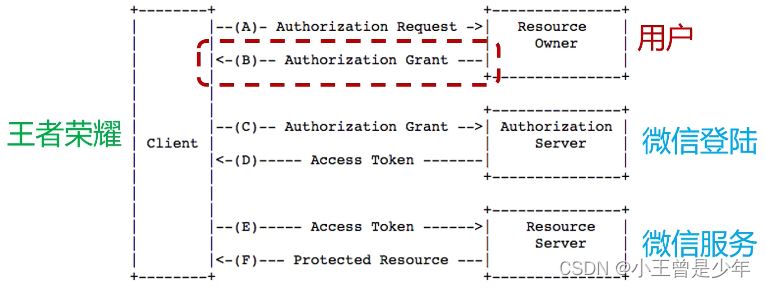
- A:Client申请访问用户资源
- B:用户授权(过程较复杂)一次有效
- C:Client向Server请求一个长时间有效的token
- D:返回token
- E:使用token访问资源
OAuth 2.0授权4大模式
授权码模式:完整、严密,第三方认证和授权的最主流实现
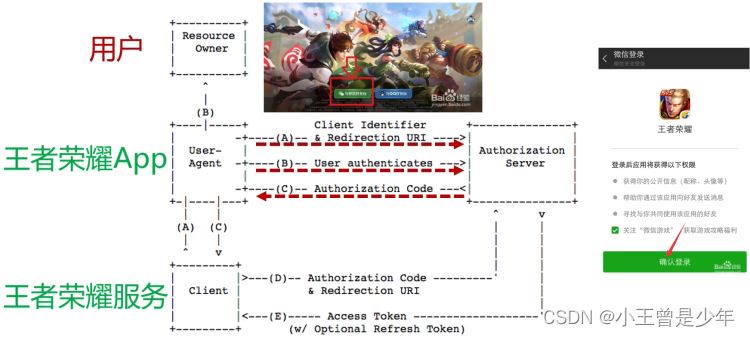
- A:APP请求微信登录
- B:用户信息验证
- C:返回只能使用一次的授权码
- D:APP把授权码发给后台服务,服务请求微信登录请求一个长期有效的token
- E:返回长期有效的token
token只有APP的后台服务和微信的后台才有,二者之间使用token通信,保证数据不易泄露到后台黑客
简化模式:令牌用户可见,移动端的常用实现手段
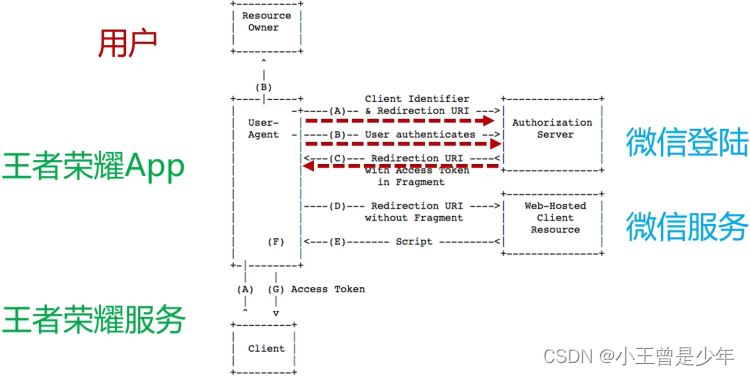
- A:APP请求微信登录
- B:用户信息验证
- C:直接返回一个长期有效的token
密码模式:用户名密码都返回
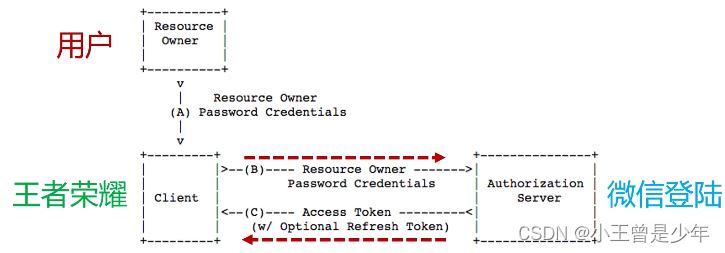
- A:用户把用户名 密码发送给APP
- B:APP可以直接用账号 密码访问微信后台
客户端模式:后台内容应用之间进行访问

微信登录会为APP分配一个内部的特定用户名和密码,APP用这个账号 密码和微信沟通,微信返回一个token,APP可以用这个token做很多部门自身的事情
合同到期后的续约机制
通常拿到Access token时还会拿到一个Refresh token,可以用来延长token的有效期
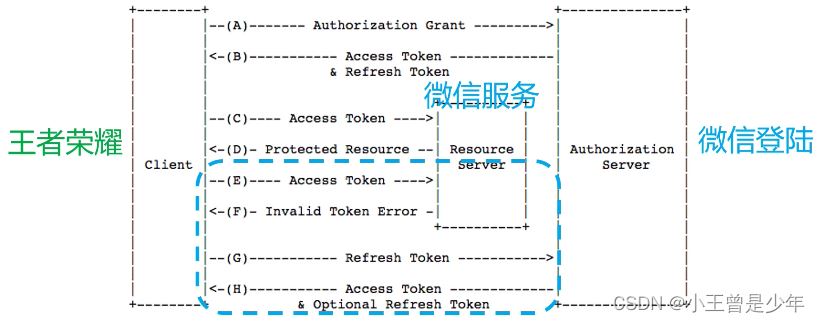
- F:token已过期
- G:使用Refresh token和微信登录沟通,尝试延长token
- H:重新返回一个新的token
OAuth2.0第三方授权实战
oauth-client
表示王者荣耀端
pom文件:
<?xml version="1.0" encoding="UTF-8"?>
<project xmlns="http://maven.apache.org/POM/4.0.0"
         xmlns:xsi="http://www.w3.org/2001/XMLSchema-instance"
         xsi:schemaLocation="http://maven.apache.org/POM/4.0.0 http://maven.apache.org/xsd/maven-4.0.0.xsd">
  <modelVersion>4.0.0</modelVersion>

  <parent>
    <groupId>org.springframework.boot</groupId>
    <artifactId>spring-boot-starter-parent</artifactId>
    <version>2.4.0</version>
    <relativePath/> <!-- lookup parent from repository -->
  </parent>

  <groupId>org.example</groupId>
  <artifactId>oauth-client</artifactId>
  <version>1.0-SNAPSHOT</version>
  <description>Demo project for Spring Boot</description>

  <properties>
    <maven.compiler.source>8</maven.compiler.source>
    <maven.compiler.target>8</maven.compiler.target>
    <spring-cloud.version>2020.0.0-M5</spring-cloud.version>
  </properties>

  <dependencies>
    <dependency>
      <groupId>org.springframework.boot</groupId>
      <artifactId>spring-boot-starter-web</artifactId>
    </dependency>
    <dependency>
      <groupId>org.springframework.cloud</groupId>
      <artifactId>spring-cloud-starter-oauth2</artifactId>
    </dependency>
    <dependency>
      <groupId>org.springframework.cloud</groupId>
      <artifactId>spring-cloud-starter-security</artifactId>
    </dependency>

    <dependency>
      <groupId>org.springframework.boot</groupId>
      <artifactId>spring-boot-starter-test</artifactId>
      <scope>test</scope>
    </dependency>
  </dependencies>

  <dependencyManagement>
    <dependencies>
      <dependency>
        <groupId>org.springframework.cloud</groupId>
        <artifactId>spring-cloud-dependencies</artifactId>
        <version>${spring-cloud.version}</version>
        <type>pom</type>
        <scope>import</scope>
      </dependency>
    </dependencies>
  </dependencyManagement>

  <build>
    <plugins>
      <plugin>
        <groupId>org.springframework.boot</groupId>
        <artifactId>spring-boot-maven-plugin</artifactId>
      </plugin>
    </plugins>
  </build>

  <repositories>
    <repository>
      <id>spring-milestones</id>
      <name>Spring Milestones</name>
      <url>https://repo.spring.io/milestone</url>
    </repository>
  </repositories>

</project>
SpringBoot的经典启动类:
package com.wjw.oauthclient;

import org.springframework.boot.SpringApplication;
import org.springframework.boot.autoconfigure.SpringBootApplication;

@SpringBootApplication
public class OauthClientApplication {
    public static void main(String[] args) {
        SpringApplication.run(OauthClientApplication.class, args);
    }
}
创建OAuth2的配置类:
package com.wjw.oauthclient.config;

import org.springframework.boot.autoconfigure.security.oauth2.client.EnableOAuth2Sso;
import org.springframework.context.annotation.Configuration;
import org.springframework.security.config.annotation.web.builders.HttpSecurity;
import org.springframework.security.config.annotation.web.configuration.WebSecurityConfigurerAdapter;

//激活OAuth2 SSO客户端
@Configuration
@EnableOAuth2Sso
public class SecurityConfig extends WebSecurityConfigurerAdapter {
    @Override
    protected void configure(HttpSecurity http) throws Exception {
        http.authorizeRequests()
            .anyRequest()
            .authenticated()
            .and()
            .csrf()
            .disable();
    }
}

配置文件application.yaml:
security.oauth2.client.client-secret=my_client_secret
security.oauth2.client.client-id=my_client_id
security.oauth2.client.user-authorization-uri=http://localhost:9090/oauth/authorize
security.oauth2.client.access-token-uri=http://localhost:9090/oauth/token
security.oauth2.resource.user-info-uri=http://localhost:9090/user

server.port=8080

server.servlet.session.cookie.name=ut
- 定义用户id为my_client_id,密码为my_client_secret
- 定义“微信登录服务”为:http://localhost:9090/oauth/authorize
- 请求长期有效token的地址为:http://localhost:9090/oauth/token
- 拿到token后请求用户信息的地址为:http://localhost:9090/user
oauth-server
表示微信客户端
pom文件:
<?xml version="1.0" encoding="UTF-8"?>
<project xmlns="http://maven.apache.org/POM/4.0.0" xmlns:xsi="http://www.w3.org/2001/XMLSchema-instance"
         xsi:schemaLocation="http://maven.apache.org/POM/4.0.0 https://maven.apache.org/xsd/maven-4.0.0.xsd">
  <modelVersion>4.0.0</modelVersion>
  <parent>
    <groupId>org.springframework.boot</groupId>
    <artifactId>spring-boot-starter-parent</artifactId>
    <version>2.4.0</version>
    <relativePath/> <!-- lookup parent from repository -->
  </parent>
  <groupId>com.example</groupId>
  <artifactId>oauth-server</artifactId>
  <version>0.0.1-SNAPSHOT</version>
  <name>oauth-server</name>
  <description>Demo project for Spring Boot</description>

  <properties>
    <java.version>1.8</java.version>
    <spring-cloud.version>2020.0.0-M5</spring-cloud.version>
  </properties>

  <dependencies>
    <dependency>
      <groupId>org.springframework.boot</groupId>
      <artifactId>spring-boot-starter-web</artifactId>
    </dependency>
    <dependency>
      <groupId>org.springframework.cloud</groupId>
      <artifactId>spring-cloud-starter-oauth2</artifactId>
    </dependency>
    <dependency>
      <groupId>org.springframework.cloud</groupId>
      <artifactId>spring-cloud-starter-security</artifactId>
    </dependency>

    <dependency>
      <groupId>org.springframework.boot</groupId>
      <artifactId>spring-boot-starter-test</artifactId>
      <scope>test</scope>
    </dependency>

  </dependencies>

  <dependencyManagement>
    <dependencies>
      <dependency>
        <groupId>org.springframework.cloud</groupId>
        <artifactId>spring-cloud-dependencies</artifactId>
        <version>${spring-cloud.version}</version>
        <type>pom</type>
        <scope>import</scope>
      </dependency>
    </dependencies>
  </dependencyManagement>

  <build>
    <plugins>
      <plugin>
        <groupId>org.springframework.boot</groupId>
        <artifactId>spring-boot-maven-plugin</artifactId>
      </plugin>
    </plugins>
  </build>

  <repositories>
    <repository>
      <id>spring-milestones</id>
      <name>Spring Milestones</name>
      <url>https://repo.spring.io/milestone</url>
    </repository>
  </repositories>

</project>
创建SpringBoot启动类:
package com.wjw.oauthserver;
import org.springframework.boot.SpringApplication;
import org.springframework.boot.autoconfigure.SpringBootApplication;
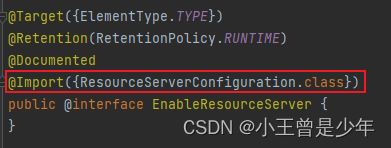
import org.springframework.security.oauth2.config.annotation.web.configuration.EnableResourceServer;
@SpringBootApplication
@EnableResourceServer
public class OauthServerApplication {
public static void main(String[] args) {
SpringApplication.run(OauthServerApplication.class, args);
}
}
创建controller:
提供一个API接口,模拟资源服务器
package com.wjw.oauthserver.controller;

import org.springframework.web.bind.annotation.GetMapping;
import org.springframework.web.bind.annotation.RestController;

import java.security.Principal;

@RestController
public class UserController {
    @GetMapping("/user")
    public Principal getCurrentUser(Principal principal) {
        return principal;
    }
}
创建oauth2的关键配置类:
package com.wjw.oauthserver.config;

import org.springframework.beans.factory.annotation.Autowired;
import org.springframework.context.annotation.Configuration;
import org.springframework.security.crypto.password.PasswordEncoder;
import org.springframework.security.oauth2.config.annotation.configurers.ClientDetailsServiceConfigurer;
import org.springframework.security.oauth2.config.annotation.web.configuration.AuthorizationServerConfigurerAdapter;
import org.springframework.security.oauth2.config.annotation.web.configuration.EnableAuthorizationServer;

@Configuration
@EnableAuthorizationServer
public class AuthorizationServerConfig extends AuthorizationServerConfigurerAdapter {
    @Autowired
    PasswordEncoder passwordEncoder;

    @Override
    public void configure(ClientDetailsServiceConfigurer clients) throws Exception {
        clients.inMemory() // 在内存里
                .withClient("my_client_id")
                .secret(passwordEncoder.encode("my_client_secret")) // 加密密码
                .autoApprove(true)  // 允许所有子类用户登录
                .redirectUris("http://localhost:8080/login")    // 反跳会登录页面
                .scopes("all")
                .accessTokenValiditySeconds(3600)
                .authorizedGrantTypes("authorization_code");    // 4大模式里的授权码模式
    }
}
现在需要提供一个登录页面让用户输入用户名和密码,并设置一个管理员账户:
package com.wjw.oauthserver.config;

import org.springframework.context.annotation.Bean;
import org.springframework.context.annotation.Configuration;
import org.springframework.core.annotation.Order;
import org.springframework.security.config.annotation.authentication.builders.AuthenticationManagerBuilder;
import org.springframework.security.config.annotation.web.builders.HttpSecurity;
import org.springframework.security.config.annotation.web.configuration.EnableWebSecurity;
import org.springframework.security.config.annotation.web.configuration.WebSecurityConfigurerAdapter;
import org.springframework.security.crypto.bcrypt.BCryptPasswordEncoder;
import org.springframework.security.crypto.password.PasswordEncoder;

@Configuration
@EnableWebSecurity
@Order(1)
public class SecurityConfig extends WebSecurityConfigurerAdapter {
    @Bean
    PasswordEncoder passwordEncoder() {
        return new BCryptPasswordEncoder();
    }

    @Override
    protected void configure(HttpSecurity http) throws Exception {
        http.requestMatchers()
                .antMatchers("/login")
                .antMatchers("/oauth/authorize")
                .and()
                .authorizeRequests().anyRequest().authenticated()
                .and()
                .formLogin()
                .permitAll()
                .and()
                .csrf().disable();
    }

    @Override
    protected void configure(AuthenticationManagerBuilder auth) throws Exception {
        auth.inMemoryAuthentication()
                .withUser("wjw")
                .password(passwordEncoder().encode("123456"))
                .roles("admin");
    }
}
配置文件application.yaml:
server.port=9090
分别启动oauth-server和oauth-client进行测试:
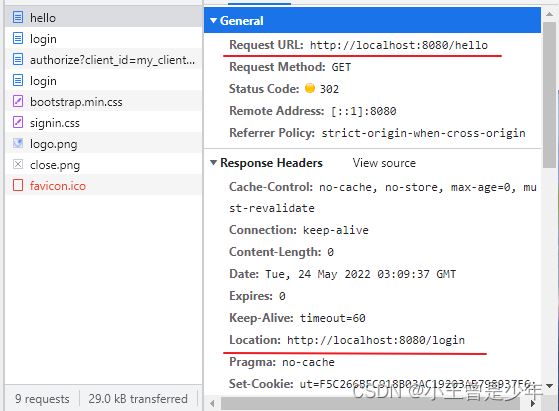
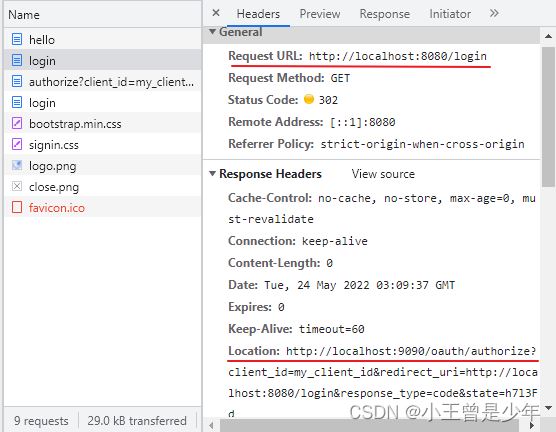
访问localhost:8080/hello
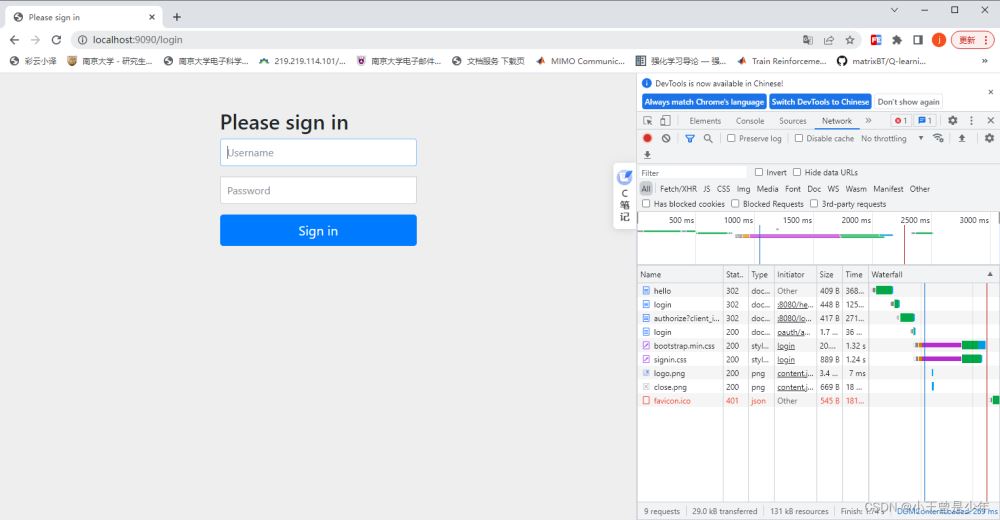
访问hello时会重定向到login
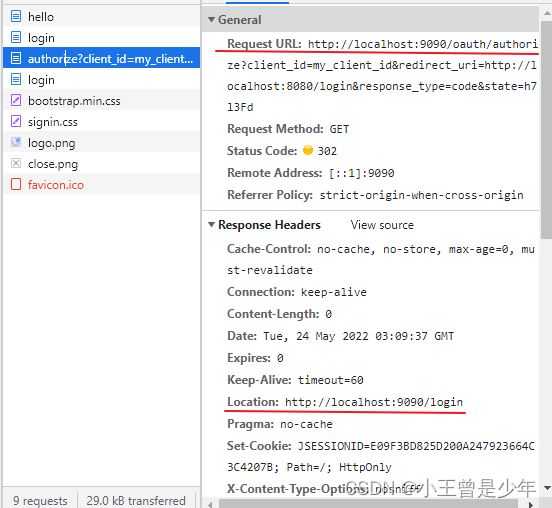
访问登录时又会重定向到微信登录:
之后又会重定向到:
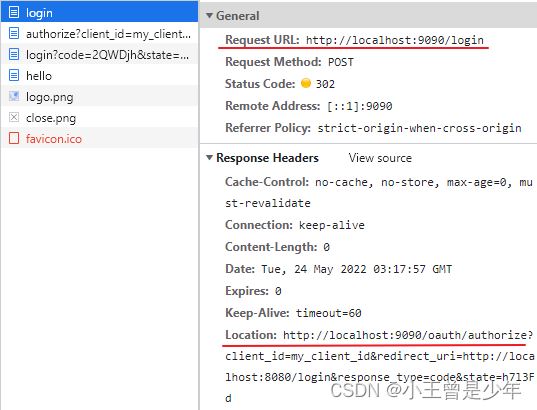
输入账户名 密码:

继续看控制台:
登录成功后还是会被重定向
此时再访问就会有授权码了(只能用一次):
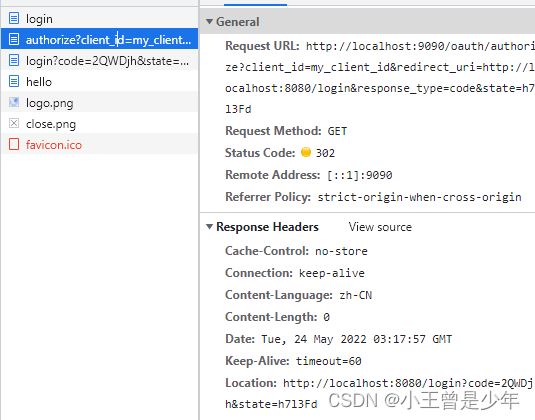
此时浏览器拿着授权码才去真正请求王者荣耀的hello接口(浏览器自动使用授权码交换token,对用户透明):
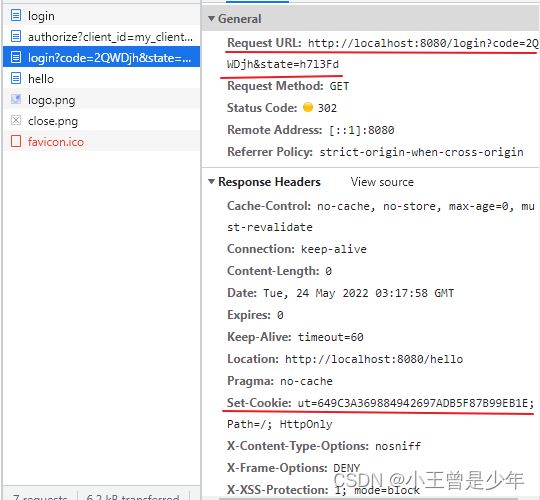
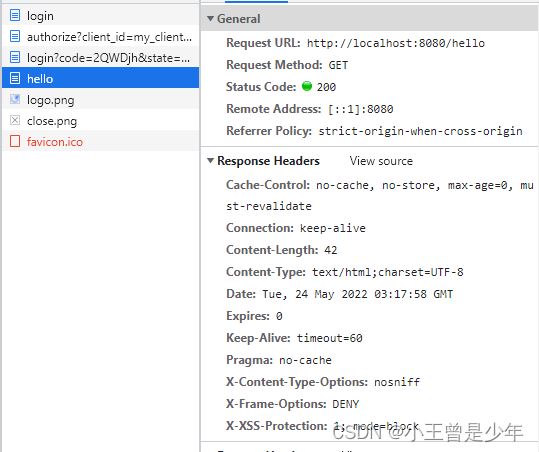
王者荣耀使用授权码请求微信得到一个token和用户信息并返回给浏览器,浏览器再使用这个token调王者荣耀的hello接口拿用户信息:
到此这篇关于Java中OAuth2.0第三方授权原理与实战的文章就介绍到这了,更多相关Java OAuth2.0第三方授权内容请搜索Devmax以前的文章或继续浏览下面的相关文章希望大家以后多多支持Devmax!