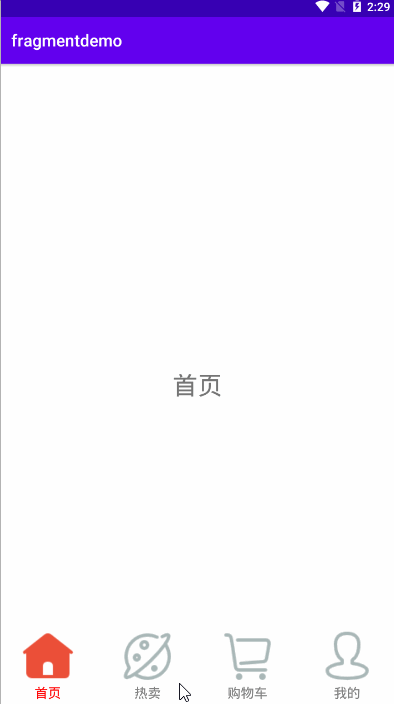
在一些购物商城中经常会遇到这类效果,效果图如下:
先看效果图
步骤一:
完成对主界面main.xml的创建:
<?xml version="1.0" encoding="utf-8"?>
<RelativeLayout xmlns:android="http://schemas.android.com/apk/res/android"
    xmlns:app="http://schemas.android.com/apk/res-auto"
    xmlns:tools="http://schemas.android.com/tools"
    android:layout_width="match_parent"
    android:layout_height="match_parent"
    tools:context=".MainActivity">

    <FrameLayout
        android:id="@ id/fragment_layout"
        android:layout_width="match_parent"
        android:layout_height="match_parent"
        android:layout_alignParentTop="true"
        />

    <RadioGroup
        android:layout_width="match_parent"
        android:layout_height="wrap_content"
        android:id="@ id/rg_group"
        android:layout_alignParentBottom="true"
        android:orientation="horizontal"
        >
        <RadioButton
            android:id="@ id/rb_home"
            android:layout_width="0dp"
            android:layout_height="match_parent"
            android:layout_weight="1"
            android:button="@null"
            style="@style/fragment"
            android:drawableTop="@drawable/rb_home_selector"
            android:text="首页"
            />
        <RadioButton
            android:id="@ id/rb_discover"
            android:layout_width="0dp"
            android:layout_height="match_parent"
            android:layout_weight="1"
            android:button="@null"
            style="@style/fragment"
            android:drawableTop="@drawable/rb_discover_selector"
            android:text="热卖"
            />
        <RadioButton
            android:id="@ id/rb_cart"
            android:layout_width="0dp"
            android:layout_height="match_parent"
            android:layout_weight="1"
            android:button="@null"
            style="@style/fragment"
            android:drawableTop="@drawable/rb_cart_selector"
            android:text="购物车"
            />
        <RadioButton
            android:id="@ id/rb_user"
            android:layout_width="0dp"
            android:layout_height="match_parent"
            android:layout_weight="1"
            android:button="@null"
            style="@style/fragment"
            android:drawableTop="@drawable/rb_user_selector"
            android:text="我的"
            />
    </RadioGroup>
</RelativeLayout>
radioButton中重复使用的样式:被抽取出来在style中写出
<style name="fragment">
        <item name="android:layout_width">match_parent</item>
        <item name="android:layout_height">match_parent</item>
        <item name="android:padding">5dp</item>
        <item name="android:gravity">center</item>
        <item name="android:textColor">@drawable/rb_text_color</item>
        <item name="android:textSize">16sp</item>
        <item name="android:textStyle">normal</item>
    </style>
点击RadioButton之后,导航栏文字颜色发生改变,声明在drawable中
名字为:rb_text_color代码如下:
<?xml version="1.0" encoding="utf-8"?>
<selector xmlns:android="http://schemas.android.com/apk/res/android">
    <item android:state_selected="true" android:color="#FF0000"/>
    <item android:color="#808080"/>
</selector>
导航栏图标发生变化这里只写其中一个其他三个都基本一样:
<?xml version="1.0" encoding="utf-8"?>
<selector xmlns:android="http://schemas.android.com/apk/res/android">
    <item android:drawable="@drawable/icon_cartfill_press" android:state_selected="true" />
    <item android:drawable="@drawable/icon_cart" />
</selector>
完成这些基本步骤之后,接下来就需要写Fragment的布局
<?xml version="1.0" encoding="utf-8"?>
<LinearLayout xmlns:android="http://schemas.android.com/apk/res/android"
    android:layout_width="match_parent"
    android:layout_height="match_parent"
    android:gravity="center">

    <TextView
        android:id="@ id/tv_cart"
        android:layout_width="wrap_content"
        android:layout_height="wrap_content"
        android:text="购物车"
        android:textSize="30sp" />
</LinearLayout>
写出其中一个另外三个类似。
之后后台代码中创建Fragment,这里也写其中一个:CartFragment
package com.example.fragmentdemo;

import android.os.Bundle;
import android.view.LayoutInflater;
import android.view.View;
import android.view.ViewGroup;
import android.widget.TextView;

import androidx.annotation.NonNull;
import androidx.annotation.Nullable;
import androidx.fragment.app.Fragment;

public class CartFragment extends Fragment {
    private View view;
    private TextView tv_home;

    @Nullable
    @Override
    public View onCreateView(@NonNull LayoutInflater inflater, @Nullable ViewGroup container, @Nullable Bundle savedInstanceState) {
        if (view==null){
            view = inflater.inflate(R.layout.cart_fragment,container,false);
        }
        return view;
    }
}
步骤二:在MainActivity中,完成对fragment的切换功能
具体注释已在代码中给出。
package com.example.fragmentdemo;

import androidx.appcompat.app.AppCompatActivity;
import androidx.fragment.app.Fragment;
import androidx.fragment.app.FragmentManager;
import androidx.fragment.app.FragmentTransaction;

import android.os.Bundle;
import android.util.Log;
import android.view.View;
import android.widget.RadioButton;
import android.widget.RadioGroup;

import java.time.LocalDate;
import java.util.ArrayList;
import java.util.List;

public class MainActivity extends AppCompatActivity implements RadioGroup.OnCheckedChangeListener {

    private RadioButton rb_home,rb_discover,rb_cart,rb_user;
    private RadioGroup rg_group;
    private List<Fragment> fragments;
    private int position=0;
    private static final String TAG = "MainActivity";

    @Override
    protected void onCreate(Bundle savedInstanceState) {
        super.onCreate(savedInstanceState);
        setContentView(R.layout.activity_main);

        rb_home=findViewById(R.id.rb_home);
        rb_discover=findViewById(R.id.rb_discover);
        rb_cart=findViewById(R.id.rb_cart);
        rb_user=findViewById(R.id.rb_user);
        rg_group=findViewById(R.id.rg_group);

        //默认选中第一个
        rb_home.setSelected(true);


        rg_group.setOnCheckedChangeListener(this);

        //初始化fragment
        initFragment();

        //默认布局,选第一个
        defaultFragment();
    }

    private void defaultFragment() {
        FragmentManager fragmentManager = getSupportFragmentManager();
        FragmentTransaction transaction = fragmentManager.beginTransaction();
        transaction.replace(R.id.fragment_layout,fragments.get(0));
        transaction.commit();
    }

    private void setSelected() {
        rb_home.setSelected(false);
        rb_discover.setSelected(false);
        rb_cart.setSelected(false);
        rb_user.setSelected(false);
    }

    private void initFragment() {
        fragments = new ArrayList<>();
        fragments.add(0,new HomeFragment());
        fragments.add(1,new DiscoverFragment());
        fragments.add(2,new CartFragment());
        fragments.add(3,new UserFragment());


    }

    @Override
    public void onCheckedChanged(RadioGroup group, int i) {
        //获取fragment管理类对象
        FragmentManager fragmentManager = getSupportFragmentManager();
        //拿到fragmentManager的触发器
        FragmentTransaction transaction = fragmentManager.beginTransaction();
        switch (i){
            case R.id.rb_home:
                position=0;
                //调用replace方法,将fragment,替换到fragment_layout这个id所在UI,或者这个控件上面来
                //这是创建replace这个事件,如果想要这个事件执行,需要把这个事件提交给触发器
                //用commit()方法
                transaction.replace(R.id.fragment_layout,fragments.get(0));
                //将所有导航栏设成默认色
                setSelected();
                rb_home.setSelected(true);
                break;
            case R.id.rb_discover:
                position=1;
                transaction.replace(R.id.fragment_layout,fragments.get(1));
                //将所有导航栏设成默认色
                setSelected();
                rb_discover.setSelected(true);
                break;
            case R.id.rb_cart:
                position=2;
                transaction.replace(R.id.fragment_layout,fragments.get(2));
                //将所有导航栏设成默认色
                setSelected();
                rb_cart.setSelected(true);
                break;
            case R.id.rb_user:
                position=3;
                transaction.replace(R.id.fragment_layout,fragments.get(3));
                //将所有导航栏设成默认色
                setSelected();
                rb_user.setSelected(true);
                break;
        }
        //事件的提交
        transaction.commit();
    }
}
这样就完成了一个简单的底部导航栏功能,这个只能通过点击切换fragment,不能通过左右滑动去切换fragment。
以上就是Android 中使用RadioGroup Fragment实现底部导航栏的功能的详细内容,更多关于android 底部导航栏的资料请关注Devmax其它相关文章!