👉实践过程
前面我们学完了EditText和TextView两个组件,但是,光学不练没意思。
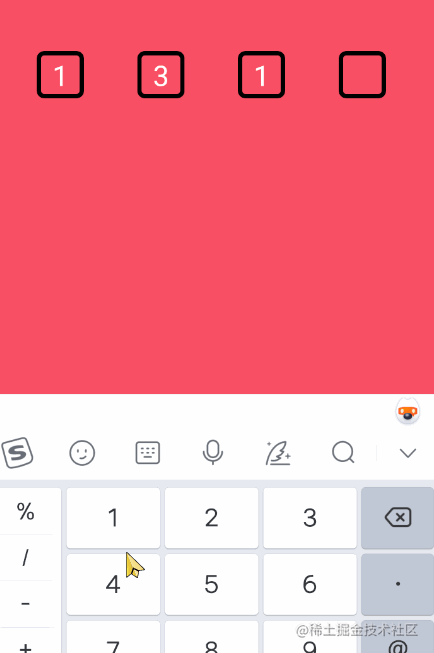
所以今天我们趁热打铁,利用两个组件实现个自定义验证码输入框。
思路前瞻:
- 隐形EditText接收输入,显性TextView展示内容
- 时刻监听EditText回调更改内容
- 自定义RelativeLayout
布局代码:
<?xml version="1.0" encoding="utf-8"?><!--自定义验证码View-->
<RelativeLayout xmlns:android="http://schemas.android.com/apk/res/android"
    android:layout_width="match_parent"
    android:layout_height="match_parent"
    android:background="#F84F64"
    android:paddingTop="100dp">
    <!--线性布局-orientation="horizontal"水平方向-->
    <LinearLayout
        android:layout_width="wrap_content"
        android:layout_height="wrap_content"
        android:orientation="horizontal">

        <View
            android:layout_width="0dp"
            android:layout_height="1dp"
            android:layout_weight="1" />

        <TextView
            android:id="@ id/txtCode1"
            android:layout_width="wrap_content"
            android:layout_height="wrap_content"
            android:background="@drawable/edittext_kuang"
            android:gravity="center"
            android:textColor="#ffffff"
            android:textSize="26sp" />

        <View
            android:layout_width="0dp"
            android:layout_height="1dp"
            android:layout_weight="1" />

        <TextView
            android:id="@ id/txtCode2"
            android:layout_width="wrap_content"
            android:layout_height="wrap_content"
            android:background="@drawable/edittext_kuang"
            android:gravity="center"
            android:textColor="#ffffff"
            android:textSize="26sp" />

        <View
            android:layout_width="0dp"
            android:layout_height="1dp"
            android:layout_weight="1" />

        <TextView
            android:id="@ id/txtCode3"
            android:layout_width="wrap_content"
            android:layout_height="wrap_content"
            android:background="@drawable/edittext_kuang"
            android:gravity="center"
            android:textColor="#ffffff"
            android:textSize="26sp" />

        <View
            android:layout_width="0dp"
            android:layout_height="1dp"
            android:layout_weight="1" />

        <TextView
            android:id="@ id/txtCode4"
            android:layout_width="wrap_content"
            android:layout_height="wrap_content"
            android:background="@drawable/edittext_kuang"
            android:gravity="center"
            android:textColor="#ffffff"
            android:textSize="26sp" />

         <View
            android:layout_width="0dp"
            android:layout_height="1dp"
            android:layout_weight="1" />
    </LinearLayout>

    <EditText
        android:id="@ id/editCode"
        android:layout_width="match_parent"
        android:layout_height="50dp"
        android:background="@android:color/transparent"
        android:inputType="number" />
</RelativeLayout>
自定义View代码
/**
 * Created by akitaka on 2022-01-26.
 *
 * @author akitaka
 * @filename VerificationCodeViewJava
 * @describe 自定义验证码view-Java代码
 * @email 960576866@qq.com
 */
public class VerificationCodeViewJava extends RelativeLayout {
    private EditText editText;
    private List<TextView> textViewList = new ArrayList<>();
    private StringBuffer stringBuffer = new StringBuffer();

    public VerificationCodeViewJava(Context context, AttributeSet attrs) {
        this(context, attrs, 0);
    }

    public VerificationCodeViewJava(Context context, AttributeSet attrs, int defStyleAttr) {
        super(context, attrs, defStyleAttr);
        //添加布局内容
        View.inflate(context, R.layout.view_verification_code, this);
        editText = findViewById(R.id.editCode);
        textViewList.add(findViewById(R.id.txtCode1));
        textViewList.add(findViewById(R.id.txtCode2));
        textViewList.add(findViewById(R.id.txtCode3));
        textViewList.add(findViewById(R.id.txtCode4));

        editText.addTextChangedListener(new TextWatcher() {

            @Override
            public void beforeTextChanged(CharSequence s, int start, int count, int after) {

            }

            @Override
            public void onTextChanged(CharSequence s, int start, int before, int count) {

            }

            @Override
            public void afterTextChanged(Editable s) {
                //如果有字符输入时才进行操作
                if (!s.toString().equals("")) {
                    //我们限制了4个验证码
                    if (stringBuffer.length() > 3) {
                        editText.setText("");
                        return;
                    } else {
                        stringBuffer.append(s);
                        //因为editText是辅助的,根本字符串是stringBuffer,所以将EditText置空
                        editText.setText("");
                        //现在很多App都是输入完毕后自动进入下一步逻辑,所以咱们一般都是在这监听,完成后进行回调业务即可
                        if (stringBuffer.length() == 4) {
                            //验证码输入完毕了,自动进行验证逻辑
                        }
                    }

                    for (int i = 0; i < stringBuffer.length(); i  ) {
                        textViewList.get(i).setText(stringBuffer.charAt(i)   "");
                    }
                }
            }
        });

        //设置删除按键的监听
        editText.setOnKeyListener(new OnKeyListener() {
            @Override
            public boolean onKey(View v, int keyCode, KeyEvent event) {
                if (keyCode == KeyEvent.KEYCODE_DEL && event.getAction() == KeyEvent.ACTION_DOWN) {
                    if (stringBuffer.length() > 0) {
                        //删除字符
                        stringBuffer.delete(stringBuffer.length() - 1, stringBuffer.length());
                        //将TextView显示内容置空
                        textViewList.get(stringBuffer.length()).setText("");
                    }
                    return true;
                }
                return false;
            }
        });
    }
/**
* Created by akitaka on 2022-01-26.
* @author akitaka
* @filename VerificationCodeViewKotlin
* @describe 自定义验证码view-Kotlin代码
* @email 960576866@qq.com
*/
class VerificationCodeViewKotlin : RelativeLayout {
private var editText: EditText? = null
private val textViewList: MutableList<TextView> = ArrayList()
private val stringBuffer = StringBuffer()
constructor(context: Context?) : this(context, null)
constructor(context: Context?, attrs: AttributeSet?) : this(context, attrs, 0)
constructor(context: Context?, attrs: AttributeSet?, defStyleAttr: Int) : super(context, attrs, defStyleAttr)
init {
//添加布局内容
View.inflate(context, R.layout.view_verification_code, this)
editText = findViewById(R.id.editCode)
textViewList.add(findViewById(R.id.txtCode1))
textViewList.add(findViewById(R.id.txtCode2))
textViewList.add(findViewById(R.id.txtCode3))
textViewList.add(findViewById(R.id.txtCode4))
editText!!.addTextChangedListener(object : TextWatcher {
override fun beforeTextChanged(s: CharSequence, start: Int, count: Int, after: Int) {}
override fun onTextChanged(s: CharSequence, start: Int, before: Int, count: Int) {}
override fun afterTextChanged(s: Editable) {
//如果有字符输入时才进行操作
if (s.toString() != "") {
//我们限制了4个验证码
if (stringBuffer.length > 3) {
editText!!.setText("")
return
} else {
stringBuffer.append(s)
//因为editText是辅助的,根本字符串是stringBuffer,所以将EditText置空
editText!!.setText("")
//现在很多App都是输入完毕后自动进入下一步逻辑,所以咱们一般都是在这监听,完成后进行回调业务即可
if (stringBuffer.length == 4) {
//验证码输入完毕了,自动进行验证逻辑
}
}
for (i in 0 until stringBuffer.length) {
textViewList[i].text = stringBuffer[i].toString() ""
}
}
}
})
//设置删除按键的监听
editText!!.setOnKeyListener(OnKeyListener { v, keyCode, event ->
if (keyCode == KeyEvent.KEYCODE_DEL && event.action == KeyEvent.ACTION_DOWN) {
if (stringBuffer.length > 0) {
//删除字符
stringBuffer.delete(stringBuffer.length - 1, stringBuffer.length)
//将TextView显示内容置空
textViewList[stringBuffer.length].text = ""
}
return@OnKeyListener true
}
false
})
}
}直接在目标Activity(页面)布局中使用即可
<?xml version="1.0" encoding="utf-8"?>
<RelativeLayout xmlns:android="http://schemas.android.com/apk/res/android"
    android:layout_width="match_parent"
    android:layout_height="match_parent">

    <cn.appstudy.customView.VerificationCodeViewJava
        android:layout_width="match_parent"
        android:visibility="gone"
        android:layout_height="match_parent" />

    <!-- 或者-->
    <cn.appstudy.customView.VerificationCodeViewKotlin
        android:layout_width="match_parent"
        android:layout_height="match_parent" />
</RelativeLayout>
😜总结
刚学Android的朋友可能又疑惑了,里面涉及了RelativeLayout和自定义View的知识。没错,小空几种验证码的实现方案特意选的这个,这样我们就引出了下一篇文章布局容器的知识:RelativeLayout(相对布局容器)和LinearLayout(线性布局容器)
当然了,设计千奇百怪。上面只是普通的实现,还做过下面俩功能需求
自定义验证码输入,自定义输入键盘的-不推荐
直接包含了输入按键写到整个页面UI里,禁止软(小)键盘弹出的-较推荐
但不管什么需求,用的是EditText或TextView
都逃脱不了EditText的【addTextChangedListener】、【InputFilter】、【android:inputType】几个知识点以及TextView的基本属性应用。
更多需求的创意解决方案就靠大家多想想了,有时候基本的技术解决困难的需求反而更轻松快捷。
到此这篇关于Android自定义验证码输入框的文章就介绍到这了,更多相关Android自定义验证码输入框内容请搜索Devmax以前的文章或继续浏览下面的相关文章希望大家以后多多支持Devmax!