本文默认 spring 版本是 spring5
1 spring 加载 yml 文件
2 spring 加载 properties 文件
3 spring 加载 系统磁盘 文件
4 spring 加载 xml 文件
5 Java 基于 InputStream 读取 properties 配置文件
spring框架默认加载配置:
resources 下的文件名称为application的 application.yml 以及 application.properties, 默认会被spring加载到容器 Container
中,如果他们有重复的配置项,会被默认合并,并且 application.properties优先级更高. 下面的 LoadYmlTest.java 有详细解释
示例:
# application.yml
user:
userName: ifredom_name
age: 30 # 定义了属性 age
# application.properties
# 也定义了属性 age
user.age=99
user.sex=2
package com.example.commonmybatisplus.config;
import lombok.Data;
import org.springframework.boot.context.properties.ConfigurationProperties;
import org.springframework.context.annotation.Configuration;
import org.springframework.context.annotation.PropertySource;
/**
 * 配置类
 * spring默认规则:自动将 resources 下名称为 application 的 yml 和 properties 文件加载为bean
 * 注意: 一定要有 get 和 set 方法,此处通过 @Data 注解注入
 */
@Data
@Configuration
@ConfigurationProperties(prefix = "user")
public class LoadPropertySourceYmlConfig {
    private String userName;
    private int sex;
    private int age;
}
package com.example.commonmybatisplus.PropertySourceTest;
import com.example.commonmybatisplus.config.LoadPropertySourceYmlConfig;
import com.example.commonmybatisplus.entity.UserEntity;
import org.junit.jupiter.api.Test;
import org.springframework.beans.factory.annotation.Autowired;
import org.springframework.boot.test.context.SpringBootTest;
import org.springframework.core.env.Environment;
/**
 * 测试
 * 从结果可知: age的值为99,证明了 properties的优先级高于yml
 * 事实上,spring最早支持 properties 类型文件,后来才支持的yml,所以为了兼容
 * 一定是 properties > yml 优先级。
 * 即便将来又出现了 XXX.abc 文件
 * 那么为了兼容,永远时最早支持的优先级更高,也就是 properties > yml >abc
 */
@SpringBootTest
public class LoadYmlTest {
    @Autowired
    private LoadPropertySourceYmlConfig ymlConfig;
    @Test
    public void testYml() {
        String name = ymlConfig.getUserName();
        int sex = ymlConfig.getSex();
        int age = ymlConfig.getAge();
        System.out.println(name); // ifredom
        System.out.println(sex);  // 2
        System.out.println(age);  // 99
    }
}
1.spring加载yml文件
上面已经通过默认的方式演示了如何加载默认的application.yml,但是更好的写法是,将我们自定义的配置独立为一个单独的文件。
比如我们开发微信公众号,小程序开发时,就需要用到配置,此时的配置就应该独立为一个额外的文件。(此处将演示加载为 List)
一共有3步:
- 创建配置文件
wechat-config.yml - 定义配置类
LoadPropertySourceYmlConfig,用来加载yml中的数据 (指定配置类的加载器) (因为 spring 配置类的默认加载器是 PropertiesLoader加载器,所以我们需要自定义 yml加载器。可以自行查看注解 @PropertySource 源码) - 自定义配置类加载器
YamlSourceFactory,继承Spring提供的默认配置类构造器DefaultPropertySourceFactory - 测试
示例:
# main/resources/chat-config.yml
#微信小程序的appid
appid: app-xxx
#微信小程序的Secret
secret: secretxxx
#微信小程序消息服务器配置的token
token: token-xxx
#微信小程序消息服务器配置的EncodingAESKey
aesKey: aesKey-xxxwx:
configs:
#微信小程序的appid
- appid: app1
#微信小程序的Secret
secret: secret1
#微信小程序消息服务器配置的token
token: token1
#微信小程序消息服务器配置的EncodingAESKey
aesKey: aesKey1#微信小程序的appid
- appid: appid2
#微信小程序的Secret
secret: secret2
#微信小程序消息服务器配置的token
token: token2
#微信小程序消息服务器配置的EncodingAESKey
aesKey: aesKey2def-my-var1: 定义配置属性var1
def-my-var2: 定义配置属性var2
这里需要注意,在上面的配置文件中是 wx.configs, 因此在配置类中,也必须用同名的 configs 来接收
package com.example.commonmybatisplus.config;
import lombok.Data;
import org.springframework.boot.context.properties.ConfigurationProperties;
import org.springframework.context.annotation.Configuration;
import org.springframework.context.annotation.PropertySource;
import org.springframework.core.io.support.PropertySourceFactory;
import org.springframework.stereotype.Component;
import java.util.List;
/**
 * 注意:factory的值,为接下来自定义的加载器
 */
@Data
@Configuration
@PropertySource(value = "classpath:wechat-config.yml", factory = YamlSourceFactory.class)
@ConfigurationProperties(prefix = "wx")
public class LoadPropertySourceYmlConfig {
    private List<Config> configs;
    @Data
    public static class Config {
        private String appid;
        private String secret;
        private String token;
        private String aesKey;
    }
    private String appid;
    private String secret;
    private String token;
    private String aesKey;
}
// 自定义记载器
package com.example.commonmybatisplus.config;
import org.springframework.boot.env.YamlPropertySourceLoader;
import org.springframework.core.env.PropertySource;
import org.springframework.core.io.support.DefaultPropertySourceFactory;
import org.springframework.core.io.support.EncodedResource;
import java.io.IOException;
import java.util.List;
public class YamlSourceFactory extends DefaultPropertySourceFactory {
@Override
public PropertySource<?> createPropertySource(String name, EncodedResource resource) throws IOException {
// 这里使用Yaml配置加载类来读取yml文件信息
List<PropertySource<?>> sources = new YamlPropertySourceLoader().load(resource.getResource().getFilename(), resource.getResource());
return sources.get(0);
}
}
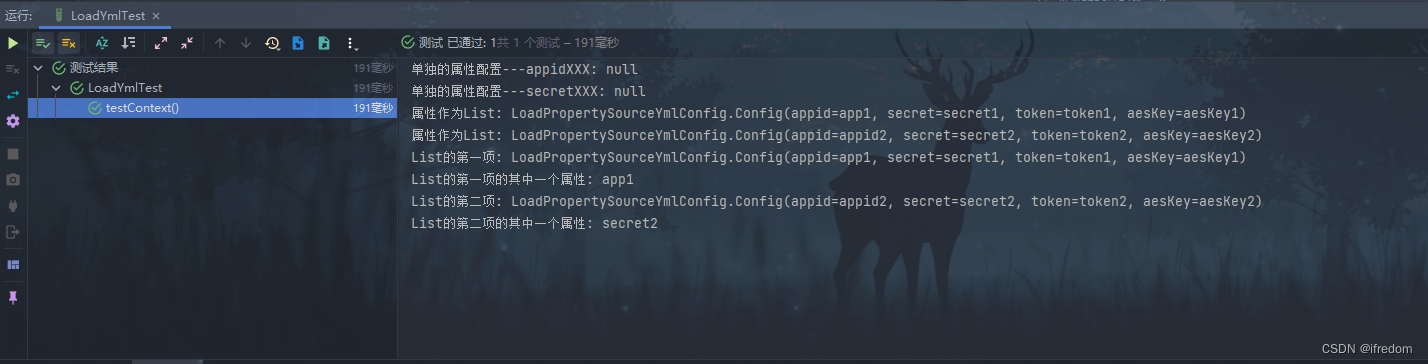
测试结果
package com.example.commonmybatisplus.PropertySourceTest;
import com.example.commonmybatisplus.config.LoadPropertySourceYmlConfig;
import org.junit.jupiter.api.Test;
import org.springframework.beans.factory.annotation.Autowired;
import org.springframework.boot.test.context.SpringBootTest;
import java.util.List;
/**
 * @Author ifredomvip@gmail.com
 * @Date 2022/6/15 10:40
 * @Version 1.0.0
 * @Description
 **/
@SpringBootTest
public class LoadYmlTest {
    @Autowired
    private LoadPropertySourceYmlConfig ymlConfig;
    @Test
    public void testYml() {
        String appidXXX = ymlConfig.getAppid();
        String secretXXX = ymlConfig.getSecret();
        System.out.println("单独的属性配置---appidXXX: "   appidXXX);
        System.out.println("单独的属性配置---secretXXX: "   secretXXX);
        // 以下演示 配置项作为 List
        List<LoadPropertySourceYmlConfig.Config> configs = ymlConfig.getConfigs();
        // 迭代 List 每一项
        for (LoadPropertySourceYmlConfig.Config config : configs) {
            System.out.println("属性作为List: "   config);
        }
        // 获取List种的某一项
        LoadPropertySourceYmlConfig.Config configFirst = configs.get(0);
        String appidFirst = configFirst.getAppid();
        System.out.println("List的第一项: "   configFirst);
        System.out.println("List的第一项的其中一个属性: "   appidFirst);
        LoadPropertySourceYmlConfig.Config configSecond = configs.get(1);
        String secretSecond = configSecond.getSecret();
        System.out.println("List的第二项: "   configSecond);
        System.out.println("List的第二项的其中一个属性: "   secretSecond);
    }
}
2.spring 加载 properties 文件
从上一步我们已经知道了, spring 默认使用 properties 文件的加载器。因此,我们可以少一步构造加载器
- 创建配置文件
alibaba-config.properties - 定义配置类
LoadPropertySourceConfig,用来加载yml中的数据 - 测试
# main/resources/alibaba-config.properties
ali-yun.username="ifredom"
ali-yun.password="123456"
ali-yun.blog="http://www.ifredom.com"
package com.example.commonmybatisplus.config;
import lombok.Data;
import org.springframework.boot.context.properties.ConfigurationProperties;
import org.springframework.context.annotation.Configuration;
import org.springframework.context.annotation.PropertySource;
@Data
@Configuration
@PropertySource("classpath:alibaba-config.properties")
@ConfigurationProperties(prefix = "aliyun")
public class LoadPropertySourceConfig {
    private String username;
    private String password;
    private String blog;
}
测试:
package com.example.commonmybatisplus.PropertySourceTest;
import com.example.commonmybatisplus.config.LoadPropertySourceConfig;
import com.example.commonmybatisplus.config.LoadPropertySourceYmlConfig;
import org.junit.jupiter.api.Test;
import org.springframework.beans.factory.annotation.Autowired;
import org.springframework.boot.test.context.SpringBootTest;
import java.util.List;
/**
 * @Author ifredomvip@gmail.com
 * @Date 2022/6/15 10:40
 * @Version 1.0.0
 * @Description
 **/
@SpringBootTest
public class LoadYmlTest {
    @Autowired
    private LoadPropertySourceYmlConfig ymlConfig;
    @Autowired
    private LoadPropertySourceConfig propertyConfig;
    @Test
    public void testProperty() {
        String username = propertyConfig.getUsername();
        String password = propertyConfig.getPassword();
        String blog = propertyConfig.getBlog();
        System.out.println("单独的属性配置---username: "   username);
        System.out.println("单独的属性配置---password: "   password);
        System.out.println("单独的属性配置---blog: "   blog);
    }
    @Test
    public void testYml() {
    }
}细心的同学应该发现了,在配置文件中定义的是ali-yun中间明明有一个短横线,读取属性的时候怎么没了?
这是因为 Spring 配置加载器类对诸如 空格,下划线,短横线,大小写都做了替空处理,也就是:配置文件是不分大小写的; 并且 下划线,短横线也会忽略: user_name -> username, pass-word -> password.因此取名你可以很随意
3.spring加载系统磁盘(properties)文件
有时候我们会需要加载其他项目下的数据库,而配置文件并不在当前项目路劲下,因此需要指定文件路径。
- 磁盘路径可以是相对路径,绝对路径,也可以通过系统属性值指定变量
- 相对路径,文件在应用根目录下:
@PropertySource(value = {"file:project1.properties"}) - 相对路径,文件在应用根目录下:
@PropertySource(value = {"file:./project1.properties"}) - 绝对路径,在指定的路径下:
@PropertySource(value = {"file:D:\\project\\project1.properties"}) - 通过系统属性值指定变量:
@PropertySource(value = {"file:${user.dir}/project1.properties"})
由于加载xml文件还需要对xml文件进行解析,此处不做讲解。仅仅使用 properties 文件做例子。 示例:
# 位于D盘下的配置文件 D:\project1.properties
driverClassName=com.mysql.cj.jdbc.Driver
url="https://www.ifredom.com"
username="ifredom"
password="123456"
由于配置文件没有前缀,因此 配置类 必须使用@Value()进行映射
package com.example.commonmybatisplus.config;
import lombok.Data;
import org.springframework.beans.factory.annotation.Value;
import org.springframework.context.annotation.Configuration;
import org.springframework.context.annotation.PropertySource;
@Data
@Configuration
@PropertySource(value = {"file:D:\\project1.properties"})
public class LoadDiskConfig {
    @Value("driverClassName")
    private String driverClassName;
    @Value("url")
    private String url;
    @Value("username")
    private String username;
    @Value("password")
    private String password;
}
/**
* 测试
*/
@SpringBootTest
public class LoadYmlTest {
@Autowired
private LoadDiskConfig diskConfig;
@Test
public void testDisk() {
String username = diskConfig.getUsername();
String url = diskConfig.getUrl();
System.out.println(username);
System.out.println(url);
}
}
4.spring加载xml文件
- 创建一个xml文件:
applicationContext.xml,并在其中定义一个bean - 通过
ApplicationContext来加载读取xml文件
不再推介使用 xml 来读取文件了,过于复杂
示例:
<?xml version="1.0" encoding="UTF-8"?>
<beans xmlns="http://www.springframework.org/schema/beans"
       xmlns:xsi="http://www.w3.org/2001/XMLSchema-instance"
       xmlns:context="http://www.springframework.org/schema/context"
       xmlns:tx="http://www.springframework.org/schema/tx"
       xsi:schemaLocation="http://www.springframework.org/schema/beans http://www.springframework.org/schema/beans/spring-beans.xsd
       http://www.springframework.org/schema/context http://www.springframework.org/schema/context/spring-context.xsd
       http://www.springframework.org/schema/tx http://www.springframework.org/schema/tx/spring-tx.xsd ">
    <bean id="blog" name="author" class="com.example.commonmybatisplus.entity.UserEntity">
        <property name="id" value="1"/>
        <property name="name" value="ifredom"/>
        <property name="age" value="30"/>
    </bean>
</beans>
@Data
public class UserEntity {
    private Long id;
    private String name;
    private int sex;
    private int age;
}
@SpringBootTest
public class LoadYmlTest {
@Test
public void testXml() {
ClassPathXmlApplicationContext context = new ClassPathXmlApplicationContext("applicationContext.xml");
UserEntity author = context.getBean("author", UserEntity.class);
System.out.println(author.getName());
}
}5.Java基于InputStream读取properties配置文件
import java.io.BufferedReader;
import java.io.FileReader;
import java.io.IOException;
import java.util.List;
import java.util.Properties;
@SpringBootTest
public class LoadYmlTest {
    @Test
    public void testInputStream() throws IOException {
        Properties properties = new Properties();
        // 使用InPutStream流读取properties文件
        BufferedReader bufferedReader = new BufferedReader(new FileReader("D:/project1.properties"));
        properties.load(bufferedReader);
        // 获取key对应的value值
        String driverClassName = properties.getProperty("driverClassName");
        String username = properties.getProperty("username");
        System.out.println(driverClassName);
        System.out.println(username);
    }
}
到此这篇关于Spring详解四种加载配置项的方法的文章就介绍到这了,更多相关Spring加载配置项内容请搜索Devmax以前的文章或继续浏览下面的相关文章希望大家以后多多支持Devmax!