一.线程的桥接
1.runBlocking方法
runBlocking方法用于在线程中去执行suspend方法,代码如下:
@Throws(InterruptedException::class)
public fun <T> runBlocking(context: CoroutineContext = EmptyCoroutineContext, block: suspend CoroutineScope.() -> T): T {
    // 通知编译器,block只执行一次
    contract {
        callsInPlace(block, InvocationKind.EXACTLY_ONCE)
    }
    // 获取当前线程
    val currentThread = Thread.currentThread()
    // 获取上下文中的拦截器
    val contextInterceptor = context[ContinuationInterceptor]
    val eventLoop: EventLoop?
    val newContext: CoroutineContext
    // 如果拦截器为空,代表无法进行调度
    if (contextInterceptor == null) {
        // 从线程中获取EventLoop,获取失败则创建一个新的
        eventLoop = ThreadLocalEventLoop.eventLoop
        // 添加到上下文中
        // newContext = EmptyCoroutineContext   context   eventLoop
        newContext = GlobalScope.newCoroutineContext(context   eventLoop)
    } else {// 如果有拦截器
        // 尝试将当前拦截器转换成EventLoop,
        // 如果转换成功,则判断是否允许可以在上下文中使用
        // 如果转换失败或不允许,则创建一个新的
        eventLoop = (contextInterceptor as? EventLoop)?.takeIf { it.shouldBeProcessedFromContext() }
            ?: ThreadLocalEventLoop.currentOrNull()
        // 计算新的上下文
        // 这里没有把EventLoop加到上下文,因为加入后会覆盖拦截器
        newContext = GlobalScope.newCoroutineContext(context)
    }
    // 创建一个协程
    val coroutine = BlockingCoroutine<T>(newContext, currentThread, eventLoop)
    // 启动协程
    coroutine.start(CoroutineStart.DEFAULT, coroutine, block)
    // 分发任务
    return coroutine.joinBlocking()
}
2.BlockingCoroutine类
在runBlocking方法中,最终创建了一个类型为BlockingCoroutine的对象。BlockingCoroutine类继承自AbstractCoroutine类,代码如下:
// 继承了AbstractCoroutine
private class BlockingCoroutine<T>(
    parentContext: CoroutineContext,
    private val blockedThread: Thread,
    private val eventLoop: EventLoop?
) : AbstractCoroutine<T>(parentContext, true) {
    // 该协程是一个作用域协程
    override val isScopedCoroutine: Boolean get() = true

    override fun afterCompletion(state: Any?) {
        // 如果当前线程不是阻塞线程
        if (Thread.currentThread() != blockedThread)
            // 唤醒阻塞线程
            LockSupport.unpark(blockedThread)
    }

    @Suppress("UNCHECKED_CAST")
    fun joinBlocking(): T {
        registerTimeLoopThread()
        try {
            // 注册使用EventLoop
            eventLoop?.incrementUseCount()
            try {
                // 死循环
                while (true) {
                    @Suppress("DEPRECATION")
                    // 如果线程当前中断,则抛出异常,同时取消当前协程
                    if (Thread.interrupted()) throw InterruptedException().also { cancelCoroutine(it) }
                    // 分发执行任务,同时获取等待时间
                    val parkNanos = eventLoop?.processNextEvent() ?: Long.MAX_VALUE
                    // 如果任务执行结束,则退出循环
                    if (isCompleted) break
                    // 休眠指定的等待时间
                    parkNanos(this, parkNanos)
                }
            } finally { // paranoia
                // 注册不使用EventLoop
                eventLoop?.decrementUseCount()
            }
        } finally { // paranoia
            unregisterTimeLoopThread()
        }
        // 获取执行的结果
        val state = this.state.unboxState()
        // 如果执行过程中取消,则抛出异常
        (state as? CompletedExceptionally)?.let { throw it.cause }
        // 返回结果
        return state as T
    }
}
BlockingCoroutine类重写了变量isScopedCoroutine为true。
isScopedCoroutine表示当前协程是否为作用域协程,该变量用在cancelParent方法中。对于一个作用域协程,当它的子协程在运行过程中抛出异常时,子协程调用cancelParent方法不会导致作用域协程取消,而是直接返回true。当子协程执行完毕,作用域协程获取结果时,如果发现子协程返回的结果为异常,则会再次抛出。
相比于一般协程,作用域协程不相信子协程在执行过程中取消通知,而是在执行完毕后亲自检查结果是否为异常,达到一种“耳听为虚,眼见为实”的效果。
joinBlocking方法通过循环在当前线程上对EventLoop进行任务分发来实现线程的阻塞。当任务发生异常或执行完毕后,会回调重写的afterCompletion方法,唤起线程继续循环,当在循环中检测到isCompleted标志位为true时,会跳出循环,恢复线程执行。
二.线程的切换
1.withContext方法
withContext方法用于在协程中切换线程去执行其他任务,该方法被suspend关键字修饰,因此会引起协程的挂起,代码如下:
public suspend fun <T> withContext(
    context: CoroutineContext,
    block: suspend CoroutineScope.() -> T
): T {
    // 通知编译器,block只执行一次
    contract {
        callsInPlace(block, InvocationKind.EXACTLY_ONCE)
    }
    // 直接挂起,获取续体
    return suspendCoroutineUninterceptedOrReturn sc@ { uCont ->
        // 从续体中获取上下文
        val oldContext = uCont.context
        // 计算新的上下文
        val newContext = oldContext   context
        // 检查任务是否执行完毕或取消
        newContext.checkCompletion()
        // 如果前后两次的上下文完全相同,说明不需要切换,只需要执行即可
        if (newContext === oldContext) {
            // 创建续体的协程
            val coroutine = ScopeCoroutine(newContext, uCont)
            // 执行block
            return@sc coroutine.startUndispatchedOrReturn(coroutine, block)
        }
        // 拦截器相同,但是上下文中增加了其他的元素
        // 这里也是在同一个线程上执行,但是其中增加的元素只在执行当前的block中使用
        if (newContext[ContinuationInterceptor] == oldContext[ContinuationInterceptor]) {
            // 创建续体的协程
            val coroutine = UndispatchedCoroutine(newContext, uCont)
            // 将当前线程ThreadLocal中的对象更新成newContext上下文对应的对象
            withCoroutineContext(newContext, null) {
                // 执行block
                return@sc coroutine.startUndispatchedOrReturn(coroutine, block)
            }
        }
        // 走到这里,说明要切换线程执行block任务
        val coroutine = DispatchedCoroutine(newContext, uCont)
        // 启动父协程
        coroutine.initParentJob()
        // 启动协程
        block.startCoroutineCancellable(coroutine, coroutine)
        // 获取结果
        coroutine.getResult()
    }
}
通过对上面代码的分析,可以发现withContext根据上下文的不同进行了三种分类,创建不同的协程并通过不同的方式去执行block。如下表所示:
| 协程上下文变化 | 协程类型 | 启动方式 |
|---|---|---|
| 完全相同 | ScopeCoroutine | startUndispatchedOrReturn |
| 拦截器相同 | UndispatchedCoroutine | startUndispatchedOrReturn |
| 拦截器不同 | DispatchedCoroutine | startCoroutineCancellable |
接下来,将对不同情况下协程的启动与执行进行分析。
2.startUndispatchedOrReturn方法
startUndispatchedOrReturn方法用于在相同的上下文环境中启动协程,代码如下:
internal fun <T, R> ScopeCoroutine<T>.startUndispatchedOrReturn(receiver: R, block: suspend R.() -> T): Any? {
    // 初始化并绑定父协程
    initParentJob()
    // 获取并处理执行结果
    return undispatchedResult({ true }) {
        // 启动协程
        block.startCoroutineUninterceptedOrReturn(receiver, this)
    }
}
private inline fun <T> ScopeCoroutine<T>.undispatchedResult(
    shouldThrow: (Throwable) -> Boolean,
    startBlock: () -> Any?
): Any? {
    // 启动协程,获取结果,
    val result = try {
        startBlock()
    } catch (e: Throwable) {
        // 产生异常,则按照取消处理
        CompletedExceptionally(e)
    }
    // 如果结果为挂起,则通知外部挂起
    if (result === COROUTINE_SUSPENDED) return COROUTINE_SUSPENDED
    // 结束任务执行,获取最终状态
    val state = makeCompletingOnce(result)
    // 如果需要等待子协程的结束,则通知外部挂起
    if (state === COMPLETING_WAITING_CHILDREN) return COROUTINE_SUSPENDED
    // 如果执最终为异常状态
    return if (state is CompletedExceptionally) {
        when {
            // 通过参数判断是否抛出
            shouldThrow(state.cause) -> throw recoverStackTrace(state.cause, uCont)
            // 执行结果为异常
            result is CompletedExceptionally -> throw recoverStackTrace(result.cause, uCont)
            // 结果不为异常,则返回
            else -> result
        }
    } else {
        // 对最终状态进行拆箱,返回最终结果
        state.unboxState()
    }
}
// JobSupport中提供了下面的类和方法,当协程进入完成状态时,会对状态进行装箱。
// 包装类
private class IncompleteStateBox(@JvmField val state: Incomplete)
// 装箱
internal fun Any?.boxIncomplete(): Any? = if (this is Incomplete) IncompleteStateBox(this) else this
// 拆箱
internal fun Any?.unboxState(): Any? = (this as? IncompleteStateBox)?.state ?: this
在startUndispatchedOrReturn方法中,通过调用block的startCoroutineUninterceptedOrReturn方法启动协程,获取最终结果,并对结果进行异常处理。
接下来,将分析startCoroutineUninterceptedOrReturn方法如何启动协程,代码如下:
@SinceKotlin("1.3")
@InlineOnly
public actual inline fun <R, T> (suspend R.() -> T).startCoroutineUninterceptedOrReturn(
    receiver: R,
    completion: Continuation<T>
): Any? = (this as Function2<R, Continuation<T>, Any?>).invoke(receiver, completion)
这里,直接找到最终的actual方法,可以发现该方法没有创建状态机,而是直接执行了block。这个方法被设计用在suspendCoroutineUninterceptedOrReturn方法中,来恢复挂起协程的执行。
至此,可以知道startUndispatchedOrReturn方法实际上就是在同一个协程中执行了block。
3.ScopeCoroutine类
在withContext方法中,当上下文相同时,会创建一个类型为ScopeCoroutine的对象。ScopeCoroutine类代表一个标准的作用域协程,代码如下:
internal open class ScopeCoroutine<in T>(
    context: CoroutineContext,
    @JvmField val uCont: Continuation<T>
) : AbstractCoroutine<T>(context, true), CoroutineStackFrame {
    final override val callerFrame: CoroutineStackFrame? get() = uCont as CoroutineStackFrame?
    final override fun getStackTraceElement(): StackTraceElement? = null
    // 作用域协程
    final override val isScopedCoroutine: Boolean get() = true
    internal val parent: Job? get() = parentContext[Job]
    // 该方法会在协程异常或取消时调用
    override fun afterCompletion(state: Any?) {
        // 进行拦截,切换线程,恢复执行
        uCont.intercepted().resumeCancellableWith(recoverResult(state, uCont))
    }
    // 该方法会在将其挂起的方法执行完毕后回调
    override fun afterResume(state: Any?) {
        // 直接恢复续体的执行
        uCont.resumeWith(recoverResult(state, uCont))
    }
}
ScopeCoroutine类重写了afterCompletion和afterResume两个方法,afterCompletion方法用于在协程取消时被回调。afterResume方法用于在挂起恢复时被回调。
根据上面的分析,当发生异常时,afterCompletion方法可能在其他的协程上下文中被调用,因此会调用拦截器切换回原本的线程中。而afterResume方法由于已经在正确的上下文环境中,因此可以直接恢复执行。
4.UndispatchedCoroutine类
在withContext方法中,当上下文不同,但调度器相同时,会创建一个类型为UndispatchedCoroutine的对象。UndispatchedCoroutine类继承自ScopeCoroutine类,重写了afterResume方法,代码如下:
private class UndispatchedCoroutine<in T>(
    context: CoroutineContext,
    uCont: Continuation<T>
) : ScopeCoroutine<T>(context, uCont) {
    override fun afterResume(state: Any?) {
        val result = recoverResult(state, uCont)
        // 将当前线程ThreadLocal中的对象更新成uCont.context上下文对应的对象
        withCoroutineContext(uCont.context, null) {
            // 恢复执行
            uCont.resumeWith(result)
        }
    }
}
与父类ScopeCoroutine的afterResume方法相比,UndispatchedCoroutine类在afterResume方法中对协程上下文进行了更新,然后再恢复执行。
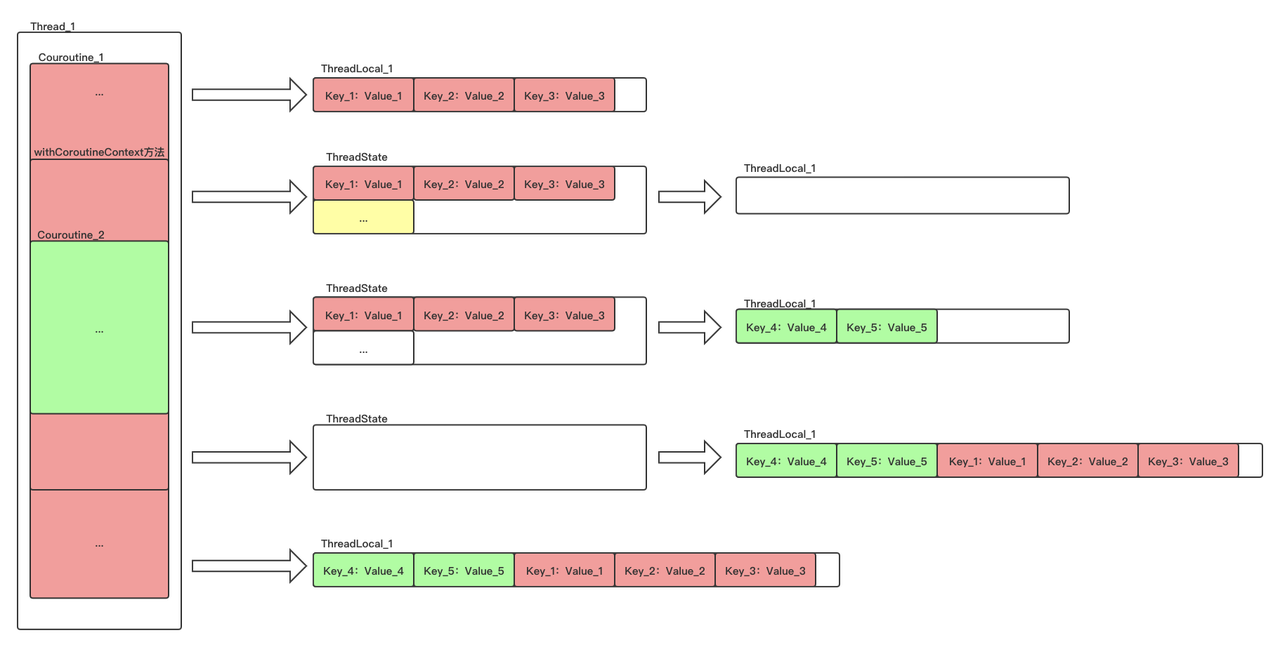
- withCoroutineContext
withCoroutineContext方法用于当一个线程中执行多个协程时,保存和恢复ThreadLocal类中的对象。
通过withContext方法的代码可以知道,当上下文不同但调度器相同时,在执行之前会通过withCoroutineContext方法将ThreadLocal中的对象更新成newContext对应的对象。在执行结束后,又将ThradLocal中的对象更新成原本续体的上下文context对应的对象。代码如下:
internal actual inline fun <T> withCoroutineContext(context: CoroutineContext, countOrElement: Any?, block: () -> T): T {
    // 将线程上下文更新新的上下文,并返回老的上下文
    val oldValue = updateThreadContext(context, countOrElement)
    try {
        // 在新的上下文环境中执行
        return block()
    } finally {
        // 执行结束恢复老的上下文
        restoreThreadContext(context, oldValue)
    }
}
协程中有一类上下文元素是ThreadContextElement,ThreadContextElement是一个接口,具体的实现类有CoroutineId类和ThreadLocalElement类。其中,CoroutineId类用来修改线程的名字。ThreadLocalElement类用来保存和恢复ThreadLocal类中的对象,withCoroutineContext方法内部的updateThreadContext方法与restoreThreadContext方法正是通过ThreadLocalElement类实现的。ThreadContextElement接口的代码如下:
public interface ThreadContextElement<S> : CoroutineContext.Element {
    // 用于更新新的上下文,并且返回老的上下文
    public fun updateThreadContext(context: CoroutineContext): S
    // 重新恢复当前线程的上下文,
    // 其中oldStart来自updateThreadContext方法的返回值
    public fun restoreThreadContext(context: CoroutineContext, oldState: S)
}
当调用updateThreadContext方法时,会返回一个代表当前状态的对象。当调用restoreThreadContext方法时,又需要传入一个代表状态的对象作为参数,来恢复之前的状态。因此,这就需要对updateThreadContext方法的返回值进行保存。
当协程上下文中只有一个ThreadContextElement接口指向的对象时,保存在变量中即可。而如果协程上下文中有多个ThreadContextElement接口指向的对象,这时就需要一个专门的类来对这些对象进行管理,这个类就是ThreadState类,他们之间的对应关系如下图所示:
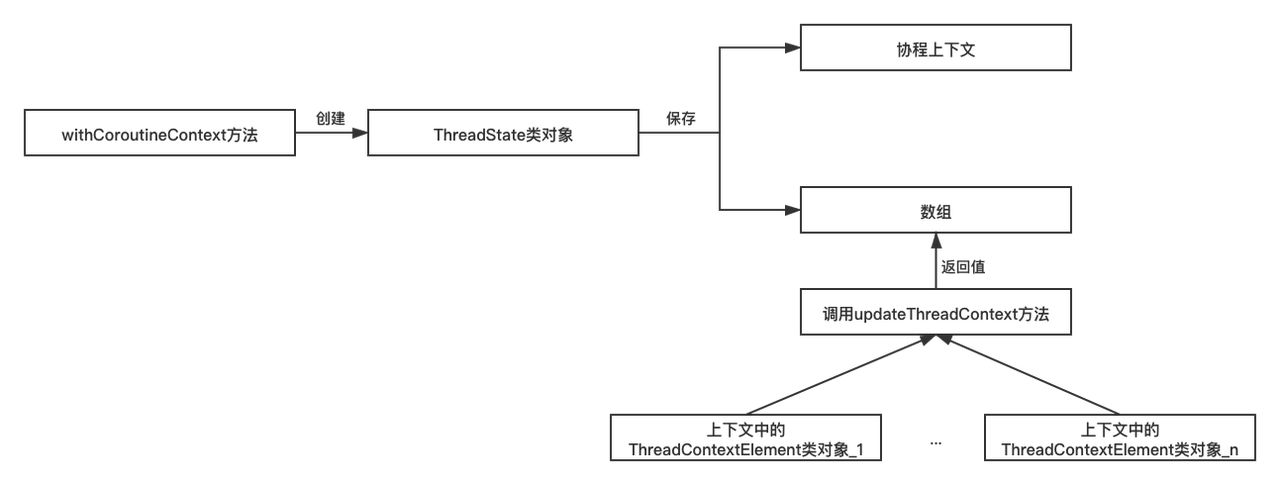
withCoroutineContext方法执行图:
5.DispatchedCoroutine类
在withContext方法中,当需要切换线程时,会创建一个类型为DispatchedCoroutine的对象。DispatchedCoroutine类继承自ScopeCoroutine类,代码如下:
// 状态机状态
private const val UNDECIDED = 0
private const val SUSPENDED = 1
private const val RESUMED = 2
private class DispatchedCoroutine<in T>(
    context: CoroutineContext,
    uCont: Continuation<T>
) : ScopeCoroutine<T>(context, uCont) {
    // 初始状态
    private val _decision = atomic(UNDECIDED)
    // 尝试挂起
    private fun trySuspend(): Boolean {
        _decision.loop { decision ->
            when (decision) {
                UNDECIDED -> if (this._decision.compareAndSet(UNDECIDED, SUSPENDED)) return true
                RESUMED -> return false
                else -> error("Already suspended")
            }
        }
    }
    // 尝试恢复
    private fun tryResume(): Boolean {
        _decision.loop { decision ->
            when (decision) {
                UNDECIDED -> if (this._decision.compareAndSet(UNDECIDED, RESUMED)) return true
                SUSPENDED -> return false
                else -> error("Already resumed")
            }
        }
    }
    override fun afterCompletion(state: Any?) {
        // 通过afterResume方法实现
        afterResume(state)
    }
    override fun afterResume(state: Any?) {
        // 如果没有挂起,则返回
        if (tryResume()) return
        // 进行拦截,切换线程,恢复执行
        uCont.intercepted().resumeCancellableWith(recoverResult(state, uCont))
    }
    // 获取最终结果
    fun getResult(): Any? {
        if (trySuspend()) return COROUTINE_SUSPENDED
        val state = this.state.unboxState()
        if (state is CompletedExceptionally) throw state.cause
        @Suppress("UNCHECKED_CAST")
        return state as T
    }
}
DispatchedCoroutine类中使用了一个状态机模型,这个状态机与在Kotlin协程:生命周期原理中分析CancellableContinuationImpl类中的状态机相同,获取结果的逻辑也与CancellableContinuationImpl类相同。
这里最重要的是DispatchedCoroutine类重写了afterCompletion和afterResume方法,并且回调这两个方法都会进行线程的切换。
6.总结
| ScopeCoroutine类 | UndispatchedCoroutine类 | DispatchedCoroutine类 | |
|---|---|---|---|
| afterCompletion方法 | 切线程 | 切线程 | 切线程 |
| afterResume方法 | 不切线程 | 不切线程。更新ThreadLocal | 切线程 |
以上就是Kotlin线程的桥接与切换使用介绍的详细内容,更多关于Kotlin线程的资料请关注Devmax其它相关文章!