前言
经常在 https://lichess.org/ 上观看大师们玩的国际象棋比赛。这些棋局和棋手的水平超出了我们的想象,如果想知道谁有优势。与其事后分析游戏,不如实时分析它们。
下面的 Python 程序针对 https://lichess.org/ 进行了优化。但是你可以为 https://www.chess.com/ 或任何国际象棋网站修改它。
它的工作原理是截取棋盘的屏幕截图,检测每个棋子在棋盘上的位置,使用 python Chess 库绘制棋盘,然后使用 Stockfish 引擎为给定位置提供评估和最佳移动。
第 1 步:导入所需的模块
使用 OpenCV (开源计算机视觉库)和 NumPy 库来截取棋盘,可视化棋盘方格,并比较图像之间的差异。
如果你不熟悉OpenCV,鼓励你了解有关它的更多信息。接下来,使用 PIL(Pillow)库来修改图像(例如,裁剪)。CompareImages 模块使用 OpenCV 来查找并突出显示两个图像之间的差异。
稍微修改 CodeDeepAI 的代码,可以查看:https://codedeepai.com/finding-difference-between-multiple-images-using-opencv-and-python/,你可以从这个 GitHub 页面下载模块:https://github.com/aaljaish/Lichess-Board-Evaluator
mss 库是一种快速简便的方法来获取监视器的屏幕截图并将图像保存为 PNG 文件。接下来,使用chess库,用于移动生成、验证和可视化。
最后,使用stockfish 引擎来评估国际象棋的位置并确定最佳走法。你可以从他们的网站下载 Stockfish 引擎:https://stockfishchess.org/download/
在 Windows 中为这个项目使用 Stockfish 14.1 (AVX2)。
import cv2  # OpenCV library
import numpy as np
import time

from PIL import Image # Pillow library will be used to open and crop images
from CompareImages import compare_images  # This code compares and detects differences
                                          # between images.
from mss import mss # will be used for grabbing screenshots
sct=mss()

import chess #used for chess baord visualization, move generation, and move validation.
from stockfish import Stockfish # The Stockfish chess engine will be used to evaluate
                                # a given position and identify the top moves.
stockfish = Stockfish(r"Enter Your Path Here//stockfish.exe")
第 2 步:确保正确捕获棋盘。
接下来,创建了一个函数来定位显示器上的棋盘。该函数接受三个输入:棋盘左上角的 X 和 Y 坐标以及棋盘上每个方格的宽度。
在显示器上,X 和 Y 坐标为像素(585、163),每个正方形的宽度为 90 像素(图 1)。你需要为你的显示器配置这些输入。
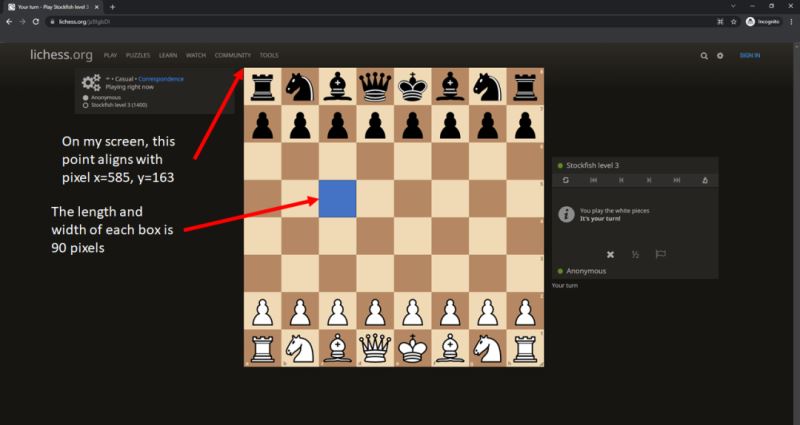
图 1:lichess.org 上棋盘的方向。左上角位于我屏幕的像素 (585, 163) 处,棋盘内的每个正方形都是 90 像素宽。
当你运行“capture_board”功能时,它将打开一个窗口,根据输入参数显示监视器的实时视图。它还将绘制一个 8x8 网格。确保蓝色框与棋盘格紧密对齐(图 2)。
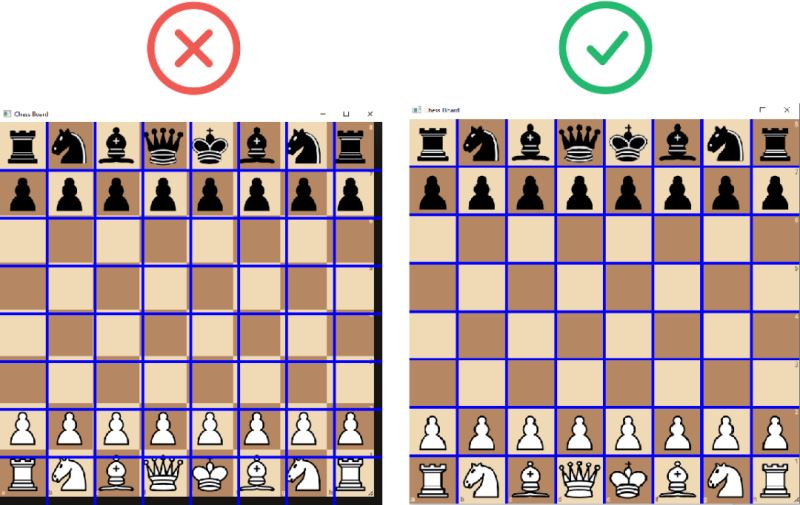
左侧的图像可能会导致对棋位的评估不佳或根本不起作用。
相反,请确保蓝线与棋盘格对齐以准确捕获棋子(右图)。
def capture_board(y_coords=163,x_coords=585, box_widths=90):

    global y_coord, x_coord, box_width
    y_coord, x_coord, box_width = y_coords, x_coords, box_widths

    '''
    This functions grabs a screenshot of your monitor based on the specified parameters.
    It then draws an 8x8 grid based on the specified box width parameter. Make sure that
    each blue square aligns closely with the chessboard squares.

    x_coord: This x coordinate is for the top left corner of the board. You will need to
    modify it for your monitor.

    y_coord: This y coordinate is for the top left corner of the board. You will need to
    modify it for your monitor.

    box_width: This is the width of each square on the chessboard. You may need to modify
    it based on the size of your board.
    '''
    with mss() as sct:
        monitor = {"top": y_coord, "left": x_coord,
                   "width": (box_width)*8, "height": box_width*8}

        while True:
            screenshot = np.array(sct.grab(monitor))

            for i in range(1,8):
                # Draw 7 vericle blue lines with thickness of 3 px
                cv2.line(screenshot,((box_width)*i,0),((box_width)*i,
                                                       y_coord (box_width)*8),
                         (255,0,0),3)

                # Draw 7 horizontal blue lines with thickness of 3 px
                cv2.line(screenshot,(0,(box_width)*i),(x_coord (box_width)*8,
                                                       (box_width)*i),
                         (255,0,0),3)

            cv2.imshow('Chess Board', screenshot)
            if cv2.waitKey(1) == ord('q'):   # press any key to quit.
                cv2.destroyAllWindows()
                break

## Run the above function
capture_board(y_coords=163,x_coords=585, box_widths=90)
第 3 步:创建一个函数,对棋盘进行截图并根据上面的输入进行裁剪。
在第三步中,创建了一个函数,该函数根据 capture_board 函数的输入获取棋盘位置的单个屏幕截图。此屏幕截图将保存在本地目录中,并在接下来的步骤中进行处理。
def take_screenshot(filename):
    ## Screen shot and then crop image
    filename1 = sct.shot(output=filename)
    im = Image.open(filename1)
                 # (left, upper, right         , lower         )
    im1 = im.crop(( x_coord  ,    y_coord, x_coord box_width*8, y_coord box_width*8))

    # Saves image in local directory
    im1.save(filename1)[]()
第 4 步(可选):确定棋盘是否翻转。
下面的函数检测棋盘是否翻转。它通过检测棋盘左上角的车(黑色或白色)来工作。如果游戏开始并且车已经从原来的位置移动,此函数可能无法正常工作。
你可以通过在棋盘翻转时取消注释“is_board_flipped=True”或在棋盘未翻转时取消注释“is_board_flipped=False”(即,棋盘底部为白色)来覆盖此函数。
def flipped_board():
    # Take a screenshot of the chessboard and save the image in local library.
    take_screenshot('InitialBoard.png')
    im = Image.open('InitialBoard.png')

    # Crop the upper left-hand sqaure and process it.
    im1 = im.crop((5, 5, 70, 70))
    im1.save('CurrentRook.png')
    image = cv2.imread('CurrentRook.png')
    gray = cv2.cvtColor(image, cv2.COLOR_BGR2GRAY)

    # Assume the rook is white if the upper left-hand square has more than 300 white pixels.
    # otherwise, the rook is black and the board is not flipped.
    is_board_flipped=True if np.sum(gray==255)>300 else False
    return is_board_flipped

is_board_flipped=flipped_board()

# is_board_flipped=True
# is_board_flipped=False

print('Is the board flipped?', is_board_flipped)第5步:棋盘的方向。
下面的数组将根据棋盘是否翻转来排列。我在下一步中使用该数组来检测棋盘上哪个方格上的棋子。如果棋盘没有翻转,方块 A1 将在左下角;否则,A1 方块将位于右上角。
myList=[list(range(56,64)),
 list(range(48,56)),
 list(range(40,48)),
 list(range(32,40)),
 list(range(24,32)),
 list(range(16,24)),
 list(range(8,16)),
 list(range(0,8))]

if is_board_flipped:
    myList.reverse()
    for i in range(8):
        myList[i].reverse()
myList
第6步:识别棋子。
这一步只运行一次(假设棋盘的大小在游戏之间没有变化)。确定每个棋子的像素数后,你可以删除此部分。
想找到一种简单、高效且一致的方法来检测和识别棋子。计算每个棋格上的黑/白像素数效果很好。
下面的代码集按照构成每个块的黑白像素的数量来排列黑白块;请注意,我手动执行了此步骤,但你的顺序应该相同。你会注意到黑色国王拥有最少的黑色像素,而黑色骑士拥有最多的黑色像素。白象的白色像素数最少,而白骑士的白色像素数最多。BPieceType和WPieceType与 Chess 库分配的棋子类型一致。
你可以在Python Chess 文档中阅读更多相关信息:
https://python-chess.readthedocs.io/en/latest/core.html
棋子类型
Pawn = 1
Knight = 2
Bisphop = 3
Rook = 4
Queen = 5
King = 6
# The pieces are arranged by the total number of black pixels. The black king has
# the fewest number of black pixels, and the black knight has the largest number
# of black pixels.
BPieces=['BlackKing','BlackBishop','BlackPawn','BlackRook','BlackQueen','BlackKnight']
BPieceType=[6,3,1,4,5,2]

# The pieces are arranged by the total number of white pixels. The white bishop has
# the smallest number of white pixels, and the white knight has the largest number
# of white pixels.
WPieces=['WhiteBishop','WhiteQueen','WhiteRook','WhitePawn','WhiteKing','WhiteKnight']
WPieceType=[3,5,4,1,6,2]
下面的 for 循环将从提供的棋盘图像中裁剪并保存 64 张图像。64 个图像中的每一个都将根据步骤 5 中指定的方向与特定的正方形对齐。确保在主目录中创建一个“Pieces”文件夹;裁剪后的图像将保存在此文件夹中。
BlackPixelList, WhitePixelList=[],[]
nn=0;
n=0

# Take a screenshot of the entire chessboard and save the image
take_screenshot('image1.png')

#Read the chessboard into memory
image = cv2.imread('image1.png')

# Convert the color image to a gray scale image and save it.
gray = cv2.cvtColor(image, cv2.COLOR_BGR2GRAY)
cv2.imwrite('gray image.png', gray)
im = Image.open('gray image.png')


# Crop each squre of the chess board and save the 64 gray scale images. Each image
# will align with a specific square on the chessboard.
for i in range(8):
    for j in range(8):

        im1=im.crop(
            (j*(box_width),
             i*(box_width),
             (j 1)*(box_width-0),
             (i 1)*(box_width-0)))
        im1.save('pieces//' str(nn) '.png')
        n =1

        n=myList[i][j]
        image = cv2.imread('pieces//' str(nn) '.png')

        # count the number of black pixels per image
        BlackPiece=np.sum(image==0)
        BlackPixelList.append(BlackPiece)

        # count the number of white pixels per image
        WhitePiece=np.sum(image==255)
        WhitePixelList.append(WhitePiece)
        nn =1
下面的代码旨在识别每个棋子的黑白像素数。我已经从上面创建了一个包含黑白像素数量的列表。
对于每种颜色,我执行以下操作:
- 保留唯一的像素值
- 以升序对列表进行排序,并保留六个最大的像素值
- 每个像素值将与BPieces / Wpieces中指定的部分对齐
# Filter out values equal 0 and keep unique pixel values
# sort the list in ascending order
# keep the six largest pixel values
BlackPixelList=set(list(filter(lambda x: x > 0, BlackPixelList)))
BlackPixelList=list(BlackPixelList)
BlackPixelList.sort()
BlackPixelList=BlackPixelList[-6:]

WhitePixelList=set(list(filter(lambda x: x > 0, WhitePixelList)))
WhitePixelList=list(WhitePixelList)
WhitePixelList.sort()
WhitePixelList=WhitePixelList[-6:]

# Create a dictionary for each color and assign
# pixel value to each chess piece, piece type,
# and piece color (False=Black, True=White).
BlackPieces={}
for i, val in enumerate(BPieces):
    BlackPieces[val] = (BlackPixelList[i],BPieceType[i],False)

WhitePieces={}
for i, val in enumerate(WPieces):
    WhitePieces[val] = (WhitePixelList[i],WPieceType[i],True)
第 7 步:为每个棋子分配像素数。
如果这是第一次运行代码,请使用步骤 6 输出为“BlackPieces”分配黑色像素数,为“WhitePieces”分配白色像素数。下面的代码以我的显示器为例。
BlackPieces=\
{'BlackKing': (5028, 6, False),
 'BlackBishop': (5052, 3, False),
 'BlackPawn': (5679, 1, False),
 'BlackRook': (6489, 4, False),
 'BlackQueen': (6495, 5, False),
 'BlackKnight': (7623, 2, False)}

WhitePieces=\
{'WhiteBishop': (2520, 3, True),
 'WhiteQueen': (3039, 5, True),
 'WhiteRook': (3741, 4, True),
 'WhitePawn': (3933, 1, True),
 'WhiteKing': (4410, 6, True),
 'WhiteKnight': (6057, 2, True)}

BlackPixelValues=[i[0] for i in list(BlackPieces.values())]
WhitePixelValues=[i[0] for i in list(WhitePieces.values())]
第 8 步:设置评估棋盘的函数。
我们已经完成了所有的设置步骤。我们首先将 stockfish 的等级设置为 3000 ELO,并将深度设置为 15。你可以将深度设置为 26,但这会显着增加处理时间。然后我们创建“evaluate_position”函数。该函数将:
- 截屏
- 将彩色图像转换为灰度并保存图像
- 确定每个棋子在棋盘上的位置,并使用国际象棋库将这些棋子放置在棋盘上的适当位置
- 将该回合分配给指定的颜色。默认是轮到白棋。
- 根据国际象棋库中的位置分配 stockfish 中的 FEN 位置
- 生成请求的输出
stockfish.set_elo_rating(3000)
stockfish.set_depth(15)

def evaluate_position(white_turn=True, board_flipped=is_board_flipped):
    start_time = time.time()
    # take a screenshot of the board
    take_screenshot('image1.png')
    image = cv2.imread('image1.png')
    gray = cv2.cvtColor(image, cv2.COLOR_BGR2GRAY)
    cv2.imwrite('gray image.png', gray)
    im = Image.open('gray image.png')

    # Set up the board from the Chess library
    board = chess.Board()
    # Remove all the pieces because they will be specified in the next step
    board.clear()
    # Set the turn to White to play, unless otherwise specified
    board.turn = white_turn

    nn=0;
    n=0
    for i in range(8):
        for j in range(8):

            im1=im.crop((j*(box_width), i*(box_width), (j 1)*(box_width-0), (i 1)*(box_width-0)))
            im1.save('pieces//' str(nn) '.png')
            n =1

            n=myList[i][j]
            # Read each cropped chess square and identify the chess piece and color.
            image = cv2.imread('pieces//' str(nn) '.png')
            BlackPiece=np.sum(image==0)
            WhitePiece=np.sum(image==255)
            res_val=(0,0,True)
            if BlackPiece>min(BlackPixelValues)-50:
                # Identify the chess piece based on he number of black pixels closest to the
                # values from the BlackPieces dictionary.
                col_key, res_val = min(BlackPieces.items(), key=lambda x: abs(BlackPiece - x[1][0]))
            if WhitePiece>min(WhitePixelValues)-50:
                # Identify the chess piece based on he number of white pixels closest to the
                # values from the BlackPieces dictionary.
                col_key, res_val = min(WhitePieces.items(), key=lambda x: abs(WhitePiece - x[1][0]))
            # set the chess piece on the board based on it position, piece type, and color.
            board.set_piece_at(n,piece=chess.Piece(piece_type=res_val[1],color=res_val[2]))
            nn =1

    #create the FEN based on the current position
    turn_fen=' w - - 1 0' if board.turn == True else ' b - - 0 1'
    current_fen=board.board_fen() turn_fen
    # Assign the postion in Stockfish based on FEN
    stockfish.set_fen_position(current_fen)
    # Get the top moves
    top_moves=stockfish.get_top_moves()
    #Get the best move
    my_move=top_moves[0]['Move']
    # Move the chess piece based on the best move
    board.push(chess.Move.from_uci(my_move))

    #Create output
    print('Time:',time.time()-start_time)
    print('Best Move:', my_move)
    print('Evaluation:', stockfish.get_evaluation())
    print('Top moves:')
    for i in top_moves:
        print(i)

    if board_flipped:
        board.apply_transform(chess.flip_vertical)
        board.apply_transform(chess.flip_horizontal)
        display(board)
    else:
        display(board)
第 9 步:运行棋盘评估。
恭喜,你完成了!指定是轮到白(设置 white_turn=True)还是轮到黑(white_turn=False)并运行评估函数。该函数将输出:
- Time:运行函数所花费的时间
- Best Move:最明智的一步
- Evaluation:对当前位置的评估
- Top moves:最佳移动
- 当前位置和下一个最佳移动的视觉效果
如果位置发生变化,重新运行evaluate_postition函数;你不需要重新运行前面的步骤。
evaluate_position(white_turn=True)
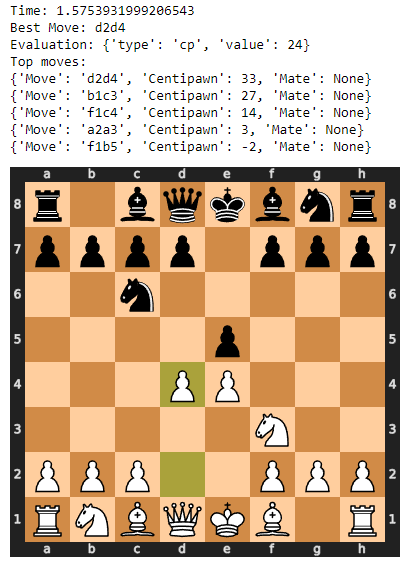
evaluate_position 输出示例。
结论
你可以运行上述代码来捕获和评估在 https://lichess.org/ 上的任何国际象棋位置。此外,你可以轻松地为任何在线棋盘修改代码:https://github.com/aaljaish/Lichess-Board-Evaluator
到此这篇关于如何使用Python在2秒内评估国际象棋位置的文章就介绍到这了,更多相关Python评估国际象棋位置内容请搜索Devmax以前的文章或继续浏览下面的相关文章希望大家以后多多支持Devmax!