本文实例为大家分享了Android实现新手引导半透明蒙层效果的具体代码,供大家参考,具体内容如下
效果图:
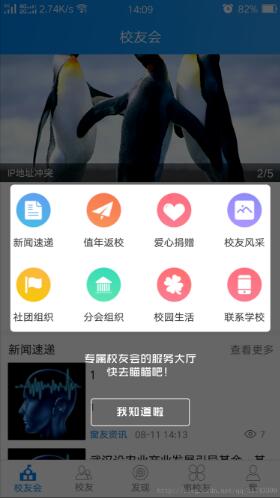
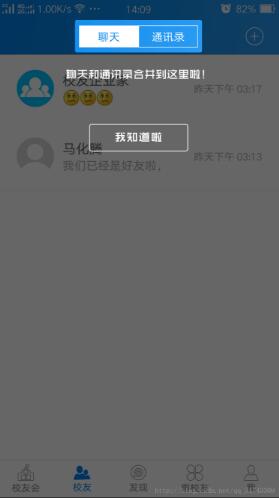
其中的文字和我知道啦是ui切得两张透明图片
自定义View:
package com.cymobi.library.view.widget;

import android.app.Activity;
import android.content.Context;
import android.graphics.Bitmap;
import android.graphics.Canvas;
import android.graphics.Paint;
import android.graphics.PorterDuff;
import android.graphics.PorterDuffXfermode;
import android.graphics.RectF;
import android.util.Log;
import android.view.Gravity;
import android.view.View;
import android.view.ViewGroup;
import android.view.ViewTreeObserver;
import android.widget.FrameLayout;
import android.widget.RelativeLayout;

import com.cymobi.library.R;

/**
 * Created by xuke on 2017/8/24.
 */

public class GuideView extends RelativeLayout implements ViewTreeObserver.OnGlobalLayoutListener {
  private final String TAG = getClass().getSimpleName();
  private Context mContent;
  private boolean first = true;
  private static final String SHOW_GUIDE_PREFIX = "show_guide";
  private int offsetX, offsetY;
  private int radius;
  private View targetView;
  private View textGuideView;
  private View customGuideView;
  private Paint mCirclePaint;
  private Paint mBackgroundPaint;
  private boolean isMeasured;
  private int[] center;
  private PorterDuffXfermode porterDuffXfermode;
  private Bitmap bitmap;
  private int backgroundColor;
  private Canvas temp;
  private Direction direction;
  private MyShape myShape;
  private int[] location;
  private boolean onClickExit;
  private OnClickCallback onclickListener;
  private int targetViewWidth;
  private int targetViewHeight;
  private boolean isContain = false;
  private boolean needDraw = true;


  public GuideView(Context context) {
    super(context);
    this.mContent = context;
  }

  public int[] getLocation() {
    return location;
  }

  public void setLocation(int[] location) {
    this.location = location;
  }

  public int getRadius() {
    return radius;
  }

  public void setRadius(int radius) {
    this.radius = radius;
  }

  public void setDirection(Direction direction) {
    this.direction = direction;
  }

  public void setShape(MyShape shape) {
    this.myShape = shape;
  }

  public void setBgColor(int background_color) {
    this.backgroundColor = background_color;
  }

  public void setTargetView(View targetView) {
    this.targetView = targetView;
  }

  public int[] getCenter() {
    return center;
  }

  public void setCenter(int[] center) {
    this.center = center;
  }

  public void setOffsetX(int offsetX) {
    this.offsetX = offsetX;
  }

  public void setOffsetY(int offsetY) {
    this.offsetY = offsetY;
  }

  public void setContain(boolean contain) {
    this.isContain = contain;
  }

  public void setCustomGuideView(View customGuideView) {
    this.customGuideView = customGuideView;
    if (!first) {
      restoreState();
    }
  }

  public void setTextGuideView(View textGuideView) {
    this.textGuideView = textGuideView;
    if (!first) {
      restoreState();
    }
  }

  private boolean hasShown() {
    if (targetView == null)
      return true;
    return mContent.getSharedPreferences(TAG, Context.MODE_PRIVATE).getBoolean(generateUniqId(targetView), false);
  }

  private String generateUniqId(View v) {
    return SHOW_GUIDE_PREFIX   v.getId();
  }

  public void setOnclickListener(OnClickCallback onclickListener) {
    this.onclickListener = onclickListener;
  }

  private void setClickInfo() {
    final boolean exit = onClickExit;
    setOnClickListener(new OnClickListener() {
      @Override
      public void onClick(View v) {
        if (onclickListener != null) {
          onclickListener.onClickedGuideView();
        }
        if (exit) {
          hide();
        }
      }
    });
  }

  public void show() {
    Log.v(TAG, "show");
    if (hasShown())
      return;

    if (targetView != null) {
      targetView.getViewTreeObserver().addOnGlobalLayoutListener(this);
    }

    this.setBackgroundResource(R.color.transparent);
    this.bringToFront(); //设置在最上层
    ((FrameLayout) ((Activity) mContent).getWindow().getDecorView()).addView(this);
    first = false;
  }

  public void hide() {
    Log.v(TAG, "hide");
    if (customGuideView != null || textGuideView != null) {
      targetView.getViewTreeObserver().removeOnGlobalLayoutListener(this);
      this.removeAllViews();
      ((FrameLayout) ((Activity) mContent).getWindow().getDecorView()).removeView(this);
      restoreState();
    }
  }

  /**
   * 获得targetView 的宽高
   *
   * @return
   */
  private int[] getTargetViewSize() {
    int[] location = {-1, -1};
    if (isMeasured) {
      location[0] = targetView.getWidth();
      location[1] = targetView.getHeight();
    }
    return location;
  }

  /**
   * 获得targetView 的半径
   *
   * @return
   */
  private int getTargetViewRadius() {
    if (isMeasured) {
      int[] size = getTargetViewSize();
      int x = size[0];
      int y = size[1];

      return (int) (Math.sqrt(x * x   y * y) / 2);
    }
    return -1;
  }

  @Override
  protected void onDraw(Canvas canvas) {
    super.onDraw(canvas);
    Log.v(TAG, "onDraw");
    if (!isMeasured)
      return;
    if (targetView == null)
      return;
    drawBackground(canvas);
  }


  private void drawBackground(Canvas canvas) {
    Log.v(TAG, "drawBackground");
    needDraw = false;
    // 先绘制bitmap,再将bitmap绘制到屏幕
    bitmap = Bitmap.createBitmap(canvas.getWidth(), canvas.getHeight(), Bitmap.Config.ARGB_8888);
    temp = new Canvas(bitmap);

    // 背景画笔
    Paint bgPaint = new Paint();
    if (backgroundColor != 0) {
      bgPaint.setColor(backgroundColor);
    } else {
      bgPaint.setColor(getResources().getColor(R.color.bg_shadow));
    }
    // 绘制屏幕背景
    temp.drawRect(0, 0, temp.getWidth(), temp.getHeight(), bgPaint);

    // targetView 的透明圆形画笔
    if (mCirclePaint == null) {
      mCirclePaint = new Paint();
    }
    //透明效果
    porterDuffXfermode = new PorterDuffXfermode(PorterDuff.Mode.CLEAR);  //SRC_OUT或者CLEAR都可以
    mCirclePaint.setXfermode(porterDuffXfermode);
    mCirclePaint.setAntiAlias(true);

    if (myShape != null) {
      RectF oval = new RectF();
      switch (myShape) {
        case CIRCULAR://圆形
          temp.drawCircle(center[0], center[1], radius, mCirclePaint);
          break;
        case RECTANGULAR://圆角矩形
          if (isContain) {
            oval.left = location[0] - 8;
            oval.top = center[1] - targetViewHeight / 2 - 8;
            oval.right = location[0]   targetViewWidth   8;
            oval.bottom = center[1]   targetViewHeight / 2   8;
          } else {
            oval.left = location[0]   5;
            oval.top = center[1] - targetViewHeight / 2   1;
            oval.right = location[0]   targetViewWidth - 5;
            oval.bottom = center[1]   targetViewHeight / 2 - 1;
          }
          temp.drawRoundRect(oval, radius, radius, mCirclePaint);
          break;
      }
    } else {
      temp.drawCircle(center[0], center[1], radius, mCirclePaint);
    }

    // 绘制到屏幕
    canvas.drawBitmap(bitmap, 0, 0, bgPaint);
    bitmap.recycle();
  }


  @Override
  public void onGlobalLayout() {
    if (isMeasured)
      return;
    if (targetView.getHeight() > 0 && targetView.getWidth() > 0) {
      isMeasured = true;
      targetViewWidth = targetView.getWidth();
      targetViewHeight = targetView.getHeight();
    }

    // 获取targetView的中心坐标
    if (center == null) {
      // 获取右上角坐标
      location = new int[2];
      targetView.getLocationInWindow(location);
      center = new int[2];
      // 获取中心坐标
      center[0] = location[0]   targetView.getWidth() / 2;
      center[1] = location[1]   targetView.getHeight() / 2;
    }
    // 获取targetView外切圆半径
    if (radius == 0) {
      radius = getTargetViewRadius();
    }

    //文字图片和提示图片
    createView();

  }

  //文字图片和我知道啦图片一起放
  private void createView() {
    Log.v(TAG, "createView");

    //文字提示
    LayoutParams textViewParams;
    textViewParams = new LayoutParams(LayoutParams.MATCH_PARENT, LayoutParams.WRAP_CONTENT);
    textViewParams.setMargins(0, center[1]   radius   10, 0, 0);

    // 我知道提示布局参数
    LayoutParams guideViewParams;
    guideViewParams = new LayoutParams(LayoutParams.MATCH_PARENT, LayoutParams.WRAP_CONTENT);
    guideViewParams.setMargins(0, center[1]   radius   10, 0, 0);

    if (textGuideView != null && customGuideView != null) {
      if (direction != null) {
        int left = center[0]   targetViewWidth / 2;
        int right = center[0]   targetViewWidth / 2;
        int top = center[1] - targetViewHeight / 2;
        int bottom = center[1]   targetViewHeight / 2;

        //我自己的项目只需要这两个方向的, 所以这里就只写了Top和Boottom
        switch (direction) {
          case TOP:
            this.setGravity(Gravity.CENTER_HORIZONTAL);
            textViewParams.setMargins(offsetX, top - offsetY, -offsetX, -top   offsetY);
            guideViewParams.setMargins(offsetX, -3 * offsetY   top, -offsetX, -top   3 * offsetY);
            break;
          case BOTTOM:
            this.setGravity(Gravity.CENTER_HORIZONTAL);
            textViewParams.setMargins(offsetX, bottom   offsetY, -offsetX, -bottom - offsetY);
            guideViewParams.setMargins(offsetX, bottom   3 * offsetY, -offsetX, -bottom - 3 * offsetY);
            break;
        }

        if (this != null)
          this.removeAllViews();
        this.addView(textGuideView, textViewParams);
        this.addView(customGuideView, guideViewParams);
      }
    }
  }


  /**
   * 定义GuideView相对于targetView的方位,
   */
  public enum Direction {
    LEFT, TOP, RIGHT, BOTTOM,
    LEFT_TOP, LEFT_BOTTOM,
    RIGHT_TOP, RIGHT_BOTTOM
  }

  /**
   * 定义目标控件的形状。圆形,矩形
   */
  public enum MyShape {
    CIRCULAR, RECTANGULAR
  }

  /**
   * GuideView点击Callback
   */
  public interface OnClickCallback {
    void onClickedGuideView();
  }

  public static class Builder {
    static GuideView guiderView;
    static Builder instance = new Builder();
    Context mContext;

    private Builder() {
    }

    public Builder(Context ctx) {
      mContext = ctx;
    }

    public static Builder newInstance(Context ctx) {
      guiderView = new GuideView(ctx);
      return instance;
    }

    /**
     * 设置目标view
     */
    public Builder setTargetView(View target) {
      guiderView.setTargetView(target);
      return instance;
    }

    /**
     * 设置蒙层颜色
     */
    public Builder setBgColor(int color) {
      guiderView.setBgColor(color);
      return instance;
    }

    /**
     * 设置文字和图片View 在目标view的位置
     */
    public Builder setDirction(Direction dir) {
      guiderView.setDirection(dir);
      return instance;
    }

    /**
     * 设置绘制形状
     */
    public Builder setShape(MyShape shape) {
      guiderView.setShape(shape);
      return instance;
    }

    public Builder setRadius(int radius) {
      guiderView.setRadius(radius);
      return instance;
    }

    /**
     * 设置文字图片
     */
    public Builder setTextGuideView(View view) {
      guiderView.setTextGuideView(view);
      return instance;
    }

    /**
     * 设置"我知道啦"图片
     */
    public Builder setCustomGuideView(View view) {
      guiderView.setCustomGuideView(view);
      return instance;
    }

    /**
     * 设置图片的偏移量
     */
    public Builder setOffset(int x, int y) {
      guiderView.setOffsetX(x);
      guiderView.setOffsetY(y);
      return instance;
    }

    /**
     * 设置时候包含 true:画的透明包含目标view
     */
    public Builder setContain(boolean isContain) {
      guiderView.setContain(isContain);
      return instance;
    }

    /**
     * 点击监听
     */
    public Builder setOnclickListener(final OnClickCallback callback) {
      guiderView.setOnclickListener(callback);
      return instance;
    }

    public GuideView build() {
      guiderView.setClickInfo();
      return guiderView;
    }

  }

  public void restoreState() {
    Log.v(TAG, "restoreState");
    offsetX = offsetY = 0;
    radius = 0;
    mCirclePaint = null;
    mBackgroundPaint = null;
    isMeasured = false;
    center = null;
    porterDuffXfermode = null;
    bitmap = null;
    needDraw = true;
    temp = null;
  }
}
在自己页面应用:
//文字图片
    final ImageView iv1 = new ImageView(context);
    iv1.setImageResource(R.drawable.img_guide_work_text);
    RelativeLayout.LayoutParams params1 = new RelativeLayout.LayoutParams(ViewGroup.LayoutParams.WRAP_CONTENT, ViewGroup.LayoutParams.WRAP_CONTENT);
    iv1.setLayoutParams(params1);

    //我知道啦
    final ImageView iv2 = new ImageView(context);
    iv2.setImageResource(R.drawable.img_guide_know);
    RelativeLayout.LayoutParams params2 = new RelativeLayout.LayoutParams(ViewGroup.LayoutParams.WRAP_CONTENT, ViewGroup.LayoutParams.WRAP_CONTENT);
    iv2.setLayoutParams(params2);

 guideView = GuideView.Builder
        .newInstance(context)
        .setTargetView(itemWork) //设置目标view
        .setTextGuideView(iv1)   //设置文字图片
        .setCustomGuideView(iv2)  //设置 我知道啦图片
        .setOffset(0, 80)      //偏移量 x=0 y=80
        .setDirction(GuideView.Direction.BOTTOM)  //方向
        .setShape(GuideView.MyShape.RECTANGULAR)  //矩形
        .setRadius(10)               //圆角
        .setContain(false)             //透明的方块时候包含目标view 默认false
        .setBgColor(getResources().getColor(R.color.bg_shadow))  //背景颜色
        .setOnclickListener(new GuideView.OnClickCallback() {
          @Override
          public void onClickedGuideView() {
            guideView.hide();
          }
        })
        .build();
guideView.show();
以上就是本文的全部内容,希望对大家的学习有所帮助,也希望大家多多支持Devmax。