本文为大家分享了Android实现通用验证码输入框的具体代码,供大家参考,具体内容如下
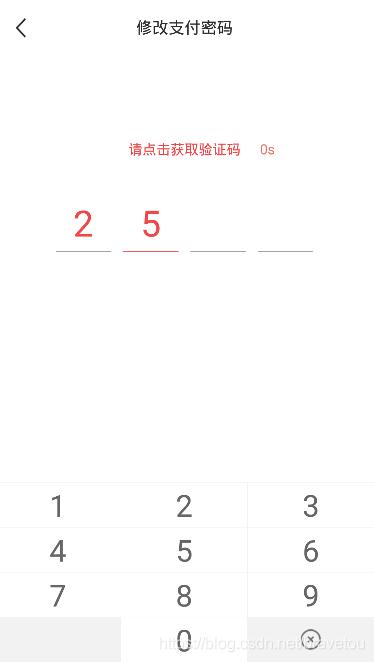
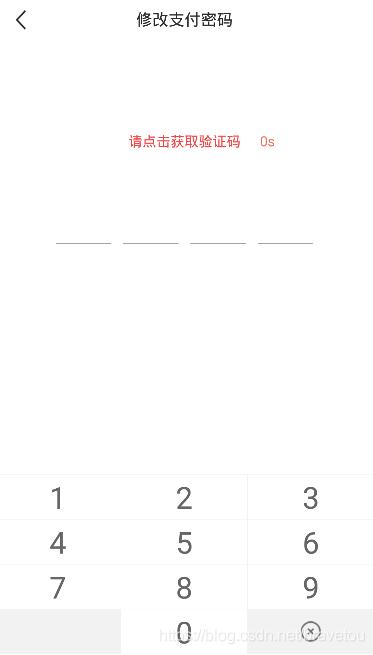
效果图
话不多说先上效果图,可以先先看看是不是自己想要的
闲聊
闲来无事优化项目时,发现原来的验证码输入框,可扩展性不高,就拿来优化了一下,说说我开始的的思路吧,最开始是想用自定义View实现的,但是发现各种画矩,太烦人了,最后采用的组合控件的形式,Android有现成的控件,用来组合组合就能用,为什么不用呢。
源码
xml ITEM 布局文件(view_auth_code_input_item.xml)
<?xml version="1.0" encoding="utf-8"?>
<LinearLayout xmlns:android="http://schemas.android.com/apk/res/android"
 android:layout_width="match_parent"
 android:layout_height="match_parent"
 android:orientation="vertical">

 <TextView
  android:id="@ id/number_tv"
  style="@style/TextStyleMain"
  android:layout_width="match_parent"
  android:layout_height="0mm"
  android:layout_weight="1"
  android:maxLength="1"
  android:text="0"
  android:textSize="72mm" />

 <View
  android:id="@ id/split_v"
  android:layout_width="match_parent"
  android:layout_height="1mm"
  android:background="@color/colorMain" />

</LinearLayout>
attrs 自定义属性(attrs.xml)
<?xml version="1.0" encoding="utf-8"?>
<resources>

 <!-- 自定义验证码输入框 属性 -->
 <declare-styleable name="AuthCodeInputView">
  <!-- 当前输入位分割线颜色 -->
  <attr name="currentSplitLineColor"
   format="reference|color" />
  <!-- 其他输入位分割线颜色 -->
  <attr name="otherSplitLineColor"
   format="reference|color" />
  <!-- 分割线高度 -->
  <attr name="splitLineHeight"
   format="dimension" />
  <!-- 验证码位数 -->
  <attr name="digit"
   format="integer" />
  <!-- 单个验证码宽度 -->
  <attr name="singleCaptchaWidth"
   format="dimension" />
  <!-- 验证码当前输入位字体颜色 -->
  <attr name="currentTextColor"
   format="reference|color" />
  <!-- 验证码当前输入位字体大小 -->
  <attr name="currentTextSize"
   format="dimension" />
  <!-- 验证码其他输入位字体颜色 -->
  <attr name="otherTextColor"
   format="reference|color" />
  <!-- 验证码其它输入位字体大小 -->
  <attr name="otherTextSize"
   format="dimension" />
  <!-- 默认颜色 -->
  <attr name="defaultColor"
   format="reference|color" />
  <!-- 默认字体大小 -->
  <attr name="defaultTextSize"
   format="dimension" />
  <!-- 默认间距 -->
  <attr name="defaultSpacing"
   format="dimension" />
 </declare-styleable>

</resources>
组合控件(AuthCodeInputView.java)
import android.content.Context;
import android.content.res.TypedArray;
import android.graphics.Color;
import android.os.Build;
import android.text.TextUtils;
import android.util.AttributeSet;
import android.util.TypedValue;
import android.view.Gravity;
import android.view.LayoutInflater;
import android.view.View;
import android.view.ViewGroup;
import android.widget.LinearLayout;
import android.widget.TextView;

import androidx.annotation.ColorInt;
import androidx.annotation.RequiresApi;

/**
 * <pre>
 *  <b>author</b> :BraveTou
 *  <b>blog</b>  :https://blog.csdn.net/bravetou
 *  <b>time</b>  :2020/9/4 16:43
 *  <b>desc</b>  :<pre>
 *   自定义验证码输入框
 *  </pre>
 * </pre>
 */
public class AuthCodeInputView extends LinearLayout {
 // <!-- 默认间距 -->
 private int mDefaultSpacing = 16;
 // <!-- 默认颜色 -->
 @ColorInt
 private int mDefaultColor = Color.BLACK;
 // <!-- 默认字体大小 -->
 private int mDefaultTextSize = 36;
 // <!-- 当前输入位分割线颜色 -->
 @ColorInt
 private int mCurrentSplitLineColor = mDefaultColor;
 // <!-- 其他输入位分割线颜色 -->
 @ColorInt
 private int mOtherSplitLineColor = mDefaultColor;
 // <!-- 分割线高度 -->
 private int mSplitLineHeight = 1;
 // <!-- 验证码位数 -->
 private int mDigit = 4;
 // <!-- 单个验证码宽度 -->
 private int mSingleCaptchaWidth = 100;
 // <!-- 验证码当前输入位字体颜色 -->
 @ColorInt
 private int mCurrentTextColor = mDefaultColor;
 // <!-- 验证码当前输入位字体大小 -->
 private int mCurrentTextSize = mDefaultTextSize;
 // <!-- 验证码其他输入位字体颜色 -->
 @ColorInt
 private int mOtherTextColor = mDefaultColor;
 // <!-- 验证码其它输入位字体大小 -->
 private int mOtherTextSize = mDefaultTextSize;

 // 记录当前输入文本
 private String mText = "";

 public AuthCodeInputView(Context context) {
  super(context);
  init(context, null);
 }

 public AuthCodeInputView(Context context, AttributeSet attrs) {
  super(context, attrs);
  init(context, attrs);
 }

 public AuthCodeInputView(Context context, AttributeSet attrs, int defStyleAttr) {
  super(context, attrs, defStyleAttr);
  init(context, attrs);
 }

 @RequiresApi(api = Build.VERSION_CODES.LOLLIPOP)
 public AuthCodeInputView(Context context, AttributeSet attrs, int defStyleAttr,
        int defStyleRes) {
  super(context, attrs, defStyleAttr, defStyleRes);
  init(context, attrs);
 }

 // 初始化
 private void init(Context context, AttributeSet attrs) {
  setOrientation(LinearLayout.HORIZONTAL);
  setGravity(Gravity.CENTER);
  if (getChildCount() > 0) {
   removeAllViews();
  }
  initAttrs(context, attrs);
  if (mDigit <= 0) {
   return;
  }
  for (int i = 0; i < mDigit; i  ) {
   // 实例化 ITEM 组件
   View child = LayoutInflater.from(context).inflate(
     R.layout.view_auth_code_input_item, this, false);
   LayoutParams lp = new LayoutParams(mSingleCaptchaWidth,
     ViewGroup.LayoutParams.MATCH_PARENT);
   if (i != 0) {
    lp.leftMargin = mDefaultSpacing;
   }
   child.setLayoutParams(lp);
   setViewAttrs(child, null, false);
   // 分割线高度只在初始化时设置一次
   View mSplitV = child.findViewById(R.id.split_v);
   LinearLayout.LayoutParams params = new LinearLayout.LayoutParams(
     ViewGroup.LayoutParams.MATCH_PARENT, mSplitLineHeight);
   mSplitV.setLayoutParams(params);
   addView(child);
  }
 }

 // 设置(未)选中属性
 private void setViewAttrs(View child, String text, boolean isSelected) {
  TextView mNumberTv = child.findViewById(R.id.number_tv);
  View mSplitV = child.findViewById(R.id.split_v);
  if (isSelected) {
   mNumberTv.setTextColor(mCurrentTextColor);
   mNumberTv.setTextSize(TypedValue.COMPLEX_UNIT_PX, mCurrentTextSize);
   mSplitV.setBackgroundColor(mCurrentSplitLineColor);
  } else {
   mNumberTv.setTextColor(mOtherTextColor);
   mNumberTv.setTextSize(TypedValue.COMPLEX_UNIT_PX, mOtherTextSize);
   mSplitV.setBackgroundColor(mOtherSplitLineColor);
  }
  mNumberTv.setText(TextUtils.isEmpty(text) ? "" : text);
 }

 // 初始化属性
 private void initAttrs(Context context, AttributeSet attrs) {
  if (null != attrs) {
   // AttributeSet 属性值的索引
   TypedArray o = context.obtainStyledAttributes(attrs, R.styleable.AuthCodeInputView);
   // 默认间距
   mDefaultSpacing = (int) o.getDimension(R.styleable.AuthCodeInputView_defaultSpacing,
     16f);
   // 获取默认颜色
   mDefaultColor = o.getColor(R.styleable.AuthCodeInputView_defaultColor, Color.BLACK);
   // 获取默认字体大小
   mDefaultTextSize = (int) o.getDimension(R.styleable.AuthCodeInputView_defaultTextSize
     , 36f);
   // 输入位分割线颜色
   mCurrentSplitLineColor =
     o.getColor(R.styleable.AuthCodeInputView_currentSplitLineColor, mDefaultColor);
   // 其他输入位分割线颜色
   mOtherSplitLineColor = o.getColor(R.styleable.AuthCodeInputView_otherSplitLineColor,
     mDefaultColor);
   // 分割线高度
   mSplitLineHeight = (int) o.getDimension(R.styleable.AuthCodeInputView_splitLineHeight
     , 1f);
   mSplitLineHeight = mSplitLineHeight <= 1 ? 1 : mSplitLineHeight;
   // 验证码位数
   mDigit = o.getInteger(R.styleable.AuthCodeInputView_digit, 4);
   // 单个验证码宽度
   mSingleCaptchaWidth =
     (int) o.getDimension(R.styleable.AuthCodeInputView_singleCaptchaWidth, 100f);
   // 验证码当前输入位字体颜色
   mCurrentTextColor = o.getColor(R.styleable.AuthCodeInputView_currentTextColor,
     mDefaultColor);
   // 验证码当前输入位字体大小
   mCurrentTextSize = (int) o.getDimension(R.styleable.AuthCodeInputView_currentTextSize
     , mDefaultTextSize);
   // 验证码其他输入位字体颜色
   mOtherTextColor = o.getColor(R.styleable.AuthCodeInputView_otherTextColor,
     mDefaultColor);
   // 验证码其它输入位字体大小
   mOtherTextSize = (int) o.getDimension(R.styleable.AuthCodeInputView_otherTextSize,
     mDefaultTextSize);
   // 回收资源
   o.recycle();
  }
 }

 // 追加文本
 public void addText(String text) {
  text = TextUtils.isEmpty(text) ? "" : text;
  setText(mText   text);
 }

 // 删除文本
 public void delText() {
  int count = TextUtils.isEmpty(mText) ? 0 : mText.length();
  if (count > 0) {
   setText(mText.substring(0, count - 1));
  } else {
   setText("");
  }
 }

 // 设置文本
 public void setText(String text) {
  text = text.trim();
  int length = TextUtils.isEmpty(text) ? 0 : text.length();
  if (length > mDigit) {
   this.mText = text.substring(0, mDigit);
   length = mDigit;
  } else {
   this.mText = length > 0 ? text : "";
  }
  int count = getChildCount();
  for (int i = 0; i < count; i  ) {
   View child = getChildAt(i);
   if (i   1 < length) {
    setViewAttrs(child, String.valueOf(text.charAt(i)), false);
   } else if (i   1 == length) {
    setViewAttrs(child, String.valueOf(text.charAt(i)), true);
   } else {
    setViewAttrs(child, null, false);
   }
  }
 }

 // 获取文本
 public String getText() {
  return mText;
 }
}
至于效果图下面那个安全键盘源码就太多了,我就不多了的,我这边是组合控件实现的,超简单。
以上就是本文的全部内容,希望对大家的学习有所帮助,也希望大家多多支持Devmax。