前言
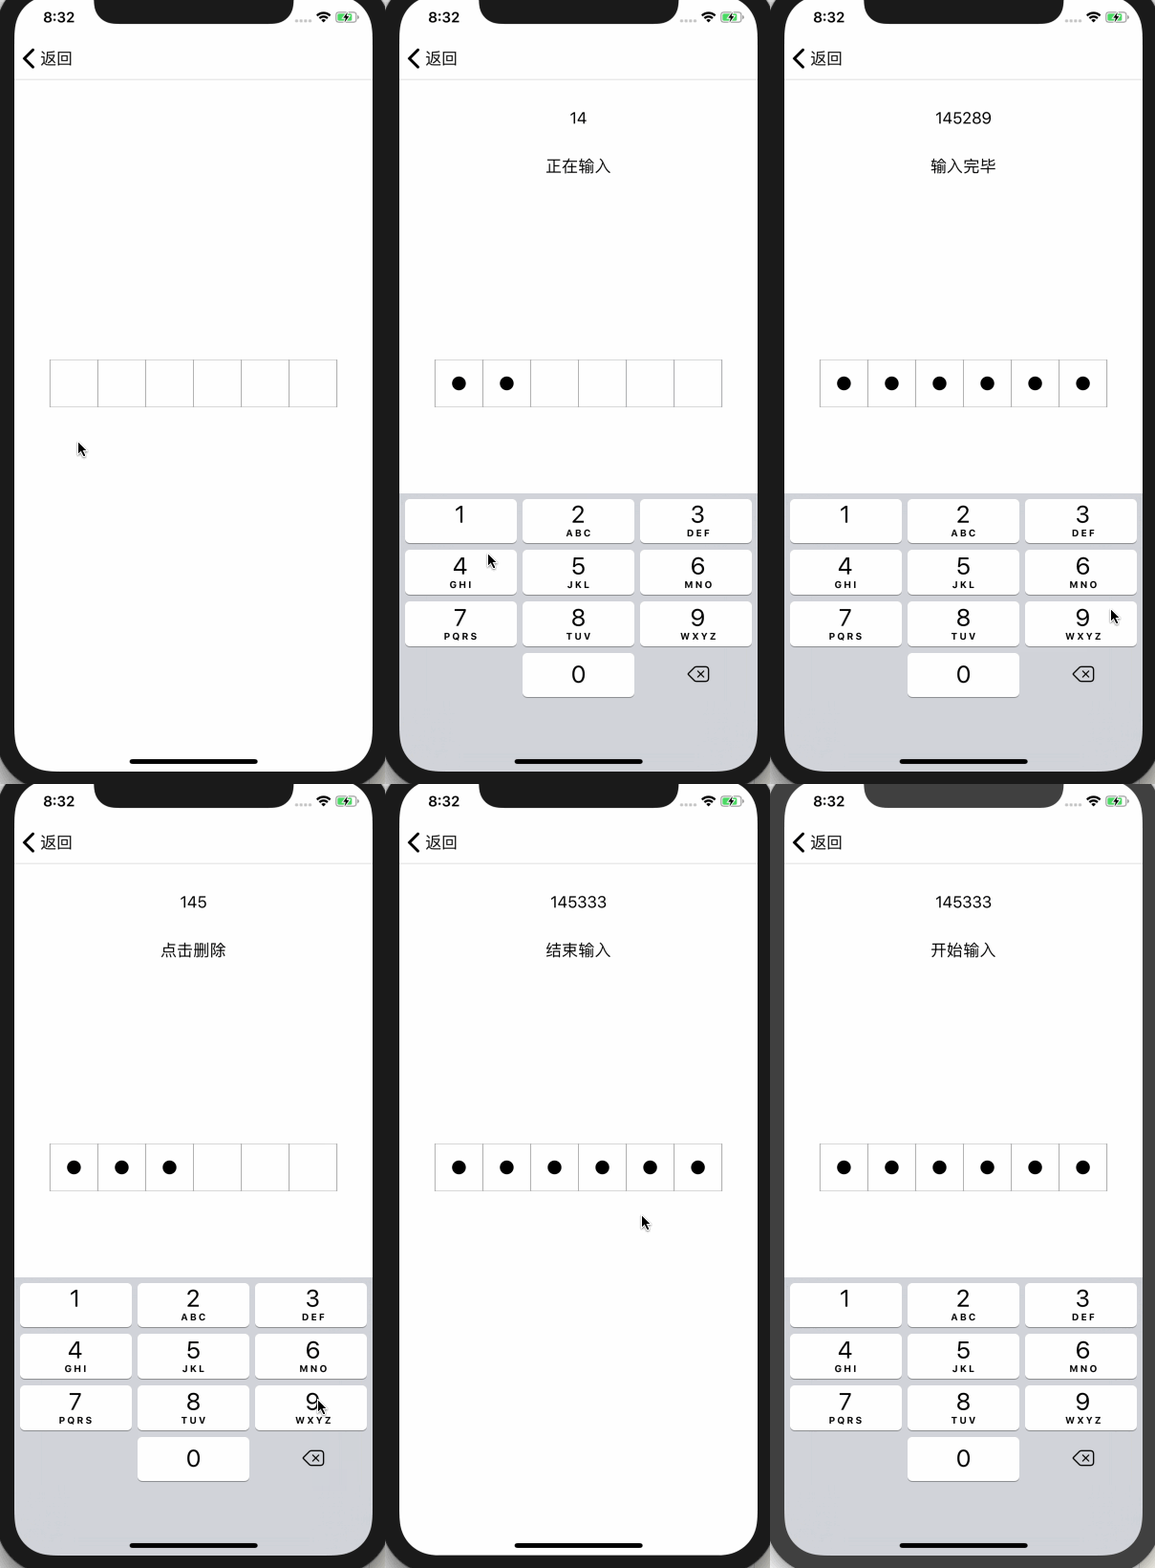
开发中很多地方都会遇到密码输入,这时候往往需要根据UI设计自定义。这里遵守UIKeyInput,实现协议中的方法,让自定义View可以进行文字输入;再通过func draw(_ rect: CGRect)绘制现自定义UI;使用配置类来统一接口;使用代理来管理各种输入相关的事件。文章末尾有提供OC和Swift双语的CLDemo下载,这里讲解就使用Swift。
1.遵守UIKeyInput协议,实现文字输入
遵守UIKeyInput协议,实现协议中- (BOOL)hasText、 - (void)insertText:(NSString *)text、 - (void)deleteBackward这三个方法。
这里方便阅读,单独抽离成为一个extension。
extension CLPasswordInputView: UIKeyInput {
 var hasText: Bool {
  return text.length > 0
 }

 func insertText(_ text: String) {
  if self.text.length < config.passwordNum {
   let cs = NSCharacterSet.init(charactersIn: "0123456789").inverted
   let string = text.components(separatedBy: cs).joined(separator: "")
   let basicTest = text == string
   if basicTest {
    self.text.append(text)
    delegate?.passwordInputViewDidChange(passwordInputView: self)
    if self.text.length == config.passwordNum {
     delegate?.passwordInputViewCompleteInput(passwordInputView: self)
    }
    setNeedsDisplay()
   }
  }
 }

 func deleteBackward() {
  if text.length > 0 {
   text.deleteCharacters(in: NSRange(location: text.length - 1, length: 1))
   delegate?.passwordInputViewDidChange(passwordInputView: self)
  }
  delegate?.passwordInputViewDidDeleteBackward(passwordInputView: self)
  setNeedsDisplay()
 }
}
2.重写override func draw(_ rect: CGRect),绘制自定义UI
根据配置信息,以及当前文字输入,绘制自定义UI,这里讲绘制代码和一些基本代码写在一起,单独抽离成extension。
extension CLPasswordInputView {
 override func becomeFirstResponder() -> Bool {
  if !isShow {
   delegate?.passwordInputViewBeginInput(passwordInputView: self)
  }
  isShow = true;
  return super.becomeFirstResponder()
 }
 override func resignFirstResponder() -> Bool {
  if isShow {
   delegate?.passwordInputViewEndInput(passwordInputView: self)
  }
  isShow = false
  return super.resignFirstResponder()
 }
 var keyboardType: UIKeyboardType {
  get {
   return .numberPad
  }
  set {

  }
 }
 override var canBecomeFirstResponder: Bool {
  return true
 }
 override var canResignFirstResponder: Bool {
  return true
 }
 override func touchesBegan(_ touches: Set<UITouch>, with event: UIEvent?) {
  super.touchesBegan(touches, with: event)
  if !isFirstResponder {
   _ = becomeFirstResponder()
  }
 }
 func updateWithConfig(config: ((CLPasswordInputViewConfigure) -> Void)?) -> Void {
  config?(self.config)
  backgroundColor = self.config.backgroundColor
  setNeedsDisplay()
 }
 override func layoutSubviews() {
  super.layoutSubviews()
  setNeedsDisplay()
 }
 override func draw(_ rect: CGRect) {
  let height = rect.size.height
  let width = rect.size.width
  let squareWidth = min(max(min(height, config.squareWidth), config.pointRadius * 4), height)
  let pointRadius = min(config.pointRadius, squareWidth * 0.5) * 0.8
  let middleSpace = CGFloat(width - CGFloat(config.passwordNum) * squareWidth) / CGFloat(CGFloat(config.passwordNum - 1)   config.spaceMultiple * 2)
  let leftSpace = middleSpace * config.spaceMultiple
  let y = (height - squareWidth) * 0.5

  let context = UIGraphicsGetCurrentContext()

  for i in 0 ..< config.passwordNum {
   context?.addRect(CGRect(x: leftSpace   CGFloat(i) * squareWidth   CGFloat(i) * middleSpace, y: y, width: squareWidth, height: squareWidth))
   context?.setLineWidth(1)
   context?.setStrokeColor(config.rectColor.cgColor)
   context?.setFillColor(config.rectBackgroundColor.cgColor)
  }
  context?.drawPath(using: .fillStroke)
  context?.setFillColor(config.pointColor.cgColor)

  for i in 0 ..< text.length {
   context?.addArc(center: CGPoint(x: leftSpace   CGFloat(i   1) * squareWidth   CGFloat(i) * middleSpace - squareWidth * 0.5, y: y   squareWidth * 0.5), radius: pointRadius, startAngle: 0, endAngle: .pi * 2, clockwise: true)
   context?.drawPath(using: .fill)
  }
 }
}
3.使用配置类,来统一接口,生成基本配置信息
自定义UI过程中,对于颜色,间隙,原点大小等,都需要留出接口,方便外部修改。一大堆属性,对于使用者而言,并不友好,因为他并不知道哪些属性是必须的,哪些是非必须的,为了让使用者方便使用,这里单独抽离出一个配置信息类,在内部实现基础配置,同时给出方法,让外部可以修改某些属性。
class CLPasswordInputViewConfigure: NSObject {
 ///密码的位数
 var passwordNum: UInt = 6
 ///边框正方形的大小
 var squareWidth: CGFloat = 50
 ///黑点的半径
 var pointRadius: CGFloat = 18 * 0.5
 ///边距相对中间间隙倍数
 var spaceMultiple: CGFloat = 5;
 ///黑点颜色
 var pointColor: UIColor = UIColor.black
 ///边框颜色
 var rectColor: UIColor = UIColor.lightGray
 ///输入框背景颜色
 var rectBackgroundColor: UIColor = UIColor.white
 ///控件背景颜色
 var backgroundColor: UIColor = UIColor.white

 class func defaultConfig() -> CLPasswordInputViewConfigure {
  let configure = CLPasswordInputViewConfigure()
  return configure
 }
}
外部修改配置的方法,使用闭包,将基本配置回调到外部,同时在外部修改这些属性后,对内部UI进行刷新。
func updateWithConfig(config: ((CLPasswordInputViewConfigure) -> Void)?) -> Void {
  config?(self.config)
  backgroundColor = self.config.backgroundColor
  setNeedsDisplay()
 }
4.使用代理来管理各种输入相关的事件
这里单独创建一个协议,管理各种输入事件,同时通过extension实现这些协议,这样外部就可以选择性的实现这些协议,而不是必须实现。
protocol CLPasswordInputViewDelegate {
 ///输入改变
 func passwordInputViewDidChange(passwordInputView:CLPasswordInputView) -> Void
 ///点击删除
 func passwordInputViewDidDeleteBackward(passwordInputView:CLPasswordInputView) -> Void
 ///输入完成
 func passwordInputViewCompleteInput(passwordInputView:CLPasswordInputView) -> Void
 ///开始输入
 func passwordInputViewBeginInput(passwordInputView:CLPasswordInputView) -> Void
 ///结束输入
 func passwordInputViewEndInput(passwordInputView:CLPasswordInputView) -> Void
}

extension CLPasswordInputViewDelegate {
 ///输入改变
 func passwordInputViewDidChange(passwordInputView:CLPasswordInputView) -> Void {

 }
 ///点击删除
 func passwordInputViewDidDeleteBackward(passwordInputView:CLPasswordInputView) -> Void {

 }
 ///输入完成
 func passwordInputViewCompleteInput(passwordInputView:CLPasswordInputView) -> Void {

 }
 ///开始输入
 func passwordInputViewBeginInput(passwordInputView:CLPasswordInputView) -> Void {

 }
 ///结束输入
 func passwordInputViewEndInput(passwordInputView:CLPasswordInputView) -> Void {

 }
}
5.效果图
这里简单录制了一个效果,更多请参考CLDemo (本地下载)

效果图.gif
6.总结
为了方便大家学习,这里提供了OC和Swift两种语言分别实现的----->>>CLDemo (本地下载),如果对你有所帮助,欢迎Star。
好了,以上就是这篇文章的全部内容了,希望本文的内容对大家的学习或者工作具有一定的参考学习价值,如果有疑问大家可以留言交流,谢谢大家对Devmax的支持。