Android图片上传的应用场景,供大家参考,具体内容如下
在Android开发中,很多时候我们需要进行图片,文件的上传下载,最直接的一个应用场景就是用户头像的保存与切换,以及像即时通讯中的图片发送等任何在App中设计图片的应用都是通过图片的上传下载完成的。
Android 如何实现图片的上传下载?
近期在工作中遇到了需要实现其图片上传的功能,特此写了一个demo帮助更多的人进行相关学习
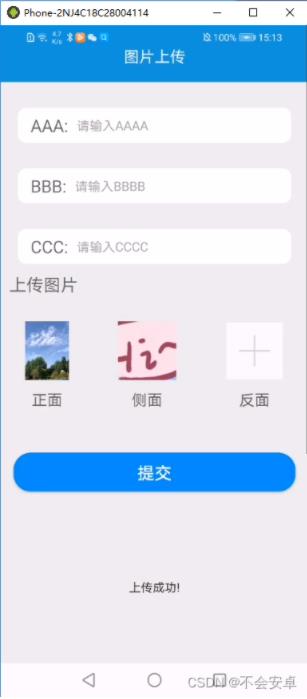
这是demo的效果图:
其实整个过程也非常简单,图片上传可以整理为访问本地选取图片,以及图片提交上传(后端提供上传图片接口,这里只对安卓技术进行相关说明)。
实现这一过程这边使用了PictureSelector Xutill或者PictureSelector OkHttp进行了功能的实现。
pictureSelector是一个强大的Android选取图片,上传图片的开源工具,支持从相册或拍照选择图片或视频、音频,支持动态权限获取、裁剪(单图or多图裁剪)、压缩、主题自定义配置等功能、适配android 6.0 系统,而且你能遇到的问题,README文档都有解决方案。
xutils是前几年比较火得一个开源框架,主要分四个重要的模块:ViewUtils,HttpUtils,BitmapUtils,DbUtils,包含了很多实用的工具类,支持大文件上传,且有更全面的http请求协议支持,拥有灵活的Orm,支持事件注解且不受代码混淆影响。
xUtils3网络模块大大方便了在实际开发中网络模块的开发,xUtils3网络模块大致包括GET请求、POST请求、请求方式、上传文件、下载文件、使用缓存等功能
Android 图片上传下载实现过程(小白教学)
Demo的UI界面:MainActivity的activity_main xml
<?xml version="1.0" encoding="utf-8"?>
<LinearLayout xmlns:android="http://schemas.android.com/apk/res/android"
    xmlns:app="http://schemas.android.com/apk/res-auto"
    xmlns:tools="http://schemas.android.com/tools"
    android:layout_width="match_parent"
    android:layout_height="match_parent"
    android:background="@color/coreGray"
    android:orientation="vertical"
    tools:context=".MainActivity">


    <include layout="@layout/layout_title"/>

    <LinearLayout
        style="@style/LoginLayoutStyle"

        android:layout_width="match_parent">

        <TextView
            android:id="@ id/aaa"
            android:layout_width="wrap_content"
            android:layout_height="wrap_content"
            android:layout_gravity="center"
            android:text="AAA:"
            android:textColor="@color/black60"
            android:textSize="20dp" />

        <com.tz.picturedemo.view.ClearEditText
            android:id="@ id/qs_username2"
            style="@style/EditTextStyle"
            android:layout_width="match_parent"
            android:layout_height="wrap_content"
            android:hint="请输入AAAA"
            android:inputType="text"
            android:lines="1"
            android:singleLine="true"
            android:textCursorDrawable="@null"
            app:regexType="name" />
    </LinearLayout>
    <LinearLayout
        style="@style/LoginLayoutStyle"
        android:layout_width="match_parent">

        <TextView
            android:layout_width="wrap_content"
            android:layout_height="wrap_content"
            android:layout_gravity="center"
            android:text="BBB:"
            android:textColor="@color/black60"
            android:textSize="20dp" />

        <com.tz.picturedemo.view.ClearEditText
            android:id="@ id/qs_username3"
            style="@style/EditTextStyle"
            android:layout_width="match_parent"
            android:layout_height="wrap_content"
            android:hint="请输入BBBB"
            android:inputType="text"
            android:lines="1"
            android:singleLine="true"
            android:textCursorDrawable="@null"
            app:regexType="name" />
    </LinearLayout>
    <LinearLayout
        style="@style/LoginLayoutStyle"
        android:layout_width="match_parent">

        <TextView
            android:layout_width="wrap_content"
            android:layout_height="wrap_content"
            android:layout_gravity="center"
            android:text="CCC:"
            android:textColor="@color/black60"
            android:textSize="20dp" />

        <com.tz.picturedemo.view.ClearEditText
            android:id="@ id/qs_username"
            style="@style/EditTextStyle"
            android:layout_width="match_parent"
            android:layout_height="wrap_content"
            android:hint="请输入CCCC"
            android:inputType="text"
            android:lines="1"
            android:singleLine="true"
            android:textCursorDrawable="@null"
            app:regexType="name" />
    </LinearLayout>

    <TextView
        android:layout_width="match_parent"
        android:layout_height="wrap_content"
        android:text="上传图片"
        android:textColor="@color/black60"
        android:padding="10dp"
        android:textSize="20sp"/>
    <LinearLayout
        android:layout_width="match_parent"
        android:layout_height="wrap_content"
        android:paddingTop="20dp"
        android:orientation="horizontal">

        <LinearLayout
            android:layout_width="wrap_content"
            android:layout_height="wrap_content"
            android:layout_weight="1"
            android:layout_gravity="center"
            android:gravity="center"
            android:orientation="vertical">
            <ImageView
                android:id="@ id/picture1"
                android:layout_width="wrap_content"
                android:layout_height="wrap_content"
                android:src="@mipmap/ic_add_image"/>

            <TextView
                android:layout_width="wrap_content"
                android:layout_height="wrap_content"
                android:paddingTop="10dp"
                android:text="正面"
                android:textColor="@color/black60"
                android:textSize="18sp" />

        </LinearLayout>

        <LinearLayout
            android:layout_width="wrap_content"
            android:layout_height="wrap_content"
            android:layout_weight="1"
            android:layout_gravity="center"
            android:gravity="center"
            android:orientation="vertical">
            <ImageView
                android:id="@ id/picture2"
                android:layout_width="wrap_content"
                android:layout_height="wrap_content"
                android:src="@mipmap/ic_add_image"/>

            <TextView
                android:layout_width="wrap_content"
                android:layout_height="wrap_content"
                android:paddingTop="10dp"
                android:text="侧面"
                android:textColor="@color/black60"
                android:textSize="18sp" />

        </LinearLayout>

        <LinearLayout
            android:layout_width="wrap_content"
            android:layout_height="wrap_content"
            android:layout_weight="1"
            android:layout_gravity="center"
            android:gravity="center"
            android:orientation="vertical">
            <ImageView
                android:id="@ id/picture3"
                android:layout_width="wrap_content"
                android:layout_height="wrap_content"
                android:src="@mipmap/ic_add_image"/>

            <TextView
                android:layout_width="wrap_content"
                android:layout_height="wrap_content"
                android:paddingTop="10dp"
                android:text="反面"
                android:textColor="@color/black60"
                android:textSize="18sp" />
        </LinearLayout>

    </LinearLayout>

    <Button
        android:id="@ id/makesure"
        android:layout_width="match_parent"
        android:layout_height="45dp"
        android:text="提交"
        android:layout_marginLeft="15dp"
        android:layout_marginRight="15dp"
        android:layout_marginTop="50dp"
        android:textSize="20dp"
        android:textColor="@color/white"
        android:background="@drawable/share_item_blue_bg"
        />
</LinearLayout>
我在此处为了界面美化,引用了一些第三方自定义view大家可自行替换成原生即可
Demo功能核心代码 MainActivity
package com.tz.picturedemo;

import static com.luck.picture.lib.config.SelectMimeType.ofImage;
import androidx.appcompat.app.AppCompatActivity;
import android.graphics.Color;
import android.os.Bundle;
import android.util.Log;
import android.view.View;
import android.widget.Button;
import android.widget.ImageView;
import android.widget.Toast;
import com.alibaba.fastjson.JSON;
import com.bumptech.glide.Glide;
import com.luck.picture.lib.basic.PictureSelector;
import com.luck.picture.lib.config.PictureConfig;
import com.luck.picture.lib.config.SelectMimeType;
import com.luck.picture.lib.entity.LocalMedia;
import com.luck.picture.lib.interfaces.OnResultCallbackListener;
import org.xutils.common.Callback;
import org.xutils.http.RequestParams;
import org.xutils.x;
import java.io.File;
import java.io.IOException;
import java.util.ArrayList;
import java.util.List;
import okhttp3.Call;
import okhttp3.MediaType;
import okhttp3.MultipartBody;
import okhttp3.OkHttpClient;
import okhttp3.Request;
import okhttp3.RequestBody;
import okhttp3.Response;

public class MainActivity extends AppCompatActivity implements View.OnClickListener {

    private ImageView mPicture1;
    private ImageView mPicture2;
    private ImageView mPicture3;
    private  List<String>  PictureArr=new ArrayList<>();
    private Button mBtn;

    @Override
    protected void onCreate(Bundle savedInstanceState) {
        super.onCreate(savedInstanceState);
        setContentView(R.layout.activity_main);
        getWindow().getDecorView().setSystemUiVisibility(View.SYSTEM_UI_FLAG_LAYOUT_FULLSCREEN );//这句让view 顶到顶
        getWindow().setStatusBarColor(Color.TRANSPARENT);//这句让状态栏透明
        initVew();
    }

    private void initVew() {
        mPicture1=findViewById(R.id.picture1);
        mPicture2=findViewById(R.id.picture2);
        mPicture3=findViewById(R.id.picture3);
        mBtn=findViewById(R.id.makesure);

        mPicture1.setOnClickListener(this);
        mPicture2.setOnClickListener(this);
        mPicture3.setOnClickListener(this);
        mBtn.setOnClickListener(this);
    }

    @Override
    public void onClick(View view) {
        switch (view.getId()) {
            case R.id.picture1:
                photoAndAll(mPicture1);
                break;
            case R.id.picture2:
                photoAndAll(mPicture2);
            break;
            case R.id.picture3:
                photoAndAll(mPicture3);
                break;
            case R.id.makesure:

                break;
        }
    }


    private  void photoAndAll(ImageView imageView){
        PictureSelector.create(this)
                .openGallery(SelectMimeType.ofImage())
                .setImageEngine(GlideEngine.createGlideEngine()).setMaxSelectNum(1)
                .forResult(new OnResultCallbackListener<LocalMedia>() {
                    @Override
                    public void onResult(ArrayList<LocalMedia> result) {
                        Log.e("leo","图片路径" result.get(0).getPath());
                        Log.e("leo","绝对路径" result.get(0).getRealPath());
                        Glide.with(MainActivity.this).load(result.get(0).getPath()).into(imageView);
                        //将bitmap图片传入后端
                        //imageUpLoad(result.get(0).getRealPath());
                        SubmitPicture(result.get(0).getRealPath());
                    }
                    @Override
                    public void onCancel() {
                        Toast.makeText(MainActivity.this, "error", Toast.LENGTH_SHORT).show();
                    }
                });
    }

    public static void imageUpLoad(String localPath) {
        MediaType MEDIA_TYPE_PNG = MediaType.parse("image/png");
        OkHttpClient client = new OkHttpClient();

        MultipartBody.Builder builder = new MultipartBody.Builder().setType(MultipartBody.FORM);

        File f = new File(localPath);
        builder.addFormDataPart("files", f.getName(), RequestBody.create(MEDIA_TYPE_PNG, f));
        final MultipartBody requestBody = builder.build();
        //构建请求
        final Request request = new Request.Builder()
                .url("后端接口")//地址
                .post(requestBody)//添加请求体
                .build();

        client.newCall(request).enqueue(new okhttp3.Callback() {
            @Override
            public void onFailure(Call call, IOException e) {
                System.out.println("上传失败:e.getLocalizedMessage() = "   e.getLocalizedMessage());
            }

            @Override
            public void onResponse(Call call, Response response) throws IOException {

                pmodel model = JSON.parseObject(response.body().string(), pmodel.class);
                Log.e("leo",JSON.toJSONString(model));
                pmodel model2 = JSON.parseObject(JSON.toJSONString(model), pmodel.class);

            }
        });
    }


    private void  SubmitPicture(String path){
        String  url = "后端接口";
        String token="token,没有要求则无需写入";
        RequestParams params = new RequestParams(url);
        params.addHeader("Authorization",token);

        //设置表单传送
        params.setMultipart(true);
        params.addBodyParameter("file",new File(path));
        params.addParameter("fileType","PICTURE");
        x.http().post(params, new Callback.CommonCallback<String>() {
            @Override
            public void onSuccess(String result) {
                Log.e("leo","2222" params);
                Toast.makeText(MainActivity.this, "上传成功!", Toast.LENGTH_SHORT).show();
                Log.e("leo","返回" result);
                pmodel model = JSON.parseObject(result, pmodel.class);
                PictureArr.add(model.getData().get(0).getUrl());
            }

            @Override
            public void onError(Throwable ex, boolean isOnCallback) {
                Log.e("leo","失败" ex.getMessage());
            }

            @Override
            public void onCancelled(CancelledException cex) {

            }

            @Override
            public void onFinished() {
            }
        });
    }

}
说明与解析:这边我们通过点击上传ImageView,则利用pictureSelector进行相册照片的选取,即photoAndAll方法进行选取,并且利用Glide(图片加载工具类)进行UI界面的显示,最后利用两种方法(imageUpload和SubmitPicture)提交上传图片,两种方法自行选取即可。
第三方pictureSelector的引入,以及Glide图片加载,xutils工具类的引入可参考如下:
 // PictureSelector 基础 (必须)
    implementation 'io.github.lucksiege:pictureselector:v3.0.5'
    // 图片压缩 (按需引入)
    implementation 'io.github.lucksiege:compress:v3.0.5'
    // 图片裁剪 (按需引入)
    implementation 'io.github.lucksiege:ucrop:v3.0.5'
    // 自定义相机 (按需引入)
    implementation 'io.github.lucksiege:camerax:v3.0.5'
    //    加载网络图片
    implementation 'com.github.bumptech.glide:glide:4.10.0'
    annotationProcessor 'com.github.bumptech.glide:compiler:4.10.0'
    //网络请求
    implementation 'org.xutils:xutils:3.8.4'
xutils工具的使用需要创建自定义Application进行初始化
public class BaseApplication extends Application {
    public static Handler sHandler;
    public static Context sContext = null;
    @Override
    public void onCreate() {
        super.onCreate();

        //初始化xUtils
        x.Ext.init(this);
        x.Ext.setDebug(BuildConfig.DEBUG);

    }

}
Android图片上传下载总结与扩展
至此,简单的Android图片上传就完成了,图片的下载与只相似,只需要利用Xutils网络工具进行接口访问,拿到图片利用Glide或者其他方式进行显示和应用即可。
图片的上传下载与一些文件的上传下载类似,本demo只进行了单图上传的实例,实际上pictureSelector工具类十分强大,对于多图多选,图片压缩,视频选取都可以一句代码搞定,这样就可以很方便的实现多图上传,视频上传等其他功能,前提是后端小伙伴提供给你的接口支持相关上传下载。
以上就是本文的全部内容,希望对大家的学习有所帮助,也希望大家多多支持Devmax。