需求:想实现像美团中列表下拉后出现悬浮窗的效果。
思路:首先对ScrollView进行滑动监听,然后在onScrollChanged()方法中获取到滑动的Y值,接着进行相关操作即可。
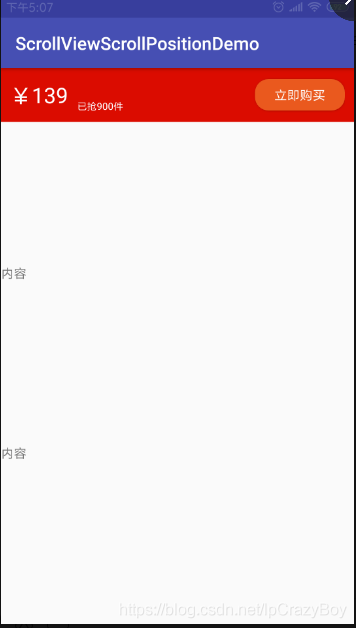
效果一如如下:

实现步骤:
1、自定义MyScrollView
(1)重写onScrollChanged()获取Y值。
(2)自定义滑动监听接口onScrollListener并公开此接口。
public class MyScrollView extends ScrollView {

    private OnScrollListener onScrollListener;

    public MyScrollView(Context context) {
        super(context);
    }

    public MyScrollView(Context context, AttributeSet attrs) {
        super(context, attrs);
    }

    public MyScrollView(Context context, AttributeSet attrs, int defStyleAttr) {
        super(context, attrs, defStyleAttr);
    }

    @Override
    protected int computeVerticalScrollRange() {
        return super.computeVerticalScrollRange();
    }

    @Override
    protected void onScrollChanged(int l, int t, int oldl, int oldt) {
        super.onScrollChanged(l, t, oldl, oldt);
        if (onScrollListener != null) {
            onScrollListener.onScroll(t);
        }
    }

    /**
     * 接口对外公开
     * @param onScrollListener
     */
    public void setOnScrollListener(OnScrollListener onScrollListener) {
        this.onScrollListener = onScrollListener;
    }

    /**
     *
     * 滚动的回调接口
     *
     * @author xiaanming
     *
     */
    public interface OnScrollListener{
        /**
         * 回调方法, 返回MyScrollView滑动的Y方向距离
         * @param scrollY
         *              、
         */
        void onScroll(int scrollY);
    }
}
2、布局文件如下:
(主要是创建两个相同的布局,顶部一个,相应的位置一个,后面有用)
<?xml version="1.0" encoding="utf-8"?>
<LinearLayout android:layout_width="match_parent"
    android:id="@ id/Main_lLayoutParent"
    android:layout_height="match_parent"
    android:orientation="vertical"
    xmlns:android="http://schemas.android.com/apk/res/android">

    <com.deepreality.scrollviewscrollpositiondemo.MyScrollView
        android:id="@ id/Main_myScrollView"
        android:layout_width="match_parent"
        android:layout_height="match_parent">

        <FrameLayout
            android:layout_width="match_parent"
            android:layout_height="wrap_content">

            <LinearLayout
                android:layout_width="match_parent"
                android:layout_height="match_parent"
                android:orientation="vertical">

                <ImageView
                    android:layout_width="match_parent"
                    android:layout_height="260dp"
                    android:src="@mipmap/icon_product"
                    android:scaleType="fitXY"/>

                <LinearLayout
                    android:id="@ id/Main_lLayoutViewTemp"
                    android:layout_width="match_parent"
                    android:layout_height="60dp"
                    android:orientation="horizontal"
                    android:background="@color/colorRed"
                    android:gravity="center_vertical"
                    android:paddingLeft="10dp"
                    android:paddingRight="10dp">

                    <TextView
                        android:layout_width="wrap_content"
                        android:layout_height="wrap_content"
                        android:text="¥139"
                        android:textSize="24dp"
                        android:textColor="@color/colorWhite"/>

                    <LinearLayout
                        android:layout_width="0dp"
                        android:layout_weight="1"
                        android:layout_height="match_parent"
                        android:orientation="vertical"
                        android:gravity="bottom"
                        android:paddingLeft="10dp"
                        android:paddingBottom="10dp">

                        <TextView
                            android:layout_width="wrap_content"
                            android:layout_height="wrap_content"
                            android:text="已抢900件"
                            android:textSize="11dp"
                            android:textColor="@color/colorWhite"/>

                    </LinearLayout>

                    <Button
                        android:layout_width="100dp"
                        android:layout_height="35dp"
                        android:text="立即购买"
                        android:textColor="@color/colorWhite"
                        android:background="@drawable/btn_corner"/>

                </LinearLayout>

                <TextView
                    android:layout_width="match_parent"
                    android:layout_height="200dp"
                    android:text="内容"/>

                <TextView
                    android:layout_width="match_parent"
                    android:layout_height="200dp"
                    android:text="内容"/>

                <TextView
                    android:layout_width="match_parent"
                    android:layout_height="200dp"
                    android:text="内容"/>

                <TextView
                    android:layout_width="match_parent"
                    android:layout_height="200dp"
                    android:text="内容"/>

            </LinearLayout>

            <LinearLayout
                android:id="@ id/Main_lLayoutView"
                android:layout_width="match_parent"
                android:layout_height="60dp"
                android:orientation="horizontal"
                android:background="@color/colorRed"
                android:gravity="center_vertical"
                android:paddingLeft="10dp"
                android:paddingRight="10dp">

                <TextView
                    android:layout_width="wrap_content"
                    android:layout_height="wrap_content"
                    android:text="¥139"
                    android:textSize="24dp"
                    android:textColor="@color/colorWhite"/>

                <LinearLayout
                    android:layout_width="0dp"
                    android:layout_weight="1"
                    android:layout_height="match_parent"
                    android:orientation="vertical"
                    android:gravity="bottom"
                    android:paddingLeft="10dp"
                    android:paddingBottom="10dp">

                    <TextView
                        android:layout_width="wrap_content"
                        android:layout_height="wrap_content"
                        android:text="已抢900件"
                        android:textSize="11dp"
                        android:textColor="@color/colorWhite"/>

                </LinearLayout>

                <Button
                    android:id="@ id/Main_btnBuy"
                    android:layout_width="100dp"
                    android:layout_height="35dp"
                    android:text="立即购买"
                    android:textColor="@color/colorWhite"
                    android:background="@drawable/btn_corner"/>

            </LinearLayout>

        </FrameLayout>

    </com.deepreality.scrollviewscrollpositiondemo.MyScrollView>

</LinearLayout>
3、MainActivity.java的代码如下:
public class MainActivity extends AppCompatActivity implements MyScrollView.OnScrollListener, View.OnClickListener {

    private Context mContext;

    private LinearLayout lLayoutParent, lLayoutTemp, lLayoutView;
    private Button btnBuy;
    private MyScrollView myScrollView;


    @Override
    protected void onCreate(Bundle savedInstanceState) {
        super.onCreate(savedInstanceState);
        setContentView(R.layout.activity_main);

        baseDataInit();
        bindViews();
        viewsAddListener();
        viewsDataInit();
    }

    private void baseDataInit() {
        mContext = this;
    }

    private void bindViews() {
        lLayoutParent = findViewById(R.id.Main_lLayoutParent);
        lLayoutTemp = findViewById(R.id.Main_lLayoutViewTemp);
        lLayoutView = findViewById(R.id.Main_lLayoutView);
        btnBuy = findViewById(R.id.Main_btnBuy);
        myScrollView = findViewById(R.id.Main_myScrollView);
    }

    private void viewsAddListener() {
        //当布局的状态或者控件的可见性发生改变回调的接口
        lLayoutParent.getViewTreeObserver().addOnGlobalLayoutListener(new ViewTreeObserver.OnGlobalLayoutListener() {
            @Override
            public void onGlobalLayout() {
                //这一步很重要,使得上面的购买布局和下面的购买布局重合
                onScroll(myScrollView.getScrollY());
            }
        });
        myScrollView.setOnScrollListener(this);
        btnBuy.setOnClickListener(this);
    }

    private void viewsDataInit() {

    }

    @Override
    public void onScroll(int scrollY) {
        int mBuyLayout2ParentTop = Math.max(scrollY, lLayoutTemp.getTop());
        lLayoutView.layout(0, mBuyLayout2ParentTop, lLayoutView.getWidth(), mBuyLayout2ParentTop   lLayoutView.getHeight());
    }

    @Override
    public void onClick(View v) {
        Toast.makeText(mContext, "您点击了购买按钮", Toast.LENGTH_SHORT).show();
    }
}
其中,onScroll()接口方法中监听到的是垂直方向滑动的距离Y,可以根据自己的需要进行布局的其他操作。
附加:
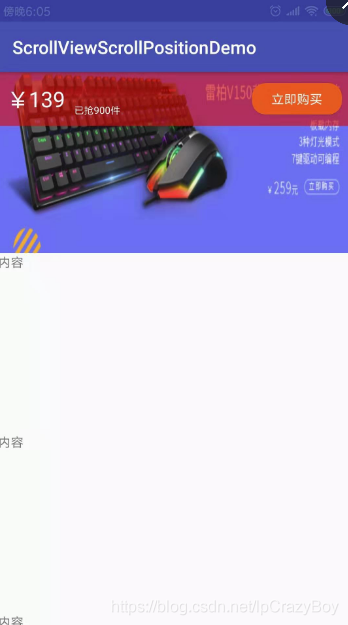
效果二如下图所示:
(根据ScrollView下滑距离设置布局的透明度)

布局文件如下:
<?xml version="1.0" encoding="utf-8"?>
<LinearLayout android:layout_width="match_parent"
    android:id="@ id/Main_lLayoutParent"
    android:layout_height="match_parent"
    android:orientation="vertical"
    xmlns:android="http://schemas.android.com/apk/res/android">

    <RelativeLayout
        android:layout_width="match_parent"
        android:layout_height="match_parent">

        <com.deepreality.scrollviewscrollpositiondemo.MyScrollView
            android:id="@ id/Main_myScrollView"
            android:layout_width="match_parent"
            android:layout_height="match_parent">

            <FrameLayout
                android:layout_width="match_parent"
                android:layout_height="wrap_content">

                <LinearLayout
                    android:layout_width="match_parent"
                    android:layout_height="match_parent"
                    android:orientation="vertical">

                    <LinearLayout
                        android:layout_width="match_parent"
                        android:layout_height="match_parent"
                        android:orientation="vertical">

                        <ImageView
                            android:layout_width="match_parent"
                            android:layout_height="260dp"
                            android:src="@mipmap/icon_product"
                            android:scaleType="fitXY"/>

                        <TextView
                            android:layout_width="match_parent"
                            android:layout_height="200dp"
                            android:text="内容"/>

                        <TextView
                            android:layout_width="match_parent"
                            android:layout_height="200dp"
                            android:text="内容"/>

                        <TextView
                            android:layout_width="match_parent"
                            android:layout_height="200dp"
                            android:text="内容"/>

                        <TextView
                            android:layout_width="match_parent"
                            android:layout_height="200dp"
                            android:text="内容"/>

                    </LinearLayout>

                </LinearLayout>

            </FrameLayout>

        </com.deepreality.scrollviewscrollpositiondemo.MyScrollView>

        <LinearLayout
            android:id="@ id/Main_lLayoutViewTemp1"
            android:layout_width="match_parent"
            android:layout_height="60dp"
            android:orientation="horizontal"
            android:background="@color/colorRed"
            android:gravity="center_vertical"
            android:paddingLeft="10dp"
            android:layout_alignParentTop="true"
            android:paddingRight="10dp">

            <TextView
                android:layout_width="wrap_content"
                android:layout_height="wrap_content"
                android:text="¥139"
                android:textSize="24dp"
                android:textColor="@color/colorWhite"/>

            <LinearLayout
                android:layout_width="0dp"
                android:layout_weight="1"
                android:layout_height="match_parent"
                android:orientation="vertical"
                android:gravity="bottom"
                android:paddingLeft="10dp"
                android:paddingBottom="10dp">

                <TextView
                    android:layout_width="wrap_content"
                    android:layout_height="wrap_content"
                    android:text="已抢900件"
                    android:textSize="11dp"
                    android:textColor="@color/colorWhite"/>

            </LinearLayout>

            <Button
                android:id="@ id/Second_btnBuy"
                android:layout_width="100dp"
                android:layout_height="35dp"
                android:text="立即购买"
                android:textColor="@color/colorWhite"
                android:background="@drawable/btn_corner"/>

        </LinearLayout>

    </RelativeLayout>

</LinearLayout>
相应的代码和上一个样式的代码基本一致,只是改了接口中的实现方法。
@Override
public void onScroll(int scrollY) {
    if (scrollY >= 225) {
        scrollY = 225;
    }
    lLayoutViewTemp1.getBackground().setAlpha(scrollY);
}
到此这篇关于Android中ScrollView监听滑动距离案例讲解的文章就介绍到这了,更多相关Android中ScrollView监听滑动距离内容请搜索Devmax以前的文章或继续浏览下面的相关文章希望大家以后多多支持Devmax!