在开发Android项目的过程中,弹出框真的是我们的常见的一种互动式窗体,但是Android系统自带的弹出框往往都不能满足我们的需要,大多数的时候需要我们自定义一种更漂亮的窗体来来展示给用户。
接下来是我很久之前用的一个自定义弹出框,记录一下,以便自己日后使用。
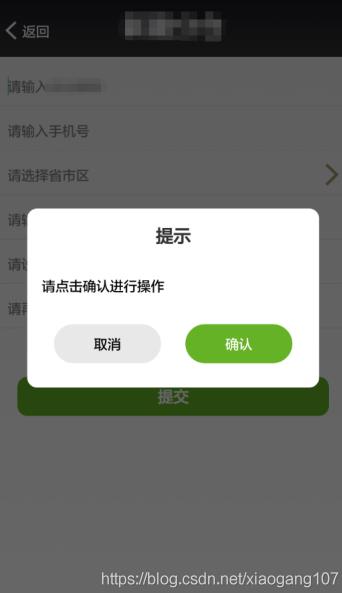
0、先来一张效果图
1、先定义个一个继承自Dialog的自定义弹框CustomDialog
import android.app.Dialog;
import android.content.Context;
import android.view.LayoutInflater;
import android.view.View;
import android.view.ViewGroup;
import android.widget.Button;
import android.widget.TextView;

/**
 * 作者 Aaron Zhao
 * 时间 2015/9/16 11:21
 * 名称 CustomDialog.java 描述
 */
public class CustomDialog extends Dialog {
    /* Constructor */
    private CustomDialog(Context context) {
        super(context);
    }

    private CustomDialog(Context context, int themeResId) {
        super(context, themeResId);
    }

    private CustomDialog(Context context, boolean cancelable, OnCancelListener cancelListener) {
        super(context, cancelable, cancelListener);
    }

    /* Builder */
    public static class Builder {
        private TextView tvTitle, tvWarning, tvInfo;
        private Button btnCancel, btnConfirm;

        private View mLayout;
        private View.OnClickListener mButtonCancelClickListener;
        private View.OnClickListener mButtonConfirmClickListener;

        private CustomDialog mDialog;

        public Builder(Context context) {
            mDialog = new CustomDialog(context, R.style.custom_dialog);
            LayoutInflater inflater = (LayoutInflater) context.getSystemService(Context.LAYOUT_INFLATER_SERVICE);
            // 加载布局文件
            mLayout = inflater.inflate(R.layout.dialog_custom, null, false);
            // 添加布局文件到 Dialog
            mDialog.addContentView(mLayout, new ViewGroup.LayoutParams(ViewGroup.LayoutParams.MATCH_PARENT, ViewGroup.LayoutParams.WRAP_CONTENT));

            tvTitle = (TextView) mLayout.findViewById(R.id.tv_title);
            tvWarning = (TextView) mLayout.findViewById(R.id.tv_warning);
            tvInfo = (TextView) mLayout.findViewById(R.id.tv_info);
            btnCancel = (Button) mLayout.findViewById(R.id.btn_cancel);
            btnConfirm = (Button) mLayout.findViewById(R.id.btn_confirm);
        }

        /**
         * 设置 Dialog 标题
         */
        public Builder setTitle(String title) {
            tvTitle.setText(title);
            tvTitle.setVisibility(View.VISIBLE);
            return this;
        }

        /**
         * 设置 Warning
         */
        public Builder setWarning(String waring) {
            tvWarning.setText(waring);
            if (waring == null || waring.equals("")) {
                tvWarning.setVisibility(View.GONE);
            }
            return this;
        }

        /**
         * 设置 Info
         */
        public Builder setInfo(String message) {
            tvInfo.setText(message);
            return this;
        }

        /**
         * 设置取消按钮文字和监听
         */
        public Builder setButtonCancel(String text, View.OnClickListener listener) {
            btnCancel.setText(text);
            mButtonCancelClickListener = listener;
            return this;
        }

        /**
         * 设置确认按钮文字和监听
         */
        public Builder setButtonConfirm(String text, View.OnClickListener listener) {
            btnConfirm.setText(text);
            mButtonConfirmClickListener = listener;
            return this;
        }

        public CustomDialog create() {
            btnCancel.setOnClickListener(new android.view.View.OnClickListener() {
                @Override
                public void onClick(View view) {
                    mDialog.dismiss();
                    mButtonCancelClickListener.onClick(view);
                }
            });

            btnConfirm.setOnClickListener(new android.view.View.OnClickListener() {
                @Override
                public void onClick(View view) {
                    mDialog.dismiss();
                    mButtonConfirmClickListener.onClick(view);
                }
            });

            mDialog.setContentView(mLayout);
            mDialog.setCancelable(true);
            mDialog.setCanceledOnTouchOutside(false);
            return mDialog;
        }
    }
}
2、定义CustomDialo布局文件:dialog_custom
<?xml version="1.0" encoding="utf-8"?>
<LinearLayout xmlns:android="http://schemas.android.com/apk/res/android"
    android:layout_width="match_parent"
    android:layout_height="match_parent"
    android:gravity="center"
    android:orientation="vertical">

    <LinearLayout
        android:layout_width="300dp"
        android:layout_height="wrap_content"
        android:background="@drawable/rect_s_rounded_white"
        android:orientation="vertical">

        <LinearLayout
            android:layout_width="match_parent"
            android:layout_height="wrap_content"
            android:layout_marginTop="@dimen/margin_10"
            android:layout_marginBottom="@dimen/margin_10"
            android:gravity="center"
            android:orientation="vertical">

            <TextView
                android:id="@ id/tv_title"
                android:layout_width="wrap_content"
                android:layout_height="wrap_content"
                android:textSize="@dimen/size_18"
                android:textStyle="bold" />
        </LinearLayout>

        <LinearLayout
            android:layout_width="match_parent"
            android:layout_height="wrap_content"
            android:orientation="vertical"
            android:padding="@dimen/padding_10">

            <TextView
                android:id="@ id/tv_warning"
                android:layout_width="match_parent"
                android:layout_height="wrap_content"
                android:textColor="@android:color/holo_red_dark"
                android:textSize="@dimen/size_14" />

            <TextView
                android:id="@ id/tv_info"
                android:layout_width="match_parent"
                android:layout_height="wrap_content"
                android:layout_marginTop="@dimen/margin_10"
                android:textColor="@android:color/black"
                android:textSize="@dimen/size_14" />
        </LinearLayout>

        <LinearLayout
            android:layout_width="match_parent"
            android:layout_height="wrap_content"
            android:layout_marginTop="@dimen/margin_10"
            android:layout_marginBottom="@dimen/margin_10"
            android:gravity="center"
            android:orientation="horizontal"
            android:padding="@dimen/padding_10">

            <Button
                android:id="@ id/btn_cancel"
                android:layout_width="110dp"
                android:layout_height="40dp"
                android:layout_marginRight="25dp"
                android:background="@drawable/button_gray_l_rounded_selector"
                android:textColor="@android:color/black"
                android:textSize="@dimen/size_14" />

            <Button
                android:id="@ id/btn_confirm"
                android:layout_width="110dp"
                android:layout_height="40dp"
                android:background="@drawable/button_green_l_rounded_selector"
                android:textColor="@android:color/white"
                android:textSize="@dimen/size_14" />
        </LinearLayout>
    </LinearLayout>

</LinearLayout>
3、定义CustomDialog样式文件:custom_dialog
<style name="custom_dialog" parent="@android:style/Theme.Dialog">
        <item name="android:windowFrame">@null</item>
        <item name="android:windowIsFloating">true</item>
        <item name="android:windowIsTranslucent">true</item>
        <item name="android:windowNoTitle">true</item>
        <item name="android:background">#00000000</item>
        <item name="android:windowBackground">@color/transparent</item>
        <item name="android:backgroundDimEnabled">true</item>
</style>
4、定义其中按钮样式:button_green_l_rounded_selector和button_gray_l_rounded_selector
<?xml version="1.0" encoding="utf-8"?>
<selector xmlns:android="http://schemas.android.com/apk/res/android">

    <item android:state_pressed="true">
        <shape android:shape="rectangle">
            <stroke android:color="@android:color/transparent" android:width="0dp"></stroke>

            <gradient android:angle="180"
                android:endColor="@color/button_green"
                android:startColor="@color/button_green"></gradient>

            <corners android:radius="50dp"></corners>
        </shape>
    </item>

    <item android:state_focused="true">
        <shape android:shape="rectangle">
            <stroke android:color="@android:color/transparent" android:width="0dp"></stroke>

            <gradient android:angle="180"
                android:endColor="@color/button_green"
                android:startColor="@color/button_green"></gradient>

            <corners android:radius="50dp"></corners>
        </shape>
    </item>

    <item android:state_pressed="false">
        <shape android:shape="rectangle">
            <stroke android:color="@android:color/transparent" android:width="0dp"></stroke>

            <gradient android:angle="0"
                android:endColor="@color/button_green"
                android:startColor="@color/button_green"></gradient>

            <corners android:radius="50dp"></corners>
        </shape>
    </item>

    <item android:state_focused="false">
        <shape android:shape="rectangle">
            <stroke android:color="@android:color/transparent" android:width="0dp"></stroke>

            <gradient android:angle="0"
                android:endColor="@color/button_green"
                android:startColor="@color/button_green"></gradient>

            <corners android:radius="50dp"></corners>
        </shape>
    </item>

</selector>
5、具体使用
private void showDialog() {
        OnClickListener onCancelClickListener = new OnClickListener() {
            @Override
            public void onClick(View v) {
                MyDialog.showToast(WarehouseAddActivity.this, "取消");
            }
        };

        OnClickListener onConfimClickListener = new OnClickListener() {
            @Override
            public void onClick(View v) {
                MyDialog.showToast(WarehouseAddActivity.this, "确认");
            }
        };

        showInfoDialog("", "请点击确认进行操作", "取消", onCancelClickListener, "确认", onConfimClickListener);
    }

protected void showInfoDialog(String waring, String info, String cancelText, OnClickListener cancelOnClick, String confirmText,
            OnClickListener confirmOnClick) {
        CustomDialog.Builder builder = new CustomDialog.Builder(this);
        builder.setTitle("提示");
        builder.setWarning(waring);
        builder.setInfo(info);
        builder.setButtonCancel(cancelText, cancelOnClick);
        builder.setButtonConfirm(confirmText, confirmOnClick);

        CustomDialog customDialog = builder.create();
        customDialog.show();
    }
以上就是本文的全部内容,希望对大家的学习有所帮助,也希望大家多多支持Devmax。