前言
大多数中,使用系统内置的dialog并不能满足UE的设计需要
方式一:继承DialogFragment,也是官方推荐的方式
通常我们只需要关注三个回调方法:
- onCreateDialog:创建一个dialog外壳
- onCreateView:给dialog外壳填充自己想要的样式布局
- onViewCreated:这里面给布局的view进行初始化操作,可以设置一些监听器等等
事例
自定义布局文件:随便写一个
<?xml version="1.0" encoding="utf-8"?>
<RelativeLayout xmlns:android="http://schemas.android.com/apk/res/android"
    xmlns:app="http://schemas.android.com/apk/res-auto"
    xmlns:tools="http://schemas.android.com/tools"
    android:id="@ id/threat_call_rootView"
    android:layout_width="match_parent"
    android:layout_height="wrap_content"
    android:background="@drawable/dialog_white_big_corner_roundrect_bg">

    <LinearLayout
        android:id="@ id/threat_call_container"
        android:layout_width="match_parent"
        android:layout_height="wrap_content"
        android:background="@drawable/dialog_white_big_corner_roundrect_bg"
        android:orientation="vertical"
        android:paddingLeft="32dp"
        android:paddingTop="48dp"
        android:paddingRight="32dp"
        android:paddingBottom="48dp">

        <TextView
            android:id="@ id/threat_call_number"
            android:layout_width="match_parent"
            android:layout_height="wrap_content"
            android:gravity="center"
            android:text="标题"
            android:textColor="@color/black"
            android:textSize="20sp"
            android:textStyle="bold" />

        <TextView
            android:id="@ id/threat_call_desc"
            android:layout_width="match_parent"
            android:layout_height="wrap_content"
            android:layout_marginTop="4dp"
            android:lineSpacingExtra="3sp"
            android:text="正文"
            android:textColor="@color/black"
            android:textSize="14sp" />

        <EditText
            android:id="@ id/threat_call_edittext"
            android:layout_width="match_parent"
            android:layout_height="48dp"
            android:layout_marginTop="16dp"
            android:width="100dp"

            android:background="@drawable/sip_threat_call_dialog_edittext_stroke"//给editText加个外边框
            android:hint="  (optional)"
            android:lineSpacingExtra="3sp"
            android:maxLength="255"
            android:minLines="1"
            android:paddingLeft="5dp"//这个属性的一个妙用可以改变光标的起始位置,不然光标有可能看不到
            android:text=""
            android:textCursorDrawable="@null"
            android:textSize="14sp"
            app:layout_constraintBottom_toBottomOf="parent"
            app:layout_constraintEnd_toEndOf="parent"
            app:layout_constraintStart_toStartOf="parent"
            app:layout_constraintTop_toTopOf="parent" />

        <Button
            android:id="@ id/threat_call_block_btn"
            android:layout_width="match_parent"
            android:layout_height="48dp"
            android:layout_marginTop="16dp"
            android:background="@drawable/sip_threat_call_dialog_btn_bg"
            android:gravity="center"
            android:text="BLOCK"
            android:textStyle="bold" />

        <Button
            android:id="@ id/threat_call_cancel_btn"
            android:layout_width="match_parent"
            android:layout_height="48dp"
            android:layout_marginTop="1dp"
            android:background="@drawable/sip_threat_call_dialog_btn_bg"
            android:gravity="center"
            android:text="CANCEL"
            android:textStyle="bold" />
    </LinearLayout>

</RelativeLayout>
selfFragment类:
package com.example.hellojni;
import android.animation.ObjectAnimator;
import android.annotation.SuppressLint;
import android.app.Dialog;
import android.content.Context;
import android.content.DialogInterface;
import android.graphics.Color;
import android.graphics.drawable.ColorDrawable;
import android.os.Bundle;
import android.view.Gravity;
import android.view.LayoutInflater;
import android.view.MotionEvent;
import android.view.View;
import android.view.ViewGroup;
import android.view.Window;
import android.view.WindowManager;
import android.view.inputmethod.InputMethodManager;
import android.widget.EditText;

import androidx.annotation.NonNull;
import androidx.annotation.Nullable;
import androidx.fragment.app.DialogFragment;

public class selfDialogFragment extends DialogFragment {
    View container;
    @NonNull
    @Override
    public Dialog onCreateDialog(@Nullable Bundle savedInstanceState) {
        return new Dialog(getContext(),R.style.bottom_dialog);
//        return super.onCreateDialog(savedInstanceState);//不采用系统默认的dialog样式,自定义dialog主题
    }

    @Nullable
    @Override
    public View onCreateView(@NonNull LayoutInflater inflater, @Nullable ViewGroup container, @Nullable Bundle savedInstanceState) {
        Window window = getDialog().getWindow();
        window.setLayout(WindowManager.LayoutParams.MATCH_PARENT,WindowManager.LayoutParams.WRAP_CONTENT);
        window.setGravity(Gravity.CENTER);//设置dialog位置处于中央
        if(!iPaid(getContext())){
               window.getDecorView().setMinimumWidth(getResources().getDisplayMetrics().widthPixels);//这个设置的目的是为了让dialog横向宽度是充满屏幕的
         }
//        window.setSoftInputMode(WindowManager.LayoutParams.SOFT_INPUT_ADJUST_RESIZE);//本来想解决dialog打开软键盘后,弹窗跟着往上走的效果,效果确实有,不过依然没有解决我的问题,下面会详解。
        return inflater.inflate(R.layout.dialog_block_reason,container,false);
    }

    @Override
    public void onViewCreated(@NonNull View view, @Nullable Bundle savedInstanceState) {
        super.onViewCreated(view, savedInstanceState);
        View dialogViewContent = view.findViewById(R.id.block_number_container);
        EditText editText = view.findViewById(R.id.optional_block_number);
        container = view.findViewById(R.id.block_number_container);
        editText.requestFocus();
        InputMethodManager imm = (InputMethodManager) getActivity().getSystemService(Context.INPUT_METHOD_SERVICE);

        dialogViewContent.setOnTouchListener(new View.OnTouchListener() {
            @SuppressLint("ClickableViewAccessibility")
            @Override
            public boolean onTouch(View v, MotionEvent event) {
            //强制收起软件盘的方式:
                InputMethodManager imm = (InputMethodManager) getActivity().getSystemService(Context.INPUT_METHOD_SERVICE);
                imm.hideSoftInputFromWindow(editText.getWindowToken(),0);
                return false;
            }
        });
        view.findViewById(R.id.cancel_btn).setOnClickListener(new View.OnClickListener() {
            @Override
            public void onClick(View view) {
                dismissAllowingStateLoss();
                hideSoftInputAndDissmissDialog();

            }
        });

    private void hideSoftInputAndDissmissDialog() {
        dismissAllowingStateLoss();
        if (getActivity() != null) {//为了解决dialog弹出软键盘退出界面后软键盘依然存在的问题
            getActivity().getWindow().setSoftInputMode(WindowManager.LayoutParams.SOFT_INPUT_STATE_ALWAYS_HIDDEN);
        }
    }

    @Override
    public void onStart() {
        super.onStart();

    }
    //判断是否为Pad的方法,通过计算屏幕对角线长度
    private boolean isPad(Context context) {
        WindowManager wm = (WindowManager) context.getSystemService(Context.WINDOW_SERVICE);
        Display display = wm.getDefaultDisplay();
        DisplayMetrics dm = new DisplayMetrics();
        display.getMetrics(dm);
        double x = Math.pow(dm.widthPixels / dm.xdpi, 2);
        double y = Math.pow(dm.heightPixels / dm.ydpi, 2);
        double screenInches = Math.sqrt(x   y); // 屏幕尺寸
        return screenInches >= 7.0;
    }
}- 坑点讲解
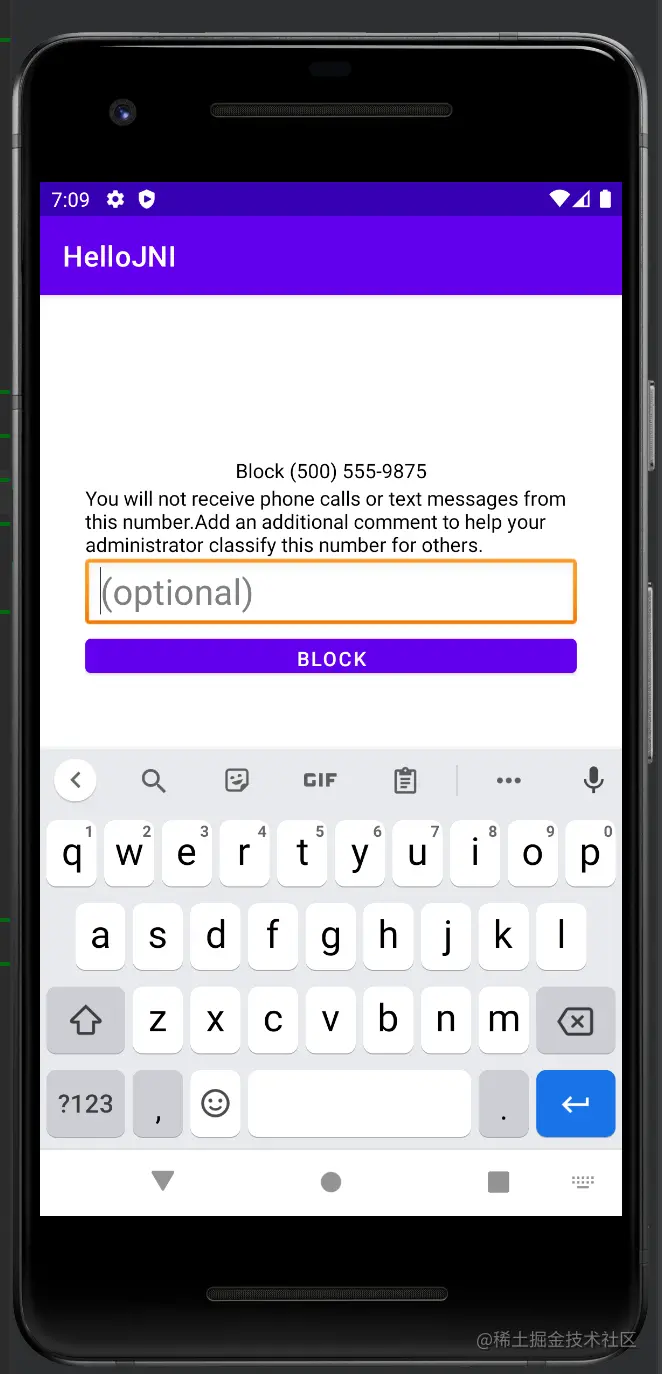
- 当dialog有editText的时候,如果你的dialog主题中的
<item name="android:windowIsFloating">false</item> 指定为false的话,即便加上了 window.setSoftInputMode(WindowManager.LayoutParams.SOFT_INPUT_ADJUST_RESIZE);也不行 效果如下:可以清楚的看到,软键盘还是挡住了两个按钮
android:windowIsFloating设为true时,效果如下:
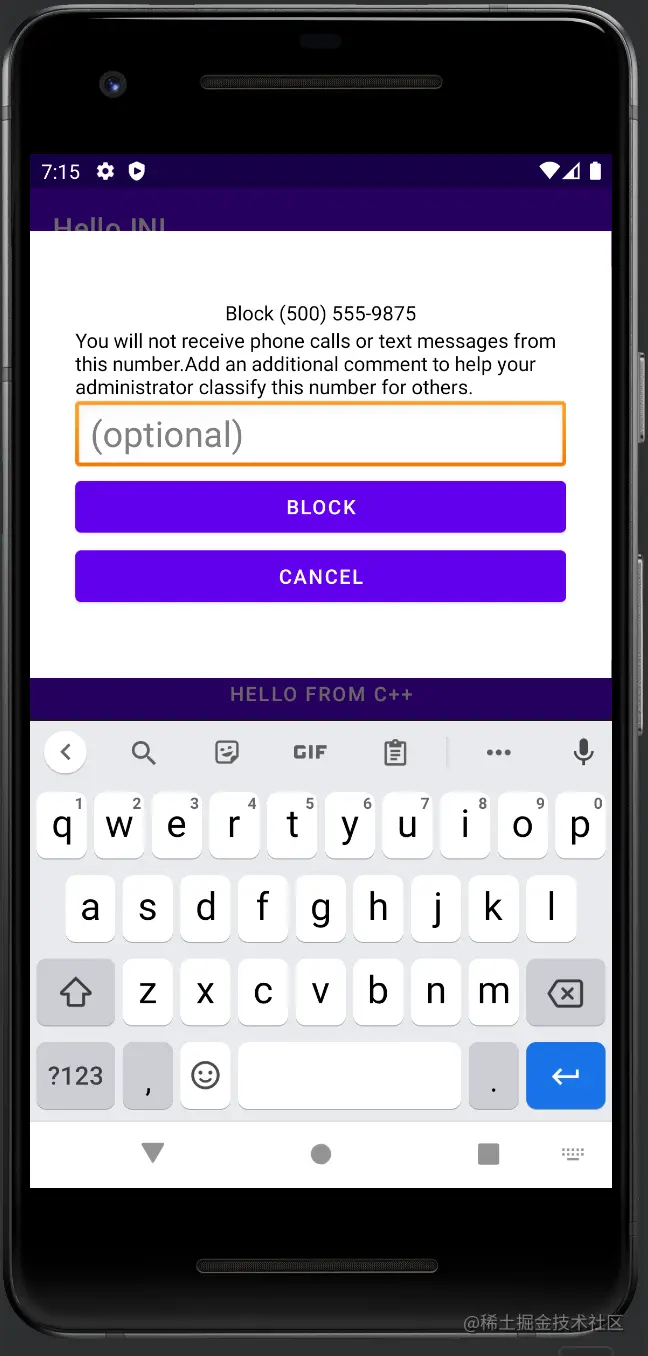
不过中间多出来的那块我也不知道受什么因素影响的,目前这个样式还能凑活用吧
- 默认的dialog并非是横向充满屏幕的
我这边用了使用了window.getDecorView().setMinimumWidth(getResources().getDisplayMetrics().widthPixels); 生效了,有的博客说是使用 window.getDecorView().setPadding(0,0,0,0)或者主题中有个属性android:windowFullscree,不过这两个我试过都貌似都没有什么效果
- 当打开软键盘,然后点击空白处的时候,dialog消失,但是软键盘却还是打开着。
这个点我使用了getActivity().getWindow().setSoftInputMode(WindowManager.LayoutParams.SOFT_INPUT_STATE_ALWAYS_HIDDEN);解决了,这句话等同于在展示dialog的activity中androidMenifests文件中设置 andorid:windowSoftInputMode = stateAlwaysHidden,而仅仅设置成stateHidden是不够的,具体这两个参数的详细区别,官方文档说的也很含糊,反正我没读懂。
我比较认同这篇文章的看法: Android 进入Activity时如何禁止弹出软键盘输入法
- 默认的dialog出场以及退场动画是采用了缩放以及透明度,可以在主题中自定义出场动画
enter动画:
<?xml version="1.0" encoding="utf-8"?>
<translate xmlns:android="http://schemas.android.com/apk/res/android"
android:fromYDelta="100%p"
android:interpolator="@android:anim/accelerate_decelerate_interpolator"
android:toYDelta="50%p"
android:duration="200">
</translate>
exit动画:
<?xml version="1.0" encoding="utf-8"?>
<set xmlns:android="http://schemas.android.com/apk/res/android"
    android:shareInterpolator="false" >
    <scale android:fromXScale="1.0" android:toXScale="0.9"
        android:fromYScale="1.0" android:toYScale="0.9"
        android:pivotX="50%" android:pivotY="50%"
        android:interpolator="@android:anim/decelerate_interpolator"
        android:duration="150" />
    <alpha android:fromAlpha="1.0" android:toAlpha="0.0"
        android:interpolator="@android:anim/decelerate_interpolator"
        android:duration="150"/>
</set>
方式二:直接继承Dialog类或者AppCompatDialog类
通常只需要关注onCreate方法,在该方法中,一般需要做如下几个事情:
- 通过
setContentView将自定义的布局填充到dialog中去 - 初始化布局中的子view,并设置监听器,事件响应等
- 初始化window相关的属性,比如设置window的宽度和高度,以及window所显示的位置等等
在构造函数中设置想要的主题:这里提供两种比较常用的主题
<!--对话框会在屏幕中间显示-->
<style name="dialog_theme_center_dispay" parent="@android:style/Theme.Dialog">
    <item name="android:windowFrame">@null</item><!-- 设置dialog空白背景-->
    <item name="android:windowIsFloating">true</item> <!-- dialog是否悬浮,当有软键盘的时候会被顶上去-->
    <item name="android:windowIsTranslucent">false</item> <!-- dialog是否半透明 -->
    <item name="android:windowMinWidthMinor">100%</item> <!-- dialog横向宽度充满整个屏幕 -->
    <item name="android:windowNoTitle">true</item><!-- dialog是否有标题 -->
    <item name="android:windowBackground">@color/transparent</item><!-- dialog背景是透明的 -->
    <item name="android:background">@color/transparent</item>
    <item name="android:backgroundDimEnabled">true</item>
    <item name="android:windowSoftInputMode">stateHidden|adjustResize</item>
</style>

<!--对话框会从底部弹出-->
<style name="dialog_theme_bottom2top">
    <item name="android:windowFrame">@null</item>
    <item name="android:windowIsFloating">true</item>
    <item name="android:windowIsTranslucent">false</item>
    <item name="android:windowNoTitle">true</item>
    <item name="android:windowBackground">@color/transparent</item>
    <item name="android:backgroundDimEnabled">true</item>  <!--是否允许对话框的背景变暗:如果允许背景就变暗了。-->
    <item name="android:windowMinWidthMinor">100%</item><!--宽度铺满全屏-->
    <item name="android:windowCloseOnTouchOutside">true</item><!--点击阴影的地方是否可以关闭对话框-->
    <item name="android:windowAnimationStyle">@style/dialog_anim_bottom2top</item><!--对话框动画-->
    <item name="android:windowSoftInputMode">stateHidden|adjustResize</item>
</style>

<!--[对话框动画]对话框会从底部弹出-->
<style name="dialog_anim_bottom2top" parent="@android:style/Animation">
    <item name="android:windowEnterAnimation">@anim/bottom_in</item>
    <item name="android:windowExitAnimation">@anim/bottom_out</item>
</style>
bottom_in:
<?xml version="1.0" encoding="utf-8"?>
<set xmlns:android="http://schemas.android.com/apk/res/android">
    <translate
        android:duration="300"
        android:fromYDelta="100%p"
        android:toYDelta="0" />
</set>
bottom_out:
<?xml version="1.0" encoding="utf-8"?>
<set xmlns:android="http://schemas.android.com/apk/res/android">
    <translate
        android:duration="200"
        android:fromYDelta="0"
        android:toYDelta="50%p" />
    <alpha
        android:duration="200"
        android:fromAlpha="1.0"
        android:toAlpha="0.0" />
</set>
更新
辨别当前设备是否是平板的方法通常有两种:
public static boolean isLargeScreen(Context context) {
   Configuration config = context.getResources().getConfiguration();
   int size = config.screenLayout & Configuration.SCREENLAYOUT_SIZE_MASK;
   return (size >= Configuration.SCREENLAYOUT_SIZE_LARGE);
}
public static boolean isPad(Context context) {
WindowManager wm = (WindowManager) context.getSystemService(Context.WINDOW_SERVICE);
Display display = wm.getDefaultDisplay();
DisplayMetrics dm = new DisplayMetrics();
display.getMetrics(dm);
double x = Math.pow(dm.widthPixels / dm.xdpi, 2);
double y = Math.pow(dm.heightPixels / dm.ydpi, 2);
double screenInches = Math.sqrt(x y); // 屏幕尺寸
return screenInches >= 7.0;
}
到此这篇关于Android自定义Dialog的2种常见方法的文章就介绍到这了,更多相关Android自定义Dialog内容请搜索Devmax以前的文章或继续浏览下面的相关文章希望大家以后多多支持Devmax!