看到标题你可能会觉得奇怪 推送消息提示框不是系统自己弹出来的吗? 为什么还要自己自定义呢?
因为项目需求是这样的:最近需要做 远程推送通知 和一个客服系统 包括店铺客服和官方客服两个模块 如果有新的消息推送的时候 如果用户当前不在客服界面的时候 要求无论是在app前台 还是app退到后台 顶部都要弹出系统的那种消息提示框
这样的需求 我们就只能自定义一个在app内 弹出消息提示框
实现步骤如下:
1.我们自定义一个view 为 STPushView 推送消息的提示框view
#import <UIKit/UIKit.h>
#import "STPushModel.h"

@interface STPushView : UIView

/** *推送数据模型 */
@property(nonatomic,strong) STPushModel *model;

 (instancetype)shareInstance;
  (void)show;
  (void)hide;

@end
#import "STPushView.h"
#import "AppDelegate.h"

@interface STPushView()

@property (nonatomic, weak) UIImageView *imageV;
@property (nonatomic,weak ) UILabel *timLabel;
@property (nonatomic,weak ) UILabel *content;

@end

@implementation STPushView

static STPushView *_instance = nil;

 (instancetype)shareInstance
{
 static dispatch_once_t onceToken;
 dispatch_once(&onceToken, ^{
 _instance = [[STPushView alloc] init];
 });
 return _instance;
}

 (instancetype) allocWithZone:(struct _NSZone *)zone
{
 if (!_instance) {
 _instance = [super allocWithZone:zone];
 }
 return _instance ;
}

- (instancetype)initWithFrame:(CGRect)frame
{
 if (self = [super initWithFrame:frame]) {

 self.backgroundColor = CUSTOMCOLOR(15, 14, 12);

 CGFloat margin = 12;
 UIImageView *imageV = [[UIImageView alloc] init];
 imageV.userInteractionEnabled = NO;
 imageV.image = [UIImage imageNamed:@"logo"];
 imageV.layer.cornerRadius = 5;
 [self addSubview:imageV];
 self.imageV = imageV;
 [imageV mas_makeConstraints:^(MASConstraintMaker *make) {
  make.left.equalTo(self).offset(margin);
  make.centerY.equalTo(self.mas_centerY);
  make.width.mas_equalTo(30);
  make.height.mas_equalTo(30);
 }];


 UILabel *titleLabel = [[UILabel alloc] init];
 titleLabel.textColor = [UIColor whiteColor];
 titleLabel.font = [UIFont boldSystemFontOfSize:12];
 titleLabel.text = @"121店官方客服";
 [self addSubview:titleLabel];
 [titleLabel mas_makeConstraints:^(MASConstraintMaker *make) {
  make.left.equalTo(imageV.mas_right).offset(margin);
  make.top.equalTo(self.mas_top).offset(margin);
  make.height.mas_equalTo(16);
 }];
 [titleLabel sizeToFit];

 UILabel *timLabel = [[UILabel alloc] init];
 timLabel.font = [UIFont systemFontOfSize:12];
 timLabel.userInteractionEnabled = NO;
 timLabel.textColor = [UIColor whiteColor];
 timLabel.text = @"刚刚";
 timLabel.textColor = [UIColor lightGrayColor];
 [self addSubview:timLabel];
 self.timLabel = timLabel;
 [timLabel mas_makeConstraints:^(MASConstraintMaker *make) {
  make.left.equalTo(titleLabel.mas_right).offset(margin);
  make.top.equalTo(self.mas_top).offset(margin);
  make.width.mas_lessThanOrEqualTo(40);
  make.height.mas_equalTo(16);
 }];


 UILabel *content = [[UILabel alloc] init];
 content.numberOfLines = 2;
 content.font = [UIFont systemFontOfSize:13];
 content.textColor = [UIColor whiteColor];
 content.userInteractionEnabled = NO;
 [self addSubview:content];
 self.content = content;
 [content mas_makeConstraints:^(MASConstraintMaker *make) {
  make.left.equalTo(imageV.mas_right).offset(margin);
  make.top.equalTo(titleLabel.mas_bottom).offset(-3);
  make.right.equalTo(self.mas_right).offset(-margin);
  make.height.mas_equalTo(35);
 }];


 UIView *toolbar = [[UIView alloc] init];
 toolbar.backgroundColor = CUSTOMCOLOR(121, 101, 81);
 toolbar.layer.cornerRadius = 3;
 [self addSubview:toolbar];
 [toolbar mas_makeConstraints:^(MASConstraintMaker *make) {
  make.width.mas_equalTo(35);
  make.height.mas_equalTo(6);
  make.centerX.equalTo(self.mas_centerX);
  make.bottom.equalTo(self.mas_bottom).offset(-2);
 }];

 }
 return self;
}

- (void)setModel:(STPushModel *)model
{
 _model = model;
 self.timLabel.text = @"刚刚";
 self.content.text = model.content;
}

  (void)show
{

 [UIApplication sharedApplication].statusBarHidden = YES;
 STPushView *pushView = [STPushView shareInstance];
 pushView.hidden = NO;

 AppDelegate *app = (AppDelegate*)[UIApplication sharedApplication].delegate;
 [app.window bringSubviewToFront:pushView];

 [UIView animateWithDuration:0.25 animations:^{

 pushView.frame = CGRectMake(0, 0, SCREEN_WIDTH, pushViewHeight);

 dispatch_after(dispatch_time(DISPATCH_TIME_NOW, (int64_t)(5 * NSEC_PER_SEC)), dispatch_get_main_queue(), ^{

  [UIView animateWithDuration:0.25 animations:^{

  pushView.frame = CGRectMake(0, -pushViewHeight, SCREEN_WIDTH, pushViewHeight);


  } completion:^(BOOL finished) {

  [UIApplication sharedApplication].statusBarHidden = NO;
  pushView.hidden = YES;

  }];

 });

 }];
}

  (void)hide
{
 STPushView *pushView = [STPushView shareInstance];

 [UIView animateWithDuration:0.25 animations:^{

 pushView.frame = CGRectMake(0, -pushViewHeight, SCREEN_WIDTH, pushViewHeight);

 } completion:^(BOOL finished) {

 [UIApplication sharedApplication].statusBarHidden = NO;
 pushView.hidden = YES;

 }];

}

@end
上面pushView需要一个模型 实现代码如下
// push 推送的model

推送过来的数据如下:
/**
 content = dsfdsnfds;
 id = 5077;
 mid = 1270339;
 title = dsfdsnfds;
 url = "3?_from=push";
 urlType = 3;

 **/
#import <Foundation/Foundation.h>

@interface STPushModel : STBaseModel<NSCoding> //STBaseModel 是一个继承自NSObject的类 我主要是在这个类中实现了字典转模型的功能 你可以直接修改为NSObject

/***id**/
@property (copy,nonatomic) NSString* recordId;
/***标题**/
@property (copy, nonatomic) NSString *title;
/***url**/
@property (copy, nonatomic) NSString *url;
/***url 类型**/
@property (copy, nonatomic) NSString* urlType;
/***图标的高度**/
@property (assign,nonatomic) NSString * mid;
/***推送内容**/
@property (copy, nonatomic) NSString* content;

@end
因为涉及到好几个页面需要使用同样的推送消息数据 进行判断而处理相应的业务 所有我对此模型做了归档处理
#import "STPushModel.h"

@implementation STPushModel


/**
 * 保存对象到文件中
 *
 * @param aCoder <#aCoder description#>
 */
-(void)encodeWithCoder:(NSCoder *)aCoder
{
 [aCoder encodeObject:self.recordId forKey:@"recordId"];
 [aCoder encodeObject:self.title forKey:@"title"];
 [aCoder encodeObject:self.url forKey:@"url"];
 [aCoder encodeObject:self.urlType forKey:@"urlType"];
 [aCoder encodeObject:self.mid forKey:@"mid"];
 [aCoder encodeObject:self.content forKey:@"content"];
}


/**
 * 从文件中读取对象
 *
 * @param aDecoder <#aDecoder description#>
 *
 * @return <#return value description#>
 */
-(id)initWithCoder:(NSCoder *)aDecoder
{
 //注意:在构造方法中需要先初始化父类的方法
 if (self=[super init]) {
 self.recordId=[aDecoder decodeObjectForKey:@"recordId"];
 self.title=[aDecoder decodeObjectForKey:@"title"];
 self.url=[aDecoder decodeObjectForKey:@"url"];
 self.urlType=[aDecoder decodeObjectForKey:@"urlType"];
 self.mid=[aDecoder decodeObjectForKey:@"mid"];
 self.content= [aDecoder decodeObjectForKey:@"content"];
 }
 return self;
}
@end
做好了上面的准备工作之后 接下来我们就需要 APPdelegate里面注册远程推送通知 并且监听推送消息
这里以个推为例子:
第一步在下面的方法中 实现个推的注册方法
- (BOOL)application:(UIApplication *)application didFinishLaunchingWithOptions:(NSDictionary *)launchOptions {

 // 注册个推推送服务
 [[GeTuiApilmpl sharedInstance] geTuiRegister];


}
GeTuiApilmpl 是一个单例类 专门用于注册个推的推送方法 实现代码如下:
#import <Foundation/Foundation.h>
#import "GeTuiSdk.h"
@interface GeTuiApilmpl : NSObject <GeTuiSdkDelegate>

  (GeTuiApilmpl *) sharedInstance;

- (void) geTuiRegister;

@end
#import "GeTuiApilmpl.h"

@implementation GeTuiApilmpl

  (GeTuiApilmpl *) sharedInstance{
 static id instance = nil;
 static dispatch_once_t onceToken;
 dispatch_once(&onceToken, ^{
 instance = [[self alloc] init];
 });
 return instance;
}

- (id)init {
 self = [super init];
 if (self) {
 NSString *path = [[NSBundle mainBundle] pathForResource:@"libGexin" ofType:@"plist"];
 NSDictionary *dic = [NSDictionary dictionaryWithContentsOfFile:path];
 [GeTuiSdk startSdkWithAppId:[dic objectForKey:@"GT_APPID"]
    appKey:[dic objectForKey:@"GT_APPKEY"]
    appSecret:[dic objectForKey:@"GT_APPSECRET"]
    delegate:self];
 }
 return self;
}

#pragma mark - GeTuiSdkDelegate
/** SDK启动成功返回cid */
- (void)GeTuiSdkDidRegisterClient:(NSString *)clientId {
 // [4-EXT-1]: 个推SDK已注册,返回clientId
 NSLog(@"\n>>>[GeTuiSdk RegisterClient]:%@\n\n", clientId);
}

/** SDK遇到错误回调 */
- (void)GeTuiSdkDidOccurError:(NSError *)error {
 // [EXT]:个推错误报告,集成步骤发生的任何错误都在这里通知,如果集成后,无法正常收到消息,查看这里的通知。
 NSLog(@"\n>>>[GexinSdk error]:%@\n\n", [error localizedDescription]);
}

/** SDK收到透传消息回调 */
- (void)GeTuiSdkDidReceivePayload:(NSString *)payloadId andTaskId:(NSString *)taskId andMessageId:(NSString *)aMsgId andOffLine:(BOOL)offLine fromApplication:(NSString *)appId {
 // [4]: 收到个推消息
 NSData *payload = [GeTuiSdk retrivePayloadById:payloadId];
 NSString *payloadMsg = nil;
 if (payload) {
 payloadMsg = [[NSString alloc] initWithBytes:payload.bytes length:payload.length encoding:NSUTF8StringEncoding];
 }
 NSString *msg = [NSString stringWithFormat:@" payloadId=%@,taskId=%@,messageId:%@,payloadMsg:%@%@", payloadId, taskId, aMsgId, payloadMsg, offLine ? @"<离线消息>" : @""];
 NSLog(@"\n>>>[GexinSdk ReceivePayload]:%@\n\n", msg);
 /**
 *汇报个推自定义事件
 *actionId:用户自定义的actionid,int类型,取值90001-90999。
 *taskId:下发任务的任务ID。
 *msgId: 下发任务的消息ID。
 *返回值:BOOL,YES表示该命令已经提交,NO表示该命令未提交成功。注:该结果不代表服务器收到该条命令
 **/
 [GeTuiSdk sendFeedbackMessage:90001 taskId:taskId msgId:aMsgId];
}

/** SDK收到sendMessage消息回调 */
- (void)GeTuiSdkDidSendMessage:(NSString *)messageId result:(int)result {
 // [4-EXT]:发送上行消息结果反馈
 NSString *msg = [NSString stringWithFormat:@"sendmessage=%@,result=%d", messageId, result];
 NSLog(@"\n>>>[GexinSdk DidSendMessage]:%@\n\n", msg);
}

/** SDK运行状态通知 */
- (void)GeTuiSDkDidNotifySdkState:(SdkStatus)aStatus {
 // [EXT]:通知SDK运行状态
 NSLog(@"\n>>>[GexinSdk SdkState]:%u\n\n", aStatus);
}

/** SDK设置推送模式回调 */
- (void)GeTuiSdkDidSetPushMode:(BOOL)isModeOff error:(NSError *)error {
 if (error) {
 NSLog(@"\n>>>[GexinSdk SetModeOff Error]:%@\n\n", [error localizedDescription]);
 return;
 }
 NSLog(@"\n>>>[GexinSdk SetModeOff]:%@\n\n", isModeOff ? @"开启" : @"关闭");
}

-(void)geTuiRegister{

}
然后再appDelegate 调用注册远程推送的方法
/** 注册用户通知 */
- (void)registerUserNotification {
 /*
 注册通知(推送)
 申请App需要接受来自服务商提供推送消息
 */
 // 判读系统版本是否是“iOS 8.0”以上
 if ([[[UIDevice currentDevice] systemVersion] floatValue] >= 8.0 ||
 [UIApplication instancesRespondToSelector:@selector(registerUserNotificationSettings:)]) {
 // 定义用户通知类型(Remote.远程 - Badge.标记 Alert.提示 Sound.声音)
 UIUserNotificationType types = UIUserNotificationTypeAlert | UIUserNotificationTypeBadge | UIUserNotificationTypeSound;
 // 定义用户通知设置
 UIUserNotificationSettings *settings = [UIUserNotificationSettings settingsForTypes:types categories:nil];
 // 注册用户通知 - 根据用户通知设置
 [[UIApplication sharedApplication] registerUserNotificationSettings:settings];
 [[UIApplication sharedApplication] registerForRemoteNotifications];
 } else { // iOS8.0 以前远程推送设置方式
 // 定义远程通知类型(Remote.远程 - Badge.标记 Alert.提示 Sound.声音)
 UIRemoteNotificationType myTypes = UIRemoteNotificationTypeBadge | UIRemoteNotificationTypeAlert | UIRemoteNotificationTypeSound;
 // 注册远程通知 -根据远程通知类型
 [[UIApplication sharedApplication] registerForRemoteNotificationTypes:myTypes];
 }
}
然后再设置了窗口的跟控制器 之后 调用:addPushView方法 添加 消息提示框STPushView: addPushView实现代码如下
#pragma mark 推送信息展示
//添加推送view
- (void)addPushView
{
 STPushView *topView = [STPushView shareInstance];
 topView.frame = CGRectMake(0, -pushViewHeight, SCREEN_WIDTH, pushViewHeight);
 [_window addSubview:topView];
 self.topView = topView;
 topView.hidden = YES;

 UITapGestureRecognizer *tap = [[UITapGestureRecognizer alloc] initWithTarget:self action:@selector(hudClick)];
 UIPanGestureRecognizer *pan = [[UIPanGestureRecognizer alloc] initWithTarget:self action:@selector(pan:)];
 [topView addGestureRecognizer:tap];
 [tap requireGestureRecognizerToFail:pan];
 topView.gestureRecognizers = @[tap,pan];

}

#pragma mark addPushView相关事件
- (void)hudClick
{
 self.topView.userInteractionEnabled = NO;

 [UIView animateWithDuration:0.25 animations:^{
 self.topView.frame = CGRectMake(0, -pushViewHeight, SCREEN_WIDTH, pushViewHeight);
 }completion:^(BOOL finished) {
 [UIApplication sharedApplication].statusBarHidden = NO;
 [self hudClickOperation];

 }];
}

- (void)hudClickOperation
{
 [self push:nil];
 dispatch_after(dispatch_time(DISPATCH_TIME_NOW, (int64_t)(1 * NSEC_PER_SEC)), dispatch_get_main_queue(), ^{
 self.topView.userInteractionEnabled = YES;
 });
}


- (void)pan:(UIPanGestureRecognizer*)pan
{
 CGFloat distance = pushViewHeight-(pushViewHeight-[pan translationInView:self.window].y);
 if (distance<-20) {
 [UIView animateWithDuration:0.25 animations:^{
  self.topView.frame = CGRectMake(0, -pushViewHeight, SCREEN_WIDTH, pushViewHeight);
 }completion:^(BOOL finished) {
  [UIApplication sharedApplication].statusBarHidden = NO;
 }];
 }
}

//显示pushView
- (void)displayPushView
{
 [STPushView show];
}
上面push方法的实现代码如下: 处理逻辑 是根据我自己的项目中需求定的 在这里实现你需要处理的代码
- (void)push:(NSDictionary *)params{

 STPushModel *model = [ NSKeyedUnarchiver unarchiveObjectWithFile:KRAPI_PUSH_DATA];

 //如果是h5
 if ([model.urlType isEqualToString:@"h5"]) {

 BOOL isStore = [[AnalysisUrl sharedInstance] analysisWebUrl:model.url];
 BOOL isGoods = [[AnalysisUrl sharedInstance] analysisGoodsIdWebUrl:model.url];
 BOOL isRedBag =[[AnalysisUrl sharedInstance] analyredBagWebUrl:model.url];
 BOOL istrace =[[AnalysisUrl sharedInstance] analytraceWebUr:model.url];
 BOOL islog =[[AnalysisUrl sharedInstance] analylogWebUrl:model.url];
 if (isStore || isGoods) {
  [[WYPageManager sharedInstance] pushViewControllerWithUrlString:model.url currentUrlString:TRAKER_URL_INDEX];

 }else if (isRedBag)
 {
  RedBageViewController * regBag =[[RedBageViewController alloc]init];
  NSArray *array = [model.url componentsSeparatedByString:@"="];
  NSString * string = [array lastObject];
  regBag.messageID = string;
  regBag.redType = @"coupon";
  UITabBarController *tabVC = (UITabBarController *)self.window.rootViewController;
  UINavigationController *pushClassStance = (UINavigationController *)tabVC.viewControllers[tabVC.selectedIndex];
  // 跳转到对应的控制器
  regBag.hidesBottomBarWhenPushed = YES;
  [pushClassStance pushViewController:regBag animated:YES];
  return;
 }else if (istrace)
 {
  RedBageViewController * regBag =[[RedBageViewController alloc]init];
  NSString * string = [StrUtils getIdFromURLString:model.url interceptString:@"/trace/"];
  regBag.messageID = string;
  regBag.redType = @"trace";
  UITabBarController *tabVC = (UITabBarController *)self.window.rootViewController;
  UINavigationController *pushClassStance = (UINavigationController *)tabVC.viewControllers[tabVC.selectedIndex];
  // 跳转到对应的控制器
  regBag.hidesBottomBarWhenPushed = YES;
  [pushClassStance pushViewController:regBag animated:YES];
  return;
 }else if (islog)
 {
  RedBageViewController * regBag =[[RedBageViewController alloc]init];
  NSString * string = [StrUtils getIdFromURLString:model.url interceptString:@"/log/"];
  regBag.messageID = string;
  regBag.redType = @"log";
  UITabBarController *tabVC = (UITabBarController *)self.window.rootViewController;
  UINavigationController *pushClassStance = (UINavigationController *)tabVC.viewControllers[tabVC.selectedIndex];
  // 跳转到对应的控制器
  regBag.hidesBottomBarWhenPushed = YES;
  [pushClassStance pushViewController:regBag animated:YES];
  return;
 }
 else{
  if (![model.url isEqualToString:@""]) {
  UIStoryboard *setStoryboard = [UIStoryboard storyboardWithName:@"UserCenter" bundle:nil];
  TotalWebViewController *setVC = [setStoryboard instantiateViewControllerWithIdentifier:@"TotalWebViewController"];
  setVC.shopUrl = model.url;
  setVC.shopTitle = [model.title isEqualToString:@""] ? @"121店" : model.title;
  UITabBarController *tabVC = (UITabBarController *)self.window.rootViewController;
  UINavigationController *pushClassStance = (UINavigationController *)tabVC.viewControllers[tabVC.selectedIndex];
  setVC.hidesBottomBarWhenPushed = YES;
  [pushClassStance pushViewController:setVC animated:YES];
  }
 }
 }else if ([model.urlType isEqualToString:@"native"]){

  if ([model.url isEqualToString:@"1"]) {
  //一元体验购 已经删除

  }else if ([model.url isEqualToString:@"2"]){
  if (([[STCommonInfo getAuthType] intValue] != 1)) {
   [self createGroundGlass];
  }else{
   STProFitViewController *vc = [[STProFitViewController alloc] init];
   UITabBarController *tabVC = (UITabBarController *)self.window.rootViewController;
   UINavigationController *pushClassStance = (UINavigationController *)tabVC.viewControllers[tabVC.selectedIndex];
   vc.hidesBottomBarWhenPushed = YES;
   [pushClassStance pushViewController:vc animated:YES];
  }
  }else if ([model.url isEqualToString:@"3"]){
  if (([[STCommonInfo getAuthType] intValue] != 1)) {
   [self createGroundGlass];
  }else{

   MessageMainVC *messageVC = [[MessageMainVC alloc] init];
   messageVC.hidesBottomBarWhenPushed = YES;
   UITabBarController *tabVC = (UITabBarController *)self.window.rootViewController;
   UINavigationController *pushClassStance = (UINavigationController *)tabVC.viewControllers[tabVC.selectedIndex];
   [pushClassStance pushViewController:messageVC animated:YES];
  }
  }else if ([model.url hasPrefix:@"http://"]&&([model.url rangeOfString:@"client"].location!=NSNotFound)){ //跳转到客服接 界面

  NSString *orgIdString =[[AnalysisUrl sharedInstance] extractOrgId:model.url];
  NSString *siteIdString = [[AnalysisUrl sharedInstance] extractOrgIdStoreId:model.url];
  [[WYPageManager sharedInstance] pushViewController:@"TLChatViewController" withParam:
   @{
   @"title_nameString":@"官方客服",
   @"orgIdString":orgIdString,
   @"siteIdString":siteIdString,
   @"currentURL":model.url
   } animated:YES];

  }
 }
}
然后再AppDelegate 实现以下方法
/** 自定义:APP被“推送”启动时处理推送消息处理(APP 未启动--》启动)*/- (void)receiveNotificationByLaunchingOptions:(NSDictionary *)launchOptions {
 if (!launchOptions)
 return;
 /*
 通过“远程推送”启动APP
 UIApplicationLaunchOptionsRemoteNotificationKey 远程推送Key
 */
 NSDictionary *userInfo = [launchOptions objectForKey:UIApplicationLaunchOptionsRemoteNotificationKey];
 if (userInfo) {
 NSLog(@"\n>>>[Launching RemoteNotification]:%@", userInfo);
 }
}

#pragma mark - 用户通知(推送)回调 _IOS 8.0以上使用

/** 已登记用户通知 */
- (void)application:(UIApplication *)application didRegisterUserNotificationSettings:(UIUserNotificationSettings *)notificationSettings {
 // 注册远程通知(推送)
 [application registerForRemoteNotifications];
}

#pragma mark - 远程通知(推送)回调

/** 远程通知注册成功委托 */
- (void)application:(UIApplication *)application didRegisterForRemoteNotificationsWithDeviceToken:(NSData *)deviceToken {
 NSString *myToken = [[deviceToken description] stringByTrimmingCharactersInSet:[NSCharacterSet characterSetWithCharactersInString:@"<>"]];
 myToken = [myToken stringByReplacingOccurrencesOfString:@" " withString:@""];
 NSUserDefaults *kr = [NSUserDefaults standardUserDefaults];
 [kr setValue:myToken forKey:@"deviceToken"];
 [kr synchronize];
 [GeTuiSdk registerDeviceToken:myToken];
 [[PostDeviceToken sharedInstance] postUpDeviceToken];
 NSLog(@"\n>>>[DeviceToken Success]:%@\n\n", myToken);
}

/** 远程通知注册失败委托 */
- (void)application:(UIApplication *)application didFailToRegisterForRemoteNotificationsWithError:(NSError *)error {
 [GeTuiSdk registerDeviceToken:@""];
 NSLog(@"\n>>>[DeviceToken Error]:%@\n\n", error.description);
}


#pragma mark - APP运行中接收到通知(推送)处理
/** APP已经接收到“远程”通知(推送) - 透传推送消息 */
- (void)application:(UIApplication *)application didReceiveRemoteNotification:(NSDictionary *)userInfo fetchCompletionHandler:(void (^)(UIBackgroundFetchResult result))completionHandler {
 // 处理APN
 NSLog(@"\n>>>[Receive RemoteNotification - Background Fetch]:%@\n\n", userInfo);
 completionHandler(UIBackgroundFetchResultNewData);

 NSString *payLoadString = [[MyPrevent sharedInstance] dictionary:userInfo objectForKey:@"payload"];
 [[SpotPunch sharedInstance] spotPunch:@"999.999.1" pointTwo:@"21" info:payLoadString];
 // NSUserDefaults *kr = [NSUserDefaults standardUserDefaults];
 if (!([[STCommonInfo getAuthType] intValue] != 1)) {
 NSData *jsonData = [payLoadString dataUsingEncoding:NSUTF8StringEncoding];
 NSDictionary *jsonDic = [NSJSONSerialization JSONObjectWithData:jsonData
        options:NSJSONReadingMutableContainers
         error:nil];

 STPushModel *model = [STPushModel modelObjectWithDict:jsonDic];
 [NSKeyedArchiver archiveRootObject:model toFile:KRAPI_PUSH_DATA];
//如果应用程序在前台 就显示客服提示框
 if (application.applicationState == UIApplicationStateActive) {
  self.topView.model = model;
  [self displayPushView]; //此方法 的实现 在上一步中 就是展示提示框出来
 }


 }
}
然后这些工作做好了之后 就是你需要在个推的后台 配置推送证书 这个配置的步骤 大家可以到个推官网去参考文档 配置
这里我假设 你已经配置到证书了 经过上面的步骤 我们的远程推送通知的方法 基本完成 现在我们运行 测试下 你会发现即使在前台 有新消息推送的时候 顶部也会弹出和系统一样的提示框 点击 跳转到对应的页面的方法逻辑根据你的需要 去做跳转处理
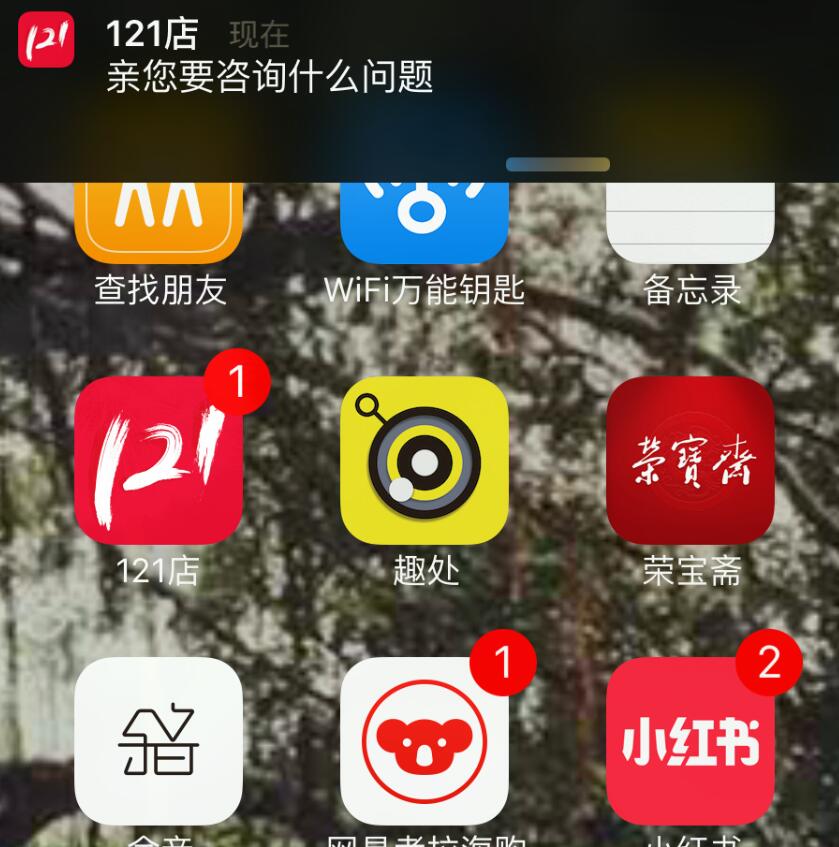
测试效果如下:
用户在后台 收到的消息提示如下:
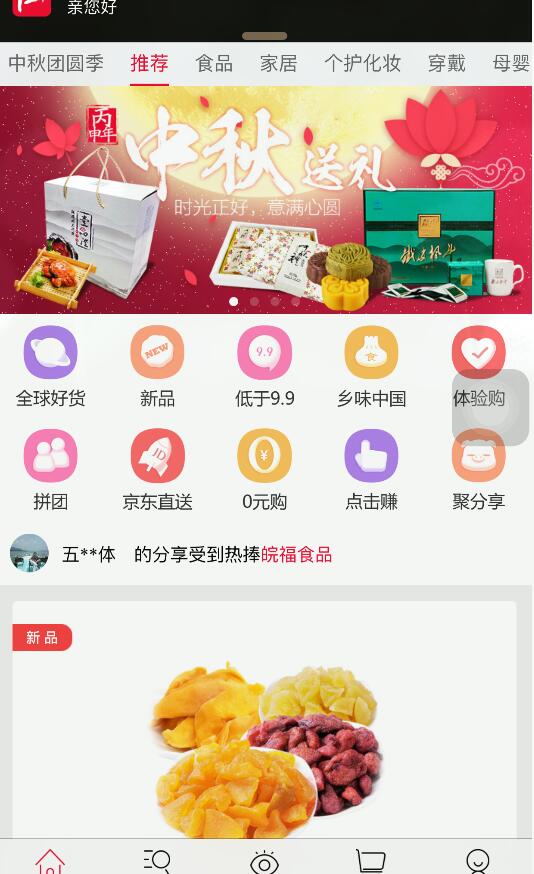
用户在前台 收到的消息提示如下:
本文已被整理到了《iOS推送教程》,欢迎大家学习阅读。
以上就是本文的全部内容,希望对大家的学习有所帮助,也希望大家多多支持Devmax。