注意事项
Soft-NMS对于大多数数据集而言,作用比较小,提升效果非常不明显,它起作用的地方是大量密集的同类重叠场景,大量密集的不同类重叠场景其实也没什么作用,同学们可以借助Soft-NMS理解非极大抑制的含义,但是实现的必要性确实不强,在提升网络性能上,不建议死磕Soft-NMS。
已对该博文中的代码进行了重置,视频中实现的代码是numpy形式,而且库比较久远。这里改成pytorch的形式,且适应当前的库。
非极大抑制是目标检测中非常非常非常非常非常重要的一部分,了解一下原理,撕一下代码是必要的
什么是非极大抑制NMS
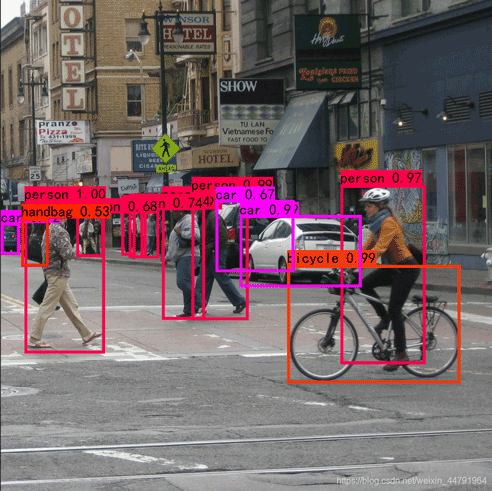
非极大抑制的概念只需要看这两幅图就知道了:
下图是经过非极大抑制的。
下图是未经过非极大抑制的。
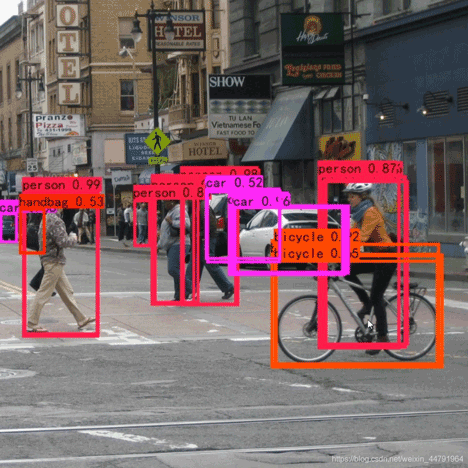
可以很明显的看出来,未经过非极大抑制的图片有许多重复的框,这些框都指向了同一个物体!
可以用一句话概括非极大抑制的功能就是:
筛选出一定区域内属于同一种类得分最大的框。
1、非极大抑制NMS的实现过程
本博文实现的是多分类的非极大抑制,该非极大抑制使用在我的pytorch-yolov3例子中:输入shape为[ batch_size, all_anchors, 5 num_classes ]
第一个维度是图片的数量。
第二个维度是所有的预测框。
第三个维度是所有的预测框的预测结果。
非极大抑制的执行过程如下所示:
1、对所有图片进行循环。
2、找出该图片中得分大于门限函数的框。在进行重合框筛选前就进行得分的筛选可以大幅度减少框的数量。
3、判断第2步中获得的框的种类与得分。取出预测结果中框的位置与之进行堆叠。此时最后一维度里面的内容由5 num_classes变成了4 1 2,四个参数代表框的位置,一个参数代表预测框是否包含物体,两个参数分别代表种类的置信度与种类。
4、对种类进行循环,非极大抑制的作用是筛选出一定区域内属于同一种类得分最大的框,对种类进行循环可以帮助我们对每一个类分别进行非极大抑制。
5、根据得分对该种类进行从大到小排序。
6、每次取出得分最大的框,计算其与其它所有预测框的重合程度,重合程度过大的则剔除。
视频中实现的代码是numpy形式,而且库比较久远。这里改成pytorch的形式,且适应当前的库。
实现代码如下:
def bbox_iou(self, box1, box2, x1y1x2y2=True):
    """
        计算IOU
    """
    if not x1y1x2y2:
        b1_x1, b1_x2 = box1[:, 0] - box1[:, 2] / 2, box1[:, 0]   box1[:, 2] / 2
        b1_y1, b1_y2 = box1[:, 1] - box1[:, 3] / 2, box1[:, 1]   box1[:, 3] / 2
        b2_x1, b2_x2 = box2[:, 0] - box2[:, 2] / 2, box2[:, 0]   box2[:, 2] / 2
        b2_y1, b2_y2 = box2[:, 1] - box2[:, 3] / 2, box2[:, 1]   box2[:, 3] / 2
    else:
        b1_x1, b1_y1, b1_x2, b1_y2 = box1[:, 0], box1[:, 1], box1[:, 2], box1[:, 3]
        b2_x1, b2_y1, b2_x2, b2_y2 = box2[:, 0], box2[:, 1], box2[:, 2], box2[:, 3]
    inter_rect_x1 = torch.max(b1_x1, b2_x1)
    inter_rect_y1 = torch.max(b1_y1, b2_y1)
    inter_rect_x2 = torch.min(b1_x2, b2_x2)
    inter_rect_y2 = torch.min(b1_y2, b2_y2)
    inter_area = torch.clamp(inter_rect_x2 - inter_rect_x1, min=0) * \
                torch.clamp(inter_rect_y2 - inter_rect_y1, min=0)
    b1_area = (b1_x2 - b1_x1) * (b1_y2 - b1_y1)
    b2_area = (b2_x2 - b2_x1) * (b2_y2 - b2_y1)
    iou = inter_area / torch.clamp(b1_area   b2_area - inter_area, min = 1e-6)
    return iou
def non_max_suppression(self, prediction, num_classes, input_shape, image_shape, letterbox_image, conf_thres=0.5, nms_thres=0.4):
    #----------------------------------------------------------#
    #   将预测结果的格式转换成左上角右下角的格式。
    #   prediction  [batch_size, num_anchors, 85]
    #----------------------------------------------------------#
    box_corner          = prediction.new(prediction.shape)
    box_corner[:, :, 0] = prediction[:, :, 0] - prediction[:, :, 2] / 2
    box_corner[:, :, 1] = prediction[:, :, 1] - prediction[:, :, 3] / 2
    box_corner[:, :, 2] = prediction[:, :, 0]   prediction[:, :, 2] / 2
    box_corner[:, :, 3] = prediction[:, :, 1]   prediction[:, :, 3] / 2
    prediction[:, :, :4] = box_corner[:, :, :4]
    output = [None for _ in range(len(prediction))]
    for i, image_pred in enumerate(prediction):
        #----------------------------------------------------------#
        #   对种类预测部分取max。
        #   class_conf  [num_anchors, 1]    种类置信度
        #   class_pred  [num_anchors, 1]    种类
        #----------------------------------------------------------#
        class_conf, class_pred = torch.max(image_pred[:, 5:5   num_classes], 1, keepdim=True)
        #----------------------------------------------------------#
        #   利用置信度进行第一轮筛选
        #----------------------------------------------------------#
        conf_mask = (image_pred[:, 4] * class_conf[:, 0] >= conf_thres).squeeze()
        #----------------------------------------------------------#
        #   根据置信度进行预测结果的筛选
        #----------------------------------------------------------#
        image_pred = image_pred[conf_mask]
        class_conf = class_conf[conf_mask]
        class_pred = class_pred[conf_mask]
        if not image_pred.size(0):
            continue
        #-------------------------------------------------------------------------#
        #   detections  [num_anchors, 7]
        #   7的内容为:x1, y1, x2, y2, obj_conf, class_conf, class_pred
        #-------------------------------------------------------------------------#
        detections = torch.cat((image_pred[:, :5], class_conf.float(), class_pred.float()), 1)
        #------------------------------------------#
        #   获得预测结果中包含的所有种类
        #------------------------------------------#
        unique_labels = detections[:, -1].cpu().unique()
        if prediction.is_cuda:
            unique_labels = unique_labels.cuda()
            detections = detections.cuda()
        for c in unique_labels:
            #------------------------------------------#
            #   获得某一类得分筛选后全部的预测结果
            #------------------------------------------#
            detections_class = detections[detections[:, -1] == c]
            # #------------------------------------------#
            # #   使用官方自带的非极大抑制会速度更快一些!
            # #------------------------------------------#
            # keep = nms(
            #     detections_class[:, :4],
            #     detections_class[:, 4] * detections_class[:, 5],
            #     nms_thres
            # )
            # max_detections = detections_class[keep]
            # 按照存在物体的置信度排序
            _, conf_sort_index = torch.sort(detections_class[:, 4]*detections_class[:, 5], descending=True)
            detections_class = detections_class[conf_sort_index]
            # 进行非极大抑制
            max_detections = []
            while detections_class.size(0):
                # 取出这一类置信度最高的,一步一步往下判断,判断重合程度是否大于nms_thres,如果是则去除掉
                max_detections.append(detections_class[0].unsqueeze(0))
                if len(detections_class) == 1:
                    break
                ious = self.bbox_iou(max_detections[-1], detections_class[1:])
                detections_class = detections_class[1:][ious < nms_thres]
            # 堆叠
            max_detections = torch.cat(max_detections).data
            # Add max detections to outputs
            output[i] = max_detections if output[i] is None else torch.cat((output[i], max_detections))
        if output[i] is not None:
            output[i]           = output[i].cpu().numpy()
            box_xy, box_wh      = (output[i][:, 0:2]   output[i][:, 2:4])/2, output[i][:, 2:4] - output[i][:, 0:2]
            output[i][:, :4]    = self.yolo_correct_boxes(box_xy, box_wh, input_shape, image_shape, letterbox_image)
    return output
2、柔性非极大抑制Soft-NMS的实现过程
柔性非极大抑制和普通的非极大抑制相差不大,只差了几行代码。
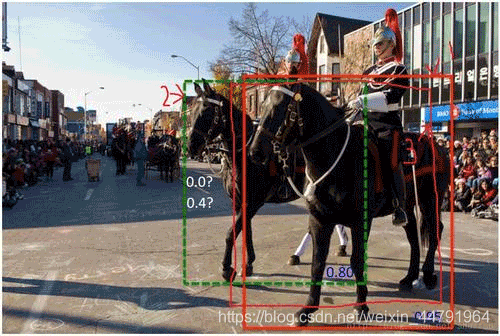
柔性非极大抑制认为不应该直接只通过重合程度进行筛选,如图所示,很明显图片中存在两匹马,但是此时两匹马的重合程度较高,此时我们如果使用普通nms,后面那匹得分比较低的马会直接被剔除。
Soft-NMS认为在进行非极大抑制的时候要同时考虑得分和重合程度。
我们直接看NMS和Soft-NMS的代码差别:
视频中实现的代码是numpy形式,而且库比较久远。这里改成pytorch的形式,且适应当前的库。
如下为NMS:
while detections_class.size(0):
    # 取出这一类置信度最高的,一步一步往下判断,判断重合程度是否大于nms_thres,如果是则去除掉
    max_detections.append(detections_class[0].unsqueeze(0))
    if len(detections_class) == 1:
        break
    ious = self.bbox_iou(max_detections[-1], detections_class[1:])
    detections_class = detections_class[1:][ious < nms_thres]
如下为Soft-NMS:
while detections_class.size(0):
    # 取出这一类置信度最高的,一步一步往下判断,判断重合程度是否大于nms_thres,如果是则去除掉
    max_detections.append(detections_class[0].unsqueeze(0))
    if len(detections_class) == 1:
        break
    ious                    = self.bbox_iou(max_detections[-1], detections_class[1:])
    detections_class[1:, 4] = torch.exp(-(ious * ious) / sigma) * detections_class[1:, 4]
    detections_class        = detections_class[1:]
    detections_class        = detections_class[detections_class[:, 4] >= conf_thres]
    arg_sort                = torch.argsort(detections_class[:, 4], descending = True)
    detections_class        = detections_class[arg_sort]
我们可以看到,对于NMS而言,其直接将 与得分最大的框 重合程度较高的其它预测剔除。而Soft-NMS则以一个权重的形式,将获得的IOU取高斯指数后乘上原得分,之后重新排序。继续循环。
视频中实现的代码是numpy形式,而且库比较久远。这里改成pytorch的形式,且适应当前的库。
实现代码如下:
def bbox_iou(self, box1, box2, x1y1x2y2=True):
    """
        计算IOU
    """
    if not x1y1x2y2:
        b1_x1, b1_x2 = box1[:, 0] - box1[:, 2] / 2, box1[:, 0]   box1[:, 2] / 2
        b1_y1, b1_y2 = box1[:, 1] - box1[:, 3] / 2, box1[:, 1]   box1[:, 3] / 2
        b2_x1, b2_x2 = box2[:, 0] - box2[:, 2] / 2, box2[:, 0]   box2[:, 2] / 2
        b2_y1, b2_y2 = box2[:, 1] - box2[:, 3] / 2, box2[:, 1]   box2[:, 3] / 2
    else:
        b1_x1, b1_y1, b1_x2, b1_y2 = box1[:, 0], box1[:, 1], box1[:, 2], box1[:, 3]
        b2_x1, b2_y1, b2_x2, b2_y2 = box2[:, 0], box2[:, 1], box2[:, 2], box2[:, 3]
    inter_rect_x1 = torch.max(b1_x1, b2_x1)
    inter_rect_y1 = torch.max(b1_y1, b2_y1)
    inter_rect_x2 = torch.min(b1_x2, b2_x2)
    inter_rect_y2 = torch.min(b1_y2, b2_y2)
    inter_area = torch.clamp(inter_rect_x2 - inter_rect_x1, min=0) * \
                torch.clamp(inter_rect_y2 - inter_rect_y1, min=0)
    b1_area = (b1_x2 - b1_x1) * (b1_y2 - b1_y1)
    b2_area = (b2_x2 - b2_x1) * (b2_y2 - b2_y1)
    iou = inter_area / torch.clamp(b1_area   b2_area - inter_area, min = 1e-6)
    return iou
def non_max_suppression(self, prediction, num_classes, input_shape, image_shape, letterbox_image, conf_thres=0.5, nms_thres=0.4, sigma=0.5):
    #----------------------------------------------------------#
    #   将预测结果的格式转换成左上角右下角的格式。
    #   prediction  [batch_size, num_anchors, 85]
    #----------------------------------------------------------#
    box_corner          = prediction.new(prediction.shape)
    box_corner[:, :, 0] = prediction[:, :, 0] - prediction[:, :, 2] / 2
    box_corner[:, :, 1] = prediction[:, :, 1] - prediction[:, :, 3] / 2
    box_corner[:, :, 2] = prediction[:, :, 0]   prediction[:, :, 2] / 2
    box_corner[:, :, 3] = prediction[:, :, 1]   prediction[:, :, 3] / 2
    prediction[:, :, :4] = box_corner[:, :, :4]
    output = [None for _ in range(len(prediction))]
    for i, image_pred in enumerate(prediction):
        #----------------------------------------------------------#
        #   对种类预测部分取max。
        #   class_conf  [num_anchors, 1]    种类置信度
        #   class_pred  [num_anchors, 1]    种类
        #----------------------------------------------------------#
        class_conf, class_pred = torch.max(image_pred[:, 5:5   num_classes], 1, keepdim=True)
        #----------------------------------------------------------#
        #   利用置信度进行第一轮筛选
        #----------------------------------------------------------#
        conf_mask = (image_pred[:, 4] * class_conf[:, 0] >= conf_thres).squeeze()
        #----------------------------------------------------------#
        #   根据置信度进行预测结果的筛选
        #----------------------------------------------------------#
        image_pred = image_pred[conf_mask]
        class_conf = class_conf[conf_mask]
        class_pred = class_pred[conf_mask]
        if not image_pred.size(0):
            continue
        #-------------------------------------------------------------------------#
        #   detections  [num_anchors, 7]
        #   7的内容为:x1, y1, x2, y2, obj_conf, class_conf, class_pred
        #-------------------------------------------------------------------------#
        detections = torch.cat((image_pred[:, :5], class_conf.float(), class_pred.float()), 1)
        #------------------------------------------#
        #   获得预测结果中包含的所有种类
        #------------------------------------------#
        unique_labels = detections[:, -1].cpu().unique()
        if prediction.is_cuda:
            unique_labels = unique_labels.cuda()
            detections = detections.cuda()
        for c in unique_labels:
            #------------------------------------------#
            #   获得某一类得分筛选后全部的预测结果
            #------------------------------------------#
            detections_class = detections[detections[:, -1] == c]
            # #------------------------------------------#
            # #   使用官方自带的非极大抑制会速度更快一些!
            # #------------------------------------------#
            # keep = nms(
            #     detections_class[:, :4],
            #     detections_class[:, 4] * detections_class[:, 5],
            #     nms_thres
            # )
            # max_detections = detections_class[keep]
            # 按照存在物体的置信度排序
            _, conf_sort_index = torch.sort(detections_class[:, 4]*detections_class[:, 5], descending=True)
            detections_class = detections_class[conf_sort_index]
            # 进行非极大抑制
            max_detections = []
            while detections_class.size(0):
                # 取出这一类置信度最高的,一步一步往下判断,判断重合程度是否大于nms_thres,如果是则去除掉
                max_detections.append(detections_class[0].unsqueeze(0))
                if len(detections_class) == 1:
                    break
                ious                    = self.bbox_iou(max_detections[-1], detections_class[1:])
                detections_class[1:, 4] = torch.exp(-(ious * ious) / sigma) * detections_class[1:, 4]
                detections_class        = detections_class[1:]
                detections_class        = detections_class[detections_class[:, 4] >= conf_thres]
                arg_sort                = torch.argsort(detections_class[:, 4], descending = True)
                detections_class        = detections_class[arg_sort]
            # 堆叠
            max_detections = torch.cat(max_detections).data
            # Add max detections to outputs
            output[i] = max_detections if output[i] is None else torch.cat((output[i], max_detections))
        if output[i] is not None:
            output[i]           = output[i].cpu().numpy()
            box_xy, box_wh      = (output[i][:, 0:2]   output[i][:, 2:4])/2, output[i][:, 2:4] - output[i][:, 0:2]
            output[i][:, :4]    = self.yolo_correct_boxes(box_xy, box_wh, input_shape, image_shape, letterbox_image)
    return output
以上就是python目标检测非极大抑制NMS与Soft-NMS的详细内容,更多关于非极大抑制NMS Soft-NMS的资料请关注Devmax其它相关文章!