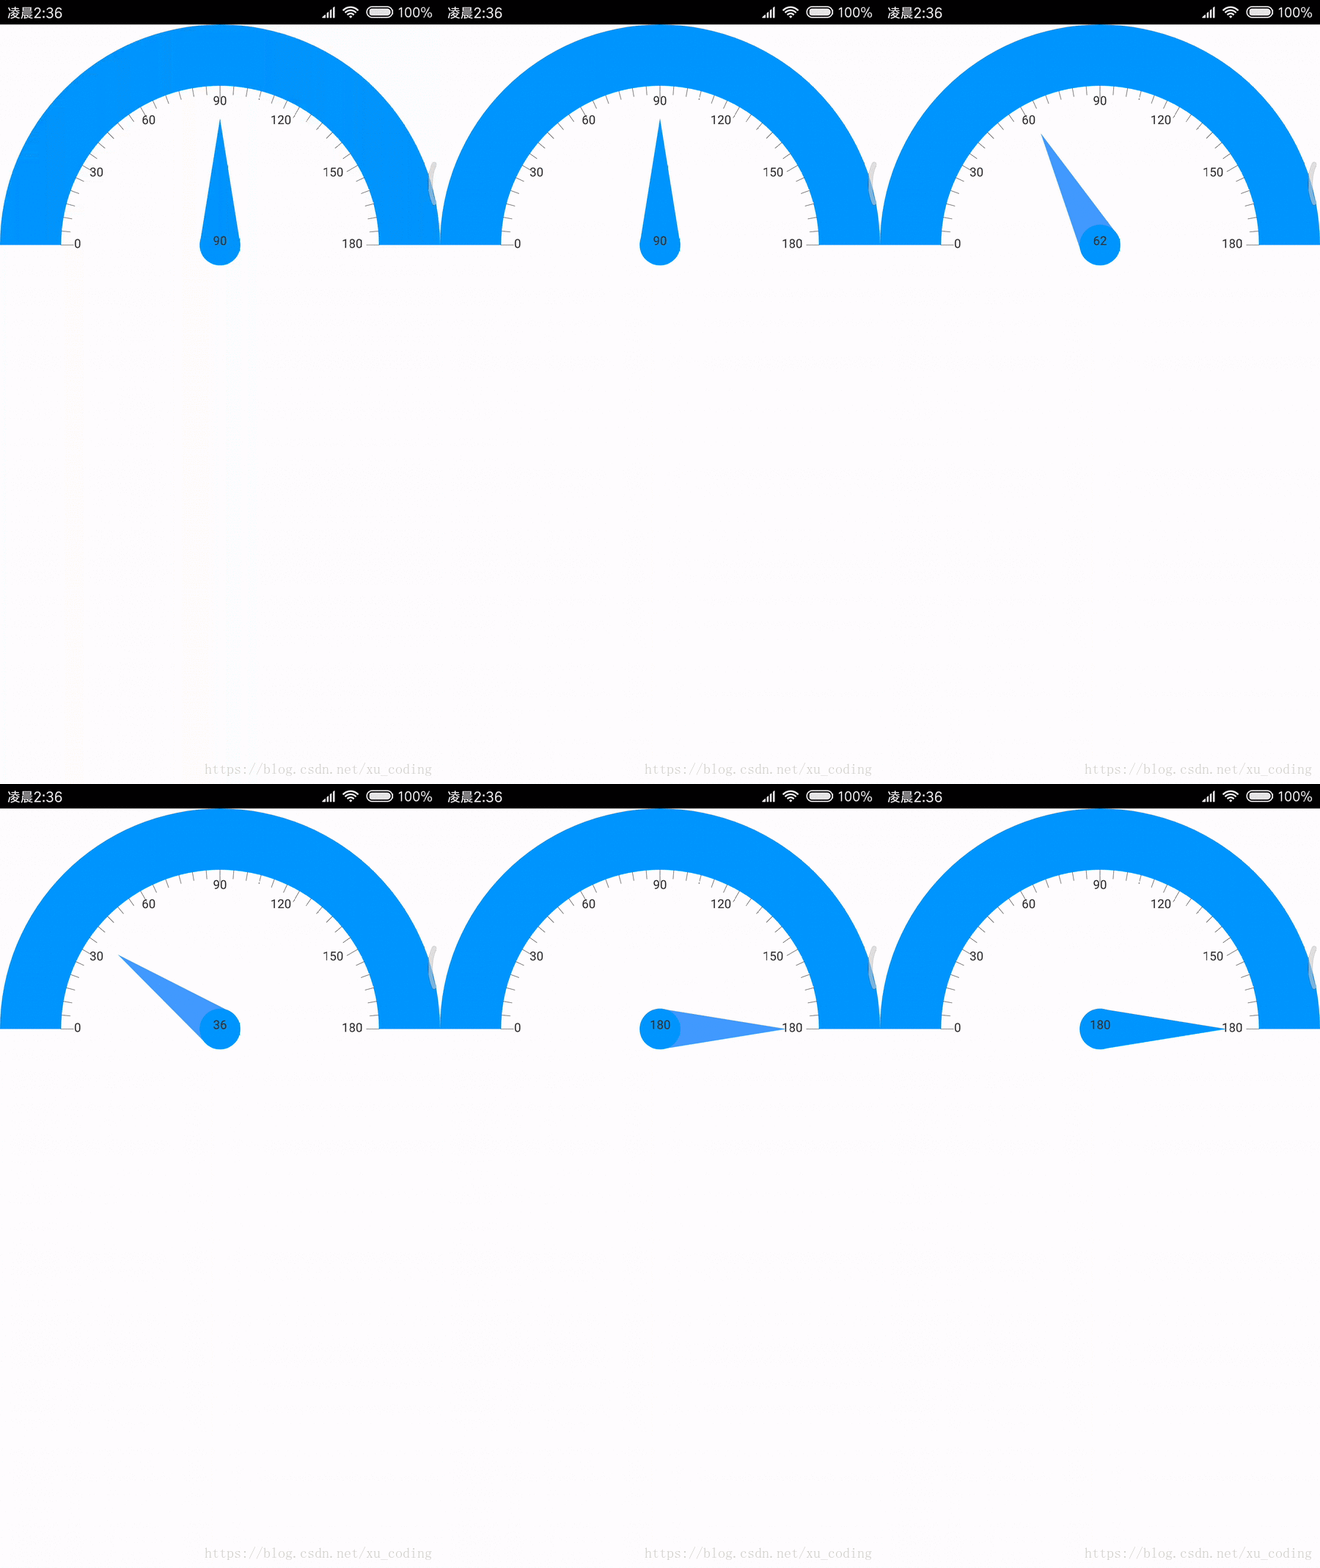
本文实例为大家分享了android自定义可拖拽的仪表盘的具体代码,供大家参考,具体内容如下
因为项目最近需要用到仪表盘,又不想使用之前使用的背景图的方式。主要是想自己写一点代码。觉得绘制要比图片好。于是有了下面这张图:

面从弧度,刻度,文字,指针都是canvas绘制出来的。
/**
 * Created by xulc on 2018/7/18.
 */

public class DashboardView extends View {
    private  int minWidthDP = 200;
    private  int minHeightDP = 100;

    private Paint arcPaint,arcInnerPaint,linePaint,textPaint;
    private int arcColor = Color.parseColor("#0096ff");  //外层弧形颜色
    private int arcInnerColor =  Color.parseColor("#FFFFFFFF");  //内层弧形颜色
    private int lineColor = Color.parseColor("#333333");   //线条颜色
    private int pointerColor = Color.parseColor("#439AFF");   //指针颜色

    private int arcWidthDP = 1;

    private RectF arcRectF,arcInnerRectF;

    private int widthDash = 0;//表盘的宽度

    private int mwidth =0;
    private int mheight = 0;

    private float shortlineLength = 0 ,longlineLength = 0;   //线的长度

    private Path path = new Path();

    private Path pointerPath = new Path();   //指针绘制路径

    private Region pointerRegion = new Region();  //指针区域

    private RectF rectF = new RectF();

    private boolean isChoosePointer = false;

    private int mdegree = 0;

    public DashboardView(Context context) {
        this(context,null);
    }

    public DashboardView(Context context, @Nullable AttributeSet attrs) {
        super(context, attrs);
        initPaint();
    }
    //初始化相关资源
    private void initPaint() {
        arcPaint = new Paint();
        arcPaint.setColor(arcColor);
        arcPaint.setAntiAlias(true);
        arcPaint.setStrokeCap(Paint.Cap.SQUARE);
        arcPaint.setStrokeWidth(1);
        arcPaint.setStyle(Paint.Style.FILL);

        arcInnerPaint = new Paint();
        arcInnerPaint.setColor(arcInnerColor);
        arcInnerPaint.setAntiAlias(true);
        arcInnerPaint.setStrokeCap(Paint.Cap.SQUARE);
        arcInnerPaint.setStrokeWidth(1);
        arcInnerPaint.setStyle(Paint.Style.FILL);

        linePaint = new Paint();
        linePaint.setColor(lineColor);
        linePaint.setAntiAlias(true);
        linePaint.setStrokeCap(Paint.Cap.SQUARE);
        linePaint.setStrokeWidth(arcWidthDP);
        linePaint.setStyle(Paint.Style.FILL);

        textPaint = new Paint();
        textPaint.setColor(lineColor);
        textPaint.setAntiAlias(true);
        linePaint.setStrokeCap(Paint.Cap.SQUARE);
        linePaint.setStrokeWidth(arcWidthDP);
        linePaint.setStyle(Paint.Style.STROKE);
        textPaint.setTextAlign(Paint.Align.LEFT);
        textPaint.setTextSize(30);

        arcRectF = new RectF();
        arcInnerRectF = new RectF();
    }

    @Override
    protected void onMeasure(int widthMeasureSpec, int heightMeasureSpec) {
        int widthMode = MeasureSpec.getMode(widthMeasureSpec);
        int heightMode = MeasureSpec.getMode(heightMeasureSpec);
        int widthSize = MeasureSpec.getSize(widthMeasureSpec);
        int heightSize = MeasureSpec.getSize(heightMeasureSpec);

        if(widthSize < DensityUtil.dip2px(getContext(),minWidthDP)||heightSize < DensityUtil.dip2px(getContext(),minHeightDP)){
            widthSize = DensityUtil.dip2px(getContext(),minWidthDP);
            heightSize = DensityUtil.dip2px(getContext(),minHeightDP);
        }

        if(widthSize/2 != heightSize){
            heightSize = widthSize/2;
        }

        setMeasuredDimension(widthSize,heightSize   50);

        arcRectF.left = 0;
        arcRectF.bottom = heightSize*2;
        arcRectF.right = widthSize;
        arcRectF.top = 0;


    }

    @Override
    protected void onSizeChanged(int w, int h, int oldw, int oldh) {
        super.onSizeChanged(w, h, oldw, oldh);
        widthDash = DensityUtil.dip2px(getContext(),50);

        arcInnerRectF.left = widthDash;
        arcInnerRectF.bottom = arcRectF.bottom - widthDash;
        arcInnerRectF.right = arcRectF.bottom -widthDash;
        arcInnerRectF.top = widthDash;
        shortlineLength = widthDash/7;
        longlineLength = widthDash/5;
        mwidth = getWidth();
        mheight = getHeight() - 50;

        Log.d("xulc","mheight----->" mheight);
        Log.d("xulc","arcRectF.bottom----->" arcRectF.bottom);
    }

    @Override
    protected void onDraw(Canvas canvas) {
        arcPaint.setColor(arcColor);
        canvas.drawArc(arcRectF,180,180,true,arcPaint);  //绘制外弧形
        canvas.drawArc(arcInnerRectF,180,180,true,arcInnerPaint);  //绘制内部弧形
        canvas.save();
        drawScale(canvas);  //绘制刻度
        canvas.restore();
        drawText(canvas);  //绘制文本
        drawPointer(canvas,mdegree);  //绘制指针
    }

    private int mradius = 50;

    //绘制指针
    private void drawPointer(Canvas canvas,float degree){
        pointerPath.reset();
        if(isChoosePointer){
            arcPaint.setColor(pointerColor);
        }
        pointerPath.reset();
        pointerPath.moveTo((float)( mwidth/2 - mradius*Math.sin(degree/180f*Math.PI)),(float)( mheight   mradius*Math.cos(degree/180f*Math.PI))); //下切点
        pointerPath.lineTo(mwidth/2 -  (float) Math.cos(degree/180f*Math.PI)*(mheight - widthDash - longlineLength -mradius),mheight - (float) Math.sin(degree/180f*Math.PI)*(mheight - widthDash - longlineLength-mradius));
        pointerPath.lineTo((float)( mwidth/2   mradius*Math.sin(degree/180f*Math.PI)),(float)( mheight - mradius*Math.cos(degree/180f*Math.PI)));
        pointerPath.close();
        pointerPath.computeBounds(rectF,true);
        pointerRegion.setPath(pointerPath,new Region((int) rectF.left,(int) rectF.top,(int) rectF.right,(int) rectF.bottom));
        canvas.drawPath(pointerPath,arcPaint);   //path转化为Region区域,方便判断用户点击的位置
        path.reset();
        arcPaint.setColor(arcColor);
        path.addCircle(mwidth/2,mheight,mradius, Path.Direction.CW);
        canvas.drawPath(path,arcPaint);
        textPaint.setTextAlign(Paint.Align.CENTER);
        canvas.drawText("" mdegree,mwidth/2,mheight,textPaint);
    }

    //设置度数
    public void setDegree(int degree){
        if(0<=degree && degree<=180){
            mdegree = degree;
            invalidate();
        }
    }

    //触摸事件
    @Override
    public boolean onTouchEvent(MotionEvent event) {
        float startx ,starty;
        if(event.getAction()==MotionEvent.ACTION_DOWN){
            startx = event.getX(); starty = event.getY();
            if(pointerRegion.contains((int) startx,(int) starty)){  //在其中
                isChoosePointer =true;
                invalidate();
                return true;   //消费当前事件,否则不会继续分发后续事件
            }
            return false;
        }else if(event.getAction()==MotionEvent.ACTION_MOVE){
            if(isChoosePointer){
                float x = event.getX(); float y = event.getY();
                if(y <= mheight && x!=mwidth/2){
                    double degree=  Math.atan2((mheight-y) ,(mwidth/2 - x));
                    setDegree((int) (degree/Math.PI*180));
                }else{
                    if(y > mheight&& x < mwidth/2){  //说明滑到下面了
                        setDegree(0);
                    }else if(y > mheight&& x > mwidth/2){
                        setDegree(180);
                    }
                }
                return true;
            }else{
                return false;
            }

        }else if(event.getAction()==MotionEvent.ACTION_UP||event.getAction()==MotionEvent.ACTION_CANCEL){
            isChoosePointer =false;
            invalidate();
            return true;
        }
        return super.onTouchEvent(event);
    }


    //绘制文字
    private void drawText(Canvas canvas) {
        textPaint.setTextAlign(Paint.Align.LEFT);
        for(int i=0;i<=6;i  ){
            int degree = i*30;
            float textWidth = textPaint.measureText("" degree);
            if(degree ==0){
                canvas.drawText(""   degree,mwidth/2 - (float) Math.cos(degree/180f*Math.PI)*(mheight - widthDash - longlineLength -10) - textWidth/2,mheight - (float) Math.sin(degree/180f*Math.PI)*(mheight - widthDash - longlineLength-10) 7,textPaint);
            }   //向右边移动7个像素  向下边移动7个像素
            else if(degree == 30){
                    canvas.drawText(""   degree,mwidth/2 - (float) Math.cos(degree/180f*Math.PI)*(mheight - widthDash - longlineLength-10) - textWidth/2,mheight - (float) Math.sin(degree/180f*Math.PI)*(mheight - widthDash - longlineLength-10) 7 ,textPaint);
            }else if(degree ==60){
                canvas.drawText(""   degree,mwidth/2 - (float) Math.cos(degree/180f*Math.PI)*(mheight - widthDash - longlineLength-10) - textWidth/2,mheight - (float) Math.sin(degree/180f*Math.PI)*(mheight - widthDash - longlineLength-10) 7 ,textPaint);
            }else if(degree ==90){
                canvas.drawText(""   degree,mwidth/2 - (float) Math.cos(degree/180f*Math.PI)*(mheight - widthDash - longlineLength-10) - textWidth/2,mheight - (float) Math.sin(degree/180f*Math.PI)*(mheight - widthDash - longlineLength-10) 7 ,textPaint);
            }else{
                canvas.drawText(""   degree,mwidth/2 - (float) Math.cos(degree/180f*Math.PI)*(mheight - widthDash - longlineLength - 10) - textWidth,mheight - (float) Math.sin(degree/180f*Math.PI)*(mheight - widthDash - longlineLength-10) 7 ,textPaint);
            }
        }
    }

    //绘制刻度
    private void drawScale(Canvas canvas){
        for(int i=0;i<=36;i  ){   //180角度,30度一个长线 0 30 60 90 120 150 180  5条小线   5度一个小线
            if(i%6==0){//长线
                canvas.drawLine(widthDash,mheight,widthDash   longlineLength ,mheight,linePaint);
            }else{ //短线
                canvas.drawLine(widthDash,mheight,widthDash   shortlineLength ,mheight,linePaint);
            }
            canvas.rotate(5,mwidth/2,mheight);
        }
    }
}
整体代码差不多就这样,代码中详尽的注释。代码基本上都在这了,就不上传git了。
以上就是本文的全部内容,希望对大家的学习有所帮助,也希望大家多多支持Devmax。