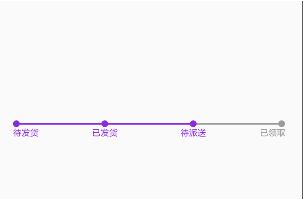
日常的开发中经常会需要用到自定义View,这次刚好有个需求,需要用到带有节点的进度条。东西很简单直接继承View就行了。
首先定义一些需要的属性
/**
 * 背景画笔
 */
 private Paint bgPaint;
 /**
 * 前景画笔
 */
 private Paint forePaint;
 /**
 * 选中画笔
 */
 private Paint selectPaint;
 /**
 * 未选中画笔
 */
 private Paint unselectPaint;
 /**
 * 背景颜色
 */
 private int bgColor = Color.parseColor("#9C9C9C");
 /**
 * 前景颜色
 */
 private int foreColor = Color.parseColor("#8A2BE2");
 /**
 * 默认高度
 */
 private int defaultHeight;
 /**
 * 节点文字
 */
 private List<String> nodeList;
 private List<Rect> mBounds;
 /**
 * 节点圆的半径
 */
 private int radius;
 /**
 * 文字和节点进度条的top
 */
 private int marginTop;
 /**
 * 两个节点之间的距离
 */
 private int dividWidth;
 /**
 * 选中位置
 */
 private int selectIndex;
然后在构造方法中初始化这些数据
private void init(Context context) {
 radius = SizeUtils.dp2px(context,4);
 defaultHeight = SizeUtils.dp2px(context,30);
 marginTop = SizeUtils.dp2px(context,5);

 bgPaint = new Paint(Paint.ANTI_ALIAS_FLAG);
 bgPaint.setColor(bgColor);
 bgPaint.setStyle(Paint.Style.FILL);

 forePaint = new Paint(Paint.ANTI_ALIAS_FLAG);
 forePaint.setColor(foreColor);
 forePaint.setStyle(Paint.Style.FILL);

 unselectPaint = new Paint(Paint.ANTI_ALIAS_FLAG);
 unselectPaint.setColor(bgColor);
 unselectPaint.setTextSize(SizeUtils.sp2px(context,10));

 selectPaint = new Paint(Paint.ANTI_ALIAS_FLAG);
 selectPaint.setColor(foreColor);
 selectPaint.setTextSize(SizeUtils.sp2px(context,10));
 }
设置节点文字
/**
 * 设置数据
 * @param nodeDatas
 */
 public void setNodeList(List<String> nodeDatas){
 if(nodeDatas != null){
 nodeList = nodeDatas;
 }
 //测量文字所占用的空间
 measureText();
 }

 /**
 * 设置选中位置
 * @param selectIndex
 */
 public void setSelectIndex(int selectIndex){
 this.selectIndex = selectIndex;
 invalidate();
 }
/**
 * 测量文字的长宽
 */
 private void measureText(){
 mBounds = new ArrayList<>();
 for (int i = 0; i < nodeList.size(); i  ) {
 Rect mBound = new Rect();
 unselectPaint.getTextBounds(nodeList.get(i),0,nodeList.get(i).length(),mBound);
 mBounds.add(mBound);
 }
 }
最后重要的步骤,开始在onDraw中绘制节点进度条和绘制文字
1、绘制灰色背景线条
if(nodeList == null || nodeList.isEmpty()){
 return;
 }
 bgPaint.setStrokeWidth(radius/2);
 //绘制灰色的背景线条
 canvas.drawLine(radius,radius,getWidth()-radius,radius,bgPaint);
2、绘制节点上的圆和两个节点之间的间隔线条
//画节点圆
 //每个圆相隔的距离
 dividWidth = (getWidth()-radius*2)/(nodeList.size() - 1);
 forePaint.setStrokeWidth(radius/2);
 for (int i = 0; i < nodeList.size(); i  ) {
 if(i == selectIndex){
 for (int j = 0; j <= i; j  ) {
  canvas.drawCircle(radius  j * dividWidth, radius, radius , forePaint);
  canvas.drawLine(radius,radius,j*dividWidth,radius,forePaint);
 }
 }else if(i>selectIndex){
 canvas.drawCircle(radius   i * dividWidth, radius, radius, bgPaint);
 }
 }
3、绘制节点上的文字
for (int i = 0; i < nodeList.size(); i  ) {
 int currentTextWidth=mBounds.get(i).width();
 if (i==0){
 if (i==selectIndex){
  canvas.drawText(nodeList.get(i), 0, radius*2   marginTop   mBounds.get(i).height()/2, selectPaint);
 }else if(i>selectIndex) {
  canvas.drawText(nodeList.get(i), 0, radius*2   marginTop   mBounds.get(i).height()/2, unselectPaint);
 }
 }else if (i==nodeList.size()-1){
 if (i==selectIndex){
  for (int j = 0; j <= i; j  ) {
  if(j == 0){
  canvas.drawText(nodeList.get(j), 0, radius*2   marginTop   mBounds.get(j).height()/2, selectPaint);
  }else if(j == i){
  canvas.drawText(nodeList.get(j), getWidth() - currentTextWidth, radius*2   marginTop   mBounds.get(j).height()/2, selectPaint);
  }else{
  canvas.drawText(nodeList.get(j), radius   j * dividWidth - currentTextWidth / 2, radius*2   marginTop   mBounds.get(j).height()/2, selectPaint);
  }
  }
 }else if(i>selectIndex) {
  canvas.drawText(nodeList.get(i), getWidth() - currentTextWidth, radius*2   marginTop   mBounds.get(i).height()/2, unselectPaint);
 }
 }else {
 if (i==selectIndex){
  for (int j = 0; j <= i; j  ) {
  if(j>0){
  canvas.drawText(nodeList.get(j), radius   j * dividWidth - currentTextWidth / 2, radius*2   marginTop   mBounds.get(j).height()/2, selectPaint);
  }else{
  canvas.drawText(nodeList.get(j), 0, radius*2   marginTop   mBounds.get(j).height()/2, selectPaint);
  }
  }
 }else if(i>selectIndex) {
  canvas.drawText(nodeList.get(i), radius   i * dividWidth - currentTextWidth / 2, radius*2   marginTop   mBounds.get(i).height()/2, unselectPaint);
 }
 }
 }
有时候可能需要的是下面这种进度条
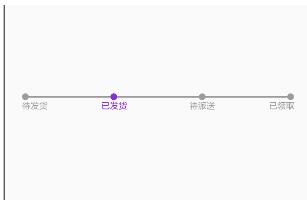
只需要修改onDraw中绘制节点圆和文字的方法就可以了
for (int i=0; i < nodeList.size();i  ) {
 if (i==selectIndex){
 canvas.drawCircle(radius  i * dividWidth, radius, radius , forePaint);
 }else {
 canvas.drawCircle(radius   i * dividWidth, radius, radius, bgPaint);
 }
 }

 for (int i=0; i<nodeList.size();i  ){
 int currentTextWidth=mBounds.get(i).width();
 if (i==0){
 if (i==selectIndex){
  canvas.drawText(nodeList.get(i), 0, radius*2   marginTop   mBounds.get(i).height()/2, selectPaint);
 }else {
  canvas.drawText(nodeList.get(i), 0, radius*2   marginTop   mBounds.get(i).height()/2, unselectPaint);
 }
 }else if (i==nodeList.size()-1){
 if (i==selectIndex){
  canvas.drawText(nodeList.get(i), getWidth() - currentTextWidth, radius*2   marginTop   mBounds.get(i).height()/2, selectPaint);
 }else {
  canvas.drawText(nodeList.get(i), getWidth() - currentTextWidth, radius*2   marginTop   mBounds.get(i).height()/2, unselectPaint);
 }
 }else {
 if (i==selectIndex){
  canvas.drawText(nodeList.get(i), radius   i * dividWidth - currentTextWidth / 2, radius*2   marginTop   mBounds.get(i).height()/2, selectPaint);
 }else {
  canvas.drawText(nodeList.get(i), radius   i * dividWidth - currentTextWidth / 2, radius*2   marginTop   mBounds.get(i).height()/2, unselectPaint);
 }
 }
 }
点击节点进行节点切换
// 实现节点切换,把注释打开就行了
@Override
 public boolean onTouchEvent(MotionEvent event) {
 float eventX;
 float eventY;
 int i = event.getAction();
 if (i == MotionEvent.ACTION_DOWN) {
 } else if (i == MotionEvent.ACTION_MOVE) {
 } else if (i == MotionEvent.ACTION_UP) {
 eventX = event.getX();
 eventY = event.getY();
 //计算选中的index
 float select = eventX / dividWidth;
 float xs = select - (int) (select);
 //selectIndex = (int) select   (xs > 0.5 ? 1 : 0);
 }
 //invalidate();
 return true;
 }
以上就是本文的全部内容,希望对大家的学习有所帮助,也希望大家多多支持Devmax。