本文实例为大家分享了Android自定义View实现遥控器按钮的具体代码,供大家参考,具体内容如下
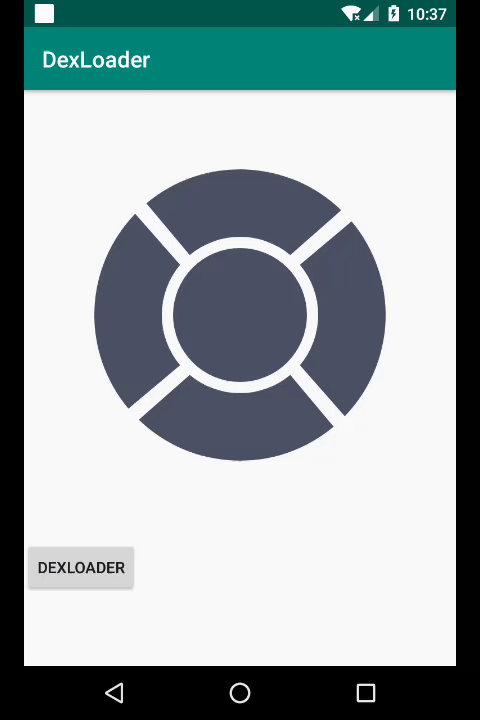
效果图:
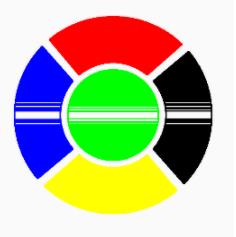
原理:
- onSizeChanged拿到控件宽高,进行path和region的计算(此处,path和region的坐标值都是以viewWidth/2,viewHeight/2为坐标原点进行计算的)
- 画布平移,绘制5个path
- 点击事件,判断是否处于相应的region区域内,进行控件的重绘
- 点击事件motionEvent的原始坐标(getX和getY),是以viewParent的左上角为坐标原点的,需要经过matrix转换成以控件中心点为原点的坐标体系。
Region区域,paint的style设置为stroke模式,遍历绘制
mPaint.setColor(Color.RED);
RegionIterator iterator = new RegionIterator(topRegion);
 Rect r = new Rect();
 while (iterator.next(r)) {
      canvas.drawRect(r, mPaint);
 }
源码:
public class RemoteControlMenu extends View {

    private int mWidth;
    private int mHeight;

    private RectF bigRectF;
    private int bigRadius;
    private RectF smallRectF;
    private int smallRadius;
    private int padding = 20;
    private int sweepAngel = 80;
    private int offsetAngel;

    @TouchArea
    private int mTouchArea = TouchArea.INVALID;

    private Paint mPaint;
    private Region topRegion, bottomRegion, leftRegion, rightRegion, centerRegion, globalRegion;
    private Path topPath, bottomPath, leftPath, rightPath, centerPath, selectedPath;

    Matrix mMapMatrix;

    private int unselectedColor = 0xff4c5165;
    private int selectedColor = 0xffdd9181;

    private boolean isSelected = false;


    public RemoteControlMenu(Context context) {
        this(context, null);
    }

    public RemoteControlMenu(Context context, @Nullable AttributeSet attrs) {
        this(context, attrs, 0);
    }

    public RemoteControlMenu(Context context, @Nullable AttributeSet attrs, int defStyleAttr) {
        super(context, attrs, defStyleAttr);
        mPaint = new Paint();
        mPaint.setAntiAlias(true);
        mPaint.setStyle(Paint.Style.FILL);
        mPaint.setStrokeWidth(4);
        mPaint.setColor(unselectedColor);

        offsetAngel = (360 - sweepAngel * 4) / 4;
        bigRectF = new RectF();
        smallRectF = new RectF();

        topRegion = new Region();
        bottomRegion = new Region();
        leftRegion = new Region();
        rightRegion = new Region();
        centerRegion = new Region();
        globalRegion = new Region();
        topPath = new Path();
        bottomPath = new Path();
        leftPath = new Path();
        rightPath = new Path();
        centerPath = new Path();
        mMapMatrix = new Matrix();
    }

    @Retention(RetentionPolicy.SOURCE)
    @IntDef({TouchArea.LEFT, TouchArea.TOP, TouchArea.RIGHT, TouchArea.BOTTOM,
            TouchArea.CENTER, TouchArea.INVALID})
    private @interface TouchArea {
        int LEFT = 1;
        int TOP = 2;
        int RIGHT = 3;
        int BOTTOM = 4;
        int CENTER = 5;
        int INVALID = 0;
    }

    @Override
    public boolean onTouchEvent(MotionEvent event) {
        float[] pts = new float[2];
        pts[0] = event.getX();
        pts[1] = event.getY();
        Log.d("zhen", "原始触摸位置:"   Arrays.toString(pts)   " mMapMatrix: "   mMapMatrix);
        mMapMatrix.mapPoints(pts);

        int x = (int) pts[0];
        int y = (int) pts[1];
        Log.w("zhen", "转换后的触摸位置:"   Arrays.toString(pts)   " mMapMatrix: "   mMapMatrix);
        int touchArea = TouchArea.INVALID;
        switch (event.getAction()) {
            case MotionEvent.ACTION_UP:
                if (leftRegion.contains(x, y)) {
                    touchArea = TouchArea.LEFT;
                }
                if (topRegion.contains(x, y)) {
                    touchArea = TouchArea.TOP;
                }
                if (rightRegion.contains(x, y)) {
                    touchArea = TouchArea.RIGHT;
                }
                if (bottomRegion.contains(x, y)) {
                    touchArea = TouchArea.BOTTOM;
                }
                if (centerRegion.contains(x, y)) {
                    touchArea = TouchArea.CENTER;
                }
                if (touchArea == TouchArea.INVALID) {
                    mTouchArea = touchArea;
                    Log.w("zhen", "点击outside");
                } else {
                    if (mTouchArea == touchArea) {
                        //取消选中
                        isSelected = false;
                        mTouchArea = TouchArea.INVALID;
                    } else {
                        //选中
                        isSelected = true;
                        mTouchArea = touchArea;
                    }
                    Log.w("zhen", "按钮状态 mTouchArea "   mTouchArea   " isSelected: "   isSelected);
                    if (mListener != null) {
                        mListener.onMenuClicked(mTouchArea, isSelected);
                    }
                    invalidate();
                }
                break;
        }

        return true;
    }

    @Override
    protected void onSizeChanged(int w, int h, int oldw, int oldh) {
        super.onSizeChanged(w, h, oldw, oldh);
        mWidth = w;
        mHeight = h;
        //大圆
        bigRadius = (Math.min(mWidth, mHeight) - 250) / 2;
        bigRectF.set(-bigRadius, -bigRadius, bigRadius, bigRadius);
        //小圆
        smallRadius = (bigRadius - padding) / 2;
        smallRectF.set(-smallRadius - padding, -smallRadius - padding,
                smallRadius   padding, smallRadius   padding);

        mMapMatrix.reset();
        globalRegion.set(-mWidth / 2, -mHeight / 2, mWidth / 2, mHeight / 2);

        centerPath.addCircle(0, 0, smallRadius, Path.Direction.CW);
        centerRegion.setPath(centerPath, globalRegion);

        float startAngel = -sweepAngel / 2f;
        rightPath.addArc(bigRectF, startAngel, sweepAngel   4);
        startAngel  = sweepAngel;
        rightPath.arcTo(smallRectF, startAngel, -sweepAngel);
        rightPath.close();
        rightRegion.setPath(rightPath, globalRegion);

        startAngel  = offsetAngel;
        bottomPath.addArc(bigRectF, startAngel, sweepAngel   4);
        startAngel  = sweepAngel;
        bottomPath.arcTo(smallRectF, startAngel, -sweepAngel);
        bottomPath.close();
        bottomRegion.setPath(bottomPath, globalRegion);

        startAngel  = offsetAngel;
        leftPath.addArc(bigRectF, startAngel, sweepAngel   4);
        startAngel  = sweepAngel;
        leftPath.arcTo(smallRectF, startAngel, -sweepAngel);
        leftPath.close();
        leftRegion.setPath(leftPath, globalRegion);

        startAngel  = offsetAngel;
        topPath.addArc(bigRectF, startAngel, sweepAngel   4);
        startAngel  = sweepAngel;
        topPath.arcTo(smallRectF, startAngel, -sweepAngel);
        topPath.close();
        topRegion.setPath(topPath, globalRegion);
        Log.d("zhen", "globalRegion: "   globalRegion);
        Log.d("zhen", "globalRegion: "   globalRegion);
        Log.d("zhen", "leftRegion: "   leftRegion);
        Log.d("zhen", "topRegion: "   topRegion);
        Log.d("zhen", "rightRegion: "   rightRegion);
        Log.d("zhen", "bottomRegion: "   bottomRegion);
        Log.d("zhen", "centerRegion: "   centerRegion);
    }

    @Override
    protected void onDraw(Canvas canvas) {
        super.onDraw(canvas);
        canvas.translate(mWidth / 2, mHeight / 2);
        // 获取测量矩阵(逆矩阵)
        if (mMapMatrix.isIdentity()) {
            canvas.getMatrix().invert(mMapMatrix);
        }

        mPaint.setColor(unselectedColor);
        canvas.drawPath(centerPath, mPaint);
        canvas.drawPath(rightPath, mPaint);
        canvas.drawPath(bottomPath, mPaint);
        canvas.drawPath(leftPath, mPaint);
        canvas.drawPath(topPath, mPaint);

        if (!isSelected) return;
        mPaint.setColor(selectedColor);
        switch (mTouchArea) {
            case TouchArea.LEFT:
                canvas.drawPath(leftPath, mPaint);
                break;
            case TouchArea.TOP:
                canvas.drawPath(topPath, mPaint);
                break;
            case TouchArea.RIGHT:
                canvas.drawPath(rightPath, mPaint);
                break;
            case TouchArea.BOTTOM:
                canvas.drawPath(bottomPath, mPaint);
                break;
            case TouchArea.CENTER:
                canvas.drawPath(centerPath, mPaint);
                break;
        }
        Log.e("zhen", " touchArea: "   mTouchArea);

        //Android还提供了一个RegionIterator来对Region中的所有矩阵进行迭代,
        // 可以使用该类,获得某个Region的所有矩阵
        //通过遍历region中的矩阵,并绘制出来,来绘制region
//        mPaint.setColor(Color.RED);
//        RegionIterator iterator = new RegionIterator(topRegion);
//        Rect r = new Rect();
//        while (iterator.next(r)) {
//            canvas.drawRect(r, mPaint);
//        }
//
//        mPaint.setColor(Color.BLUE);
//        RegionIterator iterator1 = new RegionIterator(leftRegion);
//        Rect r1 = new Rect();
//        while (iterator1.next(r1)) {
//            canvas.drawRect(r1, mPaint);
//        }
//
//        mPaint.setColor(Color.BLACK);
//        RegionIterator iterator2 = new RegionIterator(rightRegion);
//        Rect r2 = new Rect();
//        while (iterator2.next(r2)) {
//            canvas.drawRect(r2, mPaint);
//        }
//
//        mPaint.setColor(Color.YELLOW);
//        RegionIterator iterator3 = new RegionIterator(bottomRegion);
//        Rect r3 = new Rect();
//        while (iterator3.next(r3)) {
//            canvas.drawRect(r3, mPaint);
//        }
//
//        mPaint.setColor(Color.GREEN);
//        RegionIterator iterator4 = new RegionIterator(centerRegion);
//        Rect r4 = new Rect();
//        while (iterator4.next(r4)) {
//            canvas.drawRect(r4, mPaint);
//        }
    }

    private MenuListener mListener;

    public void setListener(MenuListener listener) {
        mListener = listener;
    }

    // 点击事件监听器
    public interface MenuListener {
        void onMenuClicked(int type, boolean isSelected);
    }
}
以上就是本文的全部内容,希望对大家的学习有所帮助,也希望大家多多支持Devmax。